There’s something magical about capturing the essence of a beloved dessert in a single, handheld bite. That’s the exact feeling I get with these strawberry cheesecake cookies. They’re not just another cookie recipe—they’re a little piece of nostalgia and innovation, all wrapped up in a soft, chewy package.
Think of the best part of a strawberry cheesecake: the creamy, tangy filling and the sweet, jammy fruit. Now, imagine that hidden inside a buttery, melt-in-your-mouth sugar cookie dotted with pockets of real strawberry. It sounds almost too good to be true, but I promise you, it’s absolutely achievable in your own kitchen.
The process is a labor of love, I won’t lie. It involves a little patience for reducing fresh strawberries into a thick, intensely flavored jam and prepping a frozen cheesecake filling. But let me tell you, every minute is worth it. The first time you bite into a warm cookie and hit that cool, creamy center, you’ll understand.
It’s a recipe that feels special enough for a holiday platter but comforting enough for a Tuesday afternoon pick-me-up. I developed this method after plenty of trial and error, focusing on maximizing flavor without sacrificing that perfect, chewy cookie texture. The secret, as you’ll see, is all in the jam.
Why This Recipe Truly Works
Before we dive into the ingredients, I want to share why this recipe stands out. Many stuffed cookies can be finicky, with fillings that leak out or dough that bakes unevenly. The genius here is in the techniques. By reducing the strawberry jam down to a super concentrated paste, we pack in incredible flavor without adding excess moisture.
That’s crucial for keeping the cookie dough itself chewy and structured. And freezing the cheesecake filling into solid discs? That’s the trick to a perfect, contained pocket of creaminess in the very center. No oozing mess, just a delightful surprise. The cookie base is a soft, buttery sugar cookie, providing the ideal backdrop for the star ingredients.
It’s fluffy, tender, and just sweet enough. Together, these elements create a symphony of textures and tastes that genuinely mimics eating a slice of strawberry cheesecake. It’s a recipe that rewards your effort with something truly spectacular, the kind of treat that makes people ask, “Can I have the recipe?”
Ingredients Needed for the Recipe
Gathering your ingredients is the first step to success. Using quality components here makes a noticeable difference, especially with the strawberries and dairy. Let’s break down what you’ll need and why each one matters for your strawberry cheesecake cookies.
- Fresh Strawberries: The foundation of our homemade jam. We use a full 12 ounces, hulled and finely diced, to cook down into an intense, flavorful paste. This is where the real fruit flavor comes from.
- Granulated Sugar: You’ll need this for three parts: sweetening the jam, creaming into the cookie dough, and a final roll for the cookie exteriors. It creates sweetness, helps with browning, and gives that classic sugary crunch.
- Cream Cheese: Use the full-fat, brick-style cream cheese, cold from the fridge. This is the heart of our “cheesecake” filling, providing that iconic tangy creaminess right in the middle of the cookie.
- Unsalted Butter: Very softened butter is non-negotiable for the cookie dough. It creams beautifully with the sugar, creating a light, fluffy base that translates to a tender, chewy cookie.
- All-Purpose Flour: The main structure of the cookie. The key phrase here is “spooned and leveled” to avoid using too much flour, which would make the cookies dry and cakey.
- Egg & Vanilla Extract: The egg binds the dough and adds richness, while vanilla enhances all the other flavors. Use real vanilla if you have it for the best aroma.
- Leaveners & Salt: A combination of baking powder and baking soda gives the cookies a perfect lift. Salt balances all the sweetness and intensifies the strawberry and cheesecake flavors.
Prepping Your Kitchen Tools
You don’t need any fancy equipment, but a few tools will make the process smoother. Have two baking sheets ready, lined with parchment paper. A medium saucepan is essential for simmering the strawberry jam, and a wooden spoon is perfect for stirring and smashing the berries.
A hand mixer or stand mixer will make creaming the butter and sugar a breeze, though you can do it by hand if you’re determined. Finally, a 2-tablespoon cookie scoop is incredibly helpful for portioning the dough evenly. If you don’t have one, a measuring spoon and a little patience will work just fine.
How to make Strawberry Cheesecake Cookies?
The journey to these incredible cookies happens in three clear stages: the filling, the jam, and the dough. I recommend reading through all the steps once before you begin. It’s a process, but it flows logically and the results are so rewarding. Let’s get started.

Step 1 – Make and Freeze the Cheesecake Filling
We begin with the filling because it needs time to become completely firm in the freezer. Grab your cold cream cheese, sugar, and vanilla. In a small bowl, beat them together with an electric mixer on medium-high speed. Don’t just mix until combined—go for a full two minutes until it’s fluffy and the sugar has completely dissolved.
This prevents a gritty texture. Line a small plate or baking sheet with parchment. Scoop this creamy mixture into 18 small portions, about 2 teaspoons each. Then, take the back of a spoon and gently flatten each mound into a thick disc. This shape is easier to wrap in dough later. Pop the whole sheet into the freezer and don’t touch them until they’re frozen solid.
Step 2 – Cook Down the Strawberry Jam
While the filling chills, start the jam. This is the step that fills your kitchen with an amazing smell. Add your finely diced strawberries and sugar to a medium pot over medium heat. Cook for about 45 minutes, stirring occasionally at first, then more frequently as it thickens.
About halfway through, use your wooden spoon to smash the berries. You’re looking for the mixture to reduce down to a very thick, heaping ⅓ cup. It should coat the back of a spoon without dripping. This concentration is key for flavor and cookie texture. Once it’s done, transfer it to a bowl and let it chill in the fridge.
Step 3 – Mix the Cookie Dough
Preheat your oven to 350°F (175°C) and line your baking sheets. In a medium bowl, whisk together the flour, baking powder, baking soda, and salt. Set this dry mixture aside. In a larger bowl, cream the very soft butter and granulated sugar together.
Beat it on high speed for a good two minutes until it’s light and fluffy. Scrape down the bowl, then add the egg and vanilla. Beat again for another minute or two until the mixture is pale and very fluffy. This incorporates air, which helps create that pillowy texture.
Now, add your dry ingredients to the wet. Mix on low speed just until the flour disappears. You should have a soft, cohesive dough. Here comes the fun, slightly messy part: marbling in the jam. Don’t just stir it in completely.
Step 4 – Marble in the Strawberry Jam
Push about three-quarters of the dough to one side of the bowl. Flatten the remaining quarter on the bottom of the bowl. Spoon about a quarter of your cooled jam onto that section. Grab another quarter of the dough, plop it on top, and add more jam.
Repeat this layering process until all the jam and dough are used. Now, take a spatula and “cut” the dough into quarters. Gently fold and turn each section, just until the jam is swirled in. You want distinct pockets and ribbons of jam, not a uniformly pink dough.
Step 5 – Assemble and Shape the Cookies
Scoop the marbled dough into 18 portions, roughly 2 tablespoons each. Flatten one portion in your palm, place a frozen cheesecake disc in the center, and carefully wrap the dough around it, sealing completely. Roll it into a ball, then gently flatten it into a disc shape.
A slightly flattened disc spreads more evenly than a perfect ball. Roll the outside in a little granulated sugar for that classic crackly finish. Repeat with the remaining dough and filling, keeping the cheesecake discs in the freezer until the moment you need them.
Step 6 – Bake and Cool to Perfection
Place six cookies on a prepared baking sheet, giving them plenty of room to spread. Bake for 11 to 12 minutes. The edges should be just set and very lightly golden, while the centers still look soft. As soon as they come out of the oven, you can take a large round cookie cutter or a mug and gently scoot it around each cookie.
This nudges them into a perfect circular shape. Let the cookies cool on the baking sheet for a full 10 minutes. This is critical. The filling needs this time to set up. Then, transfer them to a wire rack to cool completely. I know it’s hard, but waiting ensures you get that perfect texture contrast.
My Best Tips for Success
After making these many times, I’ve picked up a few non-negotiable tips that guarantee a perfect batch every single time. They’re simple but make all the difference.
- Measure Flour Correctly: This is my number one baking tip ever. Never scoop your cup directly into the flour bag. Instead, spoon the flour lightly into your measuring cup and level it off with a knife. For absolute precision, use a kitchen scale—125 grams equals one cup.
- Freeze the Filling Solid: Don’t rush this. Those cheesecake discs must be completely frozen solid before you wrap the dough around them. If they’re even slightly soft, they’ll melt too quickly and leak out during baking.
- Butter Softness is Key: Your butter should be “very softened.” You should be able to press your finger into it deeply with almost no resistance. This allows it to cream perfectly with the sugar, creating the right cookie texture.
- Don’t Skip the Sugar Roll: Rolling the shaped dough in granulated sugar isn’t just for looks. It creates a delicate, slightly crisp exterior that contrasts beautifully with the soft interior and adds a lovely sweetness.
- Resist the Warm Cookie: I mean it. Let them cool completely on the rack. The cheesecake center needs time to firm up from its molten state into a creamy, sliceable filling. The flavor also settles and becomes more pronounced.
Storing and Freezing for Later
These cookies are best enjoyed the day they’re made, but they keep wonderfully. Once completely cooled, store them in an airtight container at room temperature for up to 2 days. If your kitchen is warm, you might consider storing them in the fridge because of the cream cheese filling.
They also freeze like a dream. Place the cooled cookies in a single layer on a baking sheet to freeze solid, then transfer them to a freezer-safe bag or container. They’ll keep for up to 2 months. You can thaw them at room temperature or even pop a frozen cookie in the microwave for 10-15 seconds for a warm, gooey treat.
You can also freeze the shaped, unbaked cookie dough discs. Just place them on a parchment-lined sheet, freeze solid, and then bag them up. When you’re ready, bake straight from the freezer, adding a minute or two to the baking time. It’s like having gourmet cookie dough on demand.
Simple Variations to Try
Once you’ve mastered the classic version, feel free to play around. The basic framework is incredibly adaptable. For a different fruit profile, try using raspberries or a mix of berries for the jam. The cooking process is the same. You could even fold a handful of white chocolate chips into the dough for an extra layer of sweetness.
For a lemony twist, add a tablespoon of lemon zest to the cookie dough and a teaspoon of lemon juice to the cheesecake filling. It brightens everything up beautifully. If you love a crunch, a sprinkle of crushed graham cracker crumbs on top of the cookies before baking adds a lovely cheesecake-crust element.
The goal is to make it your own. The core techniques—the reduced jam, the frozen filling, the soft sugar cookie dough—are your building blocks for all sorts of delicious creations. Whether you stick to the classic strawberry or venture out, the result will be a stunning, impressive cookie that feels like so much more than the sum of its parts.
Strawberry Cheesecake Cookies Recipe
Description
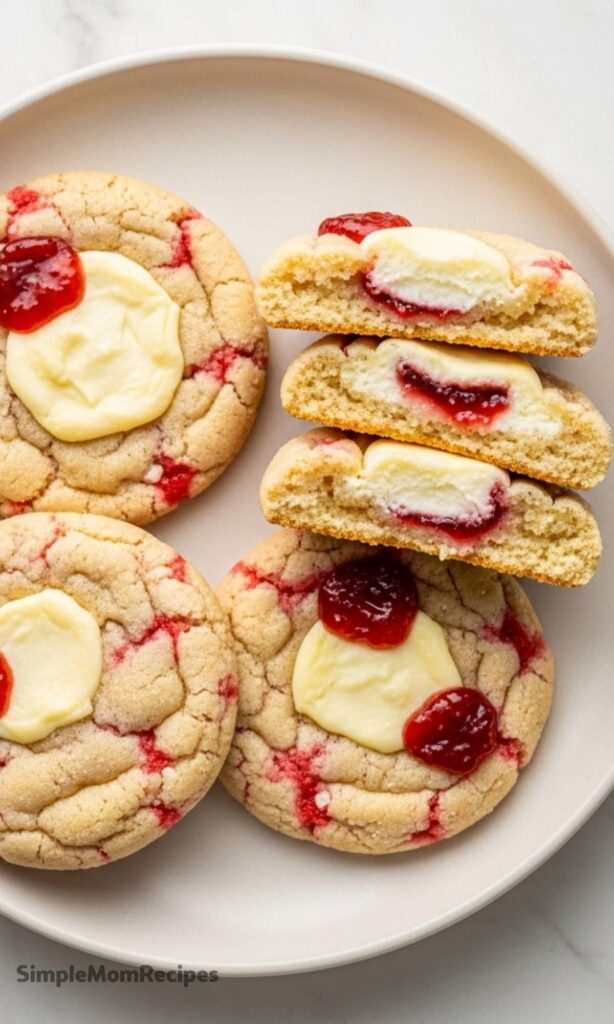
These perfect strawberry cheesecake cookies are soft and chewy sugar cookies, with jammy strawberries throughout, stuffed with a creamy vanilla cheesecake filling. They’re chewy, buttery, full of fresh strawberry flavor and taste just like strawberry cheesecake in cookie form!
ingredients
For the Cheesecake Filling
For the Strawberry Jam
For the Cookies
Instructions
For the Cheesecake Filling
- Line a small cookie sheet with parchment paper.
- Add the cream cheese, sugar and vanilla to a small bowl. Mix on medium-high speed with an electric mixer until fluffy and the sugar has dissolved, about 2 minutes.
- Scoop the cheesecake filling into 18, 2 tsp portions onto the baking sheet. Slightly flatten each scoop with the back of a spoon so each resembles a thick disc rather than a scooped ball.
- Pop them into the freezer until completely frozen.
For the Strawberry Jam
- Add the diced strawberries and sugar to a medium pot over medium heat.
- Cook for about 45 minutes, smashing halfway through with a wooden spoon. Stir continuously toward the end as the jam thickens. The jam should be very thick and reduced to a heaping 1/3 cup (80 ml).
- Remove from the heat and chill in the fridge while preparing the dough.
For the Cookies
- Preheat the oven to 350°F (175°C). Line two baking sheets with parchment paper.
- In a medium bowl, whisk together the flour, baking powder, baking soda, and salt. Set aside.
- In a large bowl, cream the softened butter and granulated sugar together with an electric mixer on high speed until fluffy, about 2 minutes.
- Add in the egg and vanilla and mix on medium speed until pale in color and very fluffy, about 1–2 minutes.
- Add in the dry ingredients. Mix on low speed just until combined.
- Push 3/4 of the dough to the side of the bowl. Flatten out 1/4 of the dough on the bottom. Spoon 1/4 of the jam onto that section. Add another 1/4 of dough on top and another 1/4 of jam. Repeat twice more to evenly disperse the jam.
- “Cut” the dough in quarters with a rubber spatula and fold each section just until the jam is slightly folded in—do not fully mix; leave pockets of jam.
- Scoop dough into 18 portions using a 2 tbsp cookie scoop. Flatten slightly, place a frozen cheesecake disc in the center, and enclose completely with dough. Shape into slightly flattened discs.
- Roll each cookie in granulated sugar. Keep remaining cheesecake balls frozen until needed.
- Bake 6 cookies at a time for 11–12 minutes. Optional: use a large circular cookie cutter right after baking to shape perfectly round cookies.
- Let cookies cool on the baking sheet for 10 minutes before transferring to a wire rack to cool completely.
Nutrition Facts
Servings 18
- Amount Per Serving
- Calories 210kcal
- % Daily Value *
- Total Fat 10g16%
- Saturated Fat 6g30%
- Cholesterol 35mg12%
- Sodium 180mg8%
- Potassium 85mg3%
- Total Carbohydrate 28g10%
- Dietary Fiber 1g4%
- Sugars 18g
- Protein 3g6%
- Calcium 40 mg
- Iron 1 mg
* Percent Daily Values are based on a 2,000 calorie diet. Your daily value may be higher or lower depending on your calorie needs.
Note
- Do not use store-bought jam—homemade thick jam ensures proper texture and intense strawberry flavor.
- Freeze cheesecake filling completely to prevent leakage during baking.
- Use very softened butter for best texture and easier creaming.
- Measure flour correctly: spoon into measuring cup and level off or weigh (125g per cup).
- Store in an airtight container for up to 3 days or freeze for up to 2 weeks.
