There’s something almost magical about pulling a batch of fresh, chewy bagels from your own oven.
The aroma fills the kitchen with a warm, toasty promise that store-bought versions just can’t match.
Why Homemade Bagels Feel Different
When you make bagels at home, you’re not just baking, you’re creating a little edible bracelet of joy.
That’s what the word means, after all—a bracelet—and yours will be crafted with a patience that commercial bakeries often rush past.
Ingredients Needed for the Recipe
Gathering your ingredients is the first quiet step in this rewarding process. You’ll need:
- 100g Sourdough Starter or Discard: This is the flavor heart of your bagels, giving them a subtle tang.
- 500g Bread Flour: Its higher protein content is essential for that classic, chewy, dense crumb.
- 250g Warm Water: It wakes up the starter and brings the stiff dough together, trust me.
- A Pinch of Instant Yeast (optional): A little helper if you’re using discard, ensuring a good rise.
- 30g Sugar: It subtly feeds the yeast and adds a hint of sweetness to balance the sour.
- 10g Salt: Never underestimate salt; it tightens the gluten and makes the flavors pop.
- For Boiling: 2 Litres of Water and 40g of Honey. This bath is the secret to that glorious, glossy crust.
How to make Easy Sourdough Bagels?
The method is straightforward, but each step holds its own importance. Let’s walk through it.

Step 1 – Mix and Rest
Combine all your dough ingredients in a stand mixer bowl until a shaggy, rough mass forms.
Then, walk away for fifteen minutes. This autolyse rest lets the flour fully hydrate, making the next step smoother.
Step 2 – Knead to Smoothness
Now, knead with the dough hook for about 10 minutes. This is a stiff, low-hydration dough, so it’ll fight a bit.
You’re looking for a supple, smooth ball that’s no longer sticky. Your mixer might need a quick breather halfway through.
Step 3 – The First Rise
Place the dough in a lightly oiled bowl, cover it, and let it ferment. It needs to double and feel puffy.
This could take a few hours on the counter, or you can let it work slowly, gently, overnight. The choice is yours.
Step 4 – Shape the Bagels
Divide your risen dough into 12 equal pieces, roughly 80g each. Roll each into a tight little ball.
Poke your thumb straight through the center of a ball, then gently spin and stretch to widen the hole. It’s satisfyingly simple.
Step 5 – The Final Proof
Line the shaped bagels on a parchment-lined tray, giving them room to breathe. Cover them with a damp cloth.
Let them sit until they look pleasantly puffed up. They won’t double again, but they’ll gain some confident volume.
Step 6 – Boil and Top
While they proof, get a large pot of water and honey boiling, and preheat your oven to 200°C (392°F).
Boil the bagels in batches, about 30 seconds a side. They’ll float, looking a bit wrinkled—that’s perfect. Dip the wet tops into seeds now if you like.
Step 7 – Bake to Golden
Transfer the boiled bagels back to the tray and bake for 20-25 minutes. Watch them turn a deep, golden brown.
That color tells you the crust is set, chewy, and ready. The hardest part is letting them cool just enough before slicing.
A Simple Timeline for Fresh Breakfast Bagels
Planning is the key to stress-free sourdough. Here’s a comfortable schedule to follow.
Feed your starter at lunchtime, mix the dough after dinner, and let it ferment overnight. Shape first thing in the morning, and you could be spreading cream cheese by 8:30 AM.
Tips
- Don’t be tempted to add more water if the dough feels stiff. That firm texture is what gives bagels their signature chew and makes them possible to shape.
- For an extra-chewy crust, extend the boil time to one or even two minutes per side. It makes a remarkable difference.
- If the bottoms of your bagels brown too quickly, place an empty baking tray on the rack below them during baking. It acts as a heat shield.
- Your bagel toppings stick best right after boiling, while the surface is still wet and tacky. Have your seed mixtures ready in shallow bowls.
Serving and Storing Your Creations
A fresh bagel is a blank canvas. Go classic with a thick schmear of cream cheese and smoked salmon.
Or, try whipped herb butter, or even a sweet fig spread. For storage, let them cool completely first.
They’re best the day they’re made, but they freeze beautifully. Just slice them before freezing for easy toasting later.
Pop a frozen half straight into the toaster—it brings back that fresh-baked feel in minutes. You’ve got this.
Sourdough Discard Bagels Recipe
Description
These easy sourdough bagels can be made using discard and will have you wondering why you haven't made them before! Trust me, you'll never buy them from the store again—especially if you make a double batch and stash half in the freezer. With a chewy crust, dense crumb, and that signature tang, these New York–style bagels are perfect toasted with cream cheese or your favorite toppings.
Ingredients
For the Dough
For Boiling
Instructions
- Add sourdough starter (discard or fed), warm water, bread flour, sugar, yeast (if using), and salt to the bowl of your stand mixer. Mix with the paddle attachment until a shaggy dough forms.A Thermomix can be used: mix 30 seconds until shaggy.
- Let the dough rest for 15 minutes (autolyse).
- Switch to the dough hook and knead on low speed for 8–10 minutes until smooth and supple. The dough should be stiff, not sticky, and not overly elastic.If using a Thermomix, knead up to 4 minutes. Do not add extra water.
- Place dough in a lightly oiled bowl, cover, and let rise until doubled in size—this can take 1–2 hours at room temperature if using yeast, or overnight (8–12 hours) if using fed starter or discard with just a pinch of yeast.Overnight fermentation develops deeper flavor.
- Once risen, divide the dough into 12 equal pieces (~80g each). Shape each into a tight ball.
- Poke a hole through the center of each ball with your finger, then gently stretch it to form a ring about 2 inches wide.
- Place shaped bagels on parchment-lined baking trays. Cover with a damp cloth and let proof until puffy (about 30–60 minutes).They should pass the ‘poke test’—slowly spring back.
- While bagels proof, bring 2 liters of water and 40g honey to a gentle boil in a large pot. Preheat oven to 200°C (392°F).
- Boil bagels 3–4 at a time for 30 seconds per side (or up to 2 minutes for extra chew). Remove with a slotted spoon.They will float when ready.
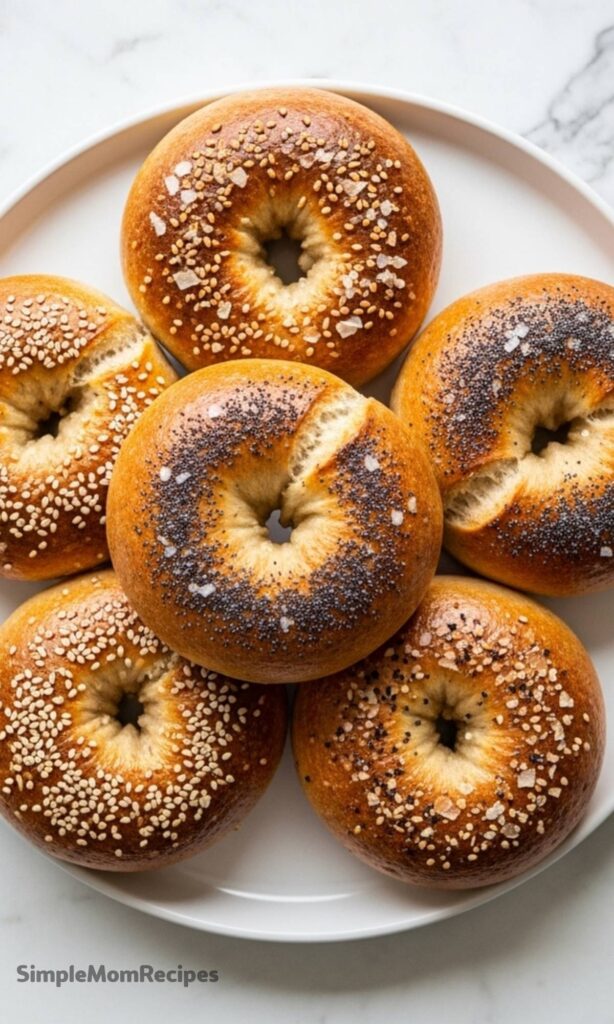
- If desired, immediately dip the wet tops into seeds or seasonings (e.g., everything bagel mix, sesame, poppy seeds).
- Place boiled bagels on a baking tray and bake for 20–25 minutes, or until deep golden brown.
- Cool completely on a wire rack before slicing and serving.Best eaten within 12 hours, or freeze for longer storage.
Nutrition Facts
Servings 12
- Amount Per Serving
- Calories 178kcal
- % Daily Value *
- Total Fat 0.7g2%
- Saturated Fat 0.1g1%
- Sodium 195mg9%
- Potassium 55mg2%
- Total Carbohydrate 37g13%
- Dietary Fiber 1.5g6%
- Sugars 3g
- Protein 6g12%
- Calcium 10 mg
- Iron 1.2 mg
* Percent Daily Values are based on a 2,000 calorie diet. Your daily value may be higher or lower depending on your calorie needs.
Note
- Topping Ideas: Try sesame seeds, poppy seeds, flaky sea salt, everything bagel seasoning, parmesan, or cinnamon sugar.
- Storage: Best eaten within 12 hours. Freeze in a ziploc bag for up to 3 months—defrost before toasting.
- Stand Mixer Tip: This stiff dough is tough to knead by hand—use a mixer if possible. Don’t add extra water!
- Chewy Crust Secret: Boil longer (up to 2 minutes) for extra chew. Honey water gives a glossy, golden crust.
