

I have a weakness for recipes that take something familiar and turn it into a dinner that feels a little more fun. That is exactly what happens with these cheeseburger bombs. I get all the things I want from a cheeseburger – seasoned ground beef, sharp cheddar, tangy pickles, and buttery bread – but everything gets tucked inside a soft biscuit and baked until the outside turns golden.
I started making these when I wanted something that felt like more than ordinary burgers but still didn’t require a lot of work. The first time, I probably put in a little too much filling because I have a hard time believing that “less is more” when cheese and beef are involved. A few of them leaked while baking. They were still delicious, but I learned pretty quickly that leaving enough room around the edges makes these much easier to seal.
I like serving them warm with fry sauce because the creamy, slightly tangy dip makes the whole thing taste even more like a cheeseburger and fries. They also work really well for a casual dinner, game-day food, or anytime I need something people can grab without sitting down with a knife and fork.
The Little Details That Make These Taste Like Cheeseburgers
I don’t need a long ingredient list for these to taste right. The ground beef carries the savory part, while the cheddar gives me that familiar cheeseburger flavor. I prefer sharp cheddar because I like being able to taste the cheese instead of having it disappear into the filling.
I also don’t skip the pickles unless I’m making them for someone who really doesn’t like them. The little pieces of dill pickle bring a salty, sour crunch that cuts through the richness of the beef, cheese, and biscuit. It is one of those small additions that makes the finished bombs taste much more interesting.
The garlic butter on top is another thing I learned not to treat as optional. I brush it over every biscuit before baking, then scatter sesame seeds over the top. The butter adds flavor and helps the biscuits brown nicely, while the sesame seeds give me that little burger-bun feeling.
I usually use refrigerated buttermilk biscuits that aren’t flaky because they are easy to flatten and wrap around the filling. I can use homemade biscuit dough if I have it on hand, but when I’m trying to get dinner on the table without making a whole production out of it, the refrigerated dough wins.
Ingredients I Used for the Recipe
- 1 pound ground beef: I use this as the hearty, savory cheeseburger filling.
- 1 small yellow onion, finely diced: I cook the onion with the beef so it softens and adds a little sweetness.
- 1 tablespoon hamburger seasoning: I use this to give the beef that familiar grilled-burger flavor.
- 1 teaspoon seasoned salt: I add this for extra savory seasoning throughout the filling.
- 1 teaspoon black pepper: I use black pepper to give the beef a little bite.
- 1/2 cup finely diced dill pickles: I tuck these inside for tangy flavor and a little crunch.
- 1/2 cup shredded sharp cheddar cheese: I use sharp cheddar for a stronger cheesy flavor.
- 1 can, 8-count refrigerated buttermilk biscuits, not flaky: I flatten these and use them to wrap around the cheeseburger filling.
- 1/4 cup unsalted butter, melted: I brush this over the biscuits to help them brown and add richness.
- 1/4 teaspoon garlic powder: I mix this with the melted butter for the garlic topping.
- 2 teaspoons sesame seeds: I sprinkle these over the garlic butter for crunch and a classic burger-bun touch.
- Fry sauce, for dipping: I serve this on the side because the creamy sauce works so well with the warm cheeseburger bombs.
How to Make Cheeseburger Bombs
I like to get the beef cooked before I touch the biscuit dough. That gives the filling a little time to cool down, and it also makes assembly much less rushed. I learned this after trying to wrap very hot beef and cheese inside dough and basically making my hands regret the entire decision.
Step 1 – Cook the Beef and Onion
I start by heating the oven to 375°F and spraying a 10-inch oven-safe skillet with nonstick cooking spray. Then I cook the ground beef and finely diced onion together in a medium nonstick skillet over medium heat.
I break the beef apart as it cooks, and once it starts browning, I add the hamburger seasoning, seasoned salt, and black pepper. I keep cooking until the beef is completely browned and no longer pink.
If there is a lot of grease in the skillet, I drain it before setting the beef mixture aside. I don’t want a greasy filling making the biscuits harder to seal.
Step 2 – Flatten the Biscuits
I open the biscuit can and place the eight biscuits on a clean work surface. I use a rolling pin to flatten each one into roughly a 5-inch circle that is about 1/8-inch thick.
I try not to roll them paper-thin. I need enough dough around the filling to pinch the edges together securely, and I also want the finished biscuit to stay soft instead of turning into a thin shell.
Step 3 – Add the Cheeseburger Filling
I put about 1 tablespoon of shredded cheddar into the center of each flattened biscuit. Then I add about 1/3 cup of the cooked beef mixture and about 1 tablespoon of diced pickles if I’m using them.
This is where I have to remind myself not to overfill. The biscuit may look like it can handle more, but the filling needs some breathing room around the edges so I can actually close it.
Step 4 – Seal Each Bomb
I carefully bring the edges of the biscuit together and pinch them closed around the filling. I make sure the seam feels sealed before moving each one into the prepared skillet.
I place the sealed biscuits seam-side down and space them evenly around the skillet. Turning the seam toward the pan keeps the filling tucked inside while the biscuit bakes.
Step 5 – Brush With Garlic Butter
I mix the melted unsalted butter with the garlic powder in a small bowl. Then I brush the mixture generously over the tops of the biscuits.
I sprinkle the sesame seeds over the buttered tops. I like getting a few on each one because they add a tiny bit of crunch, but I don’t worry if some end up on the skillet instead.
Step 6 – Bake Until Golden
I bake the cheeseburger bombs for about 23 to 25 minutes, watching for the biscuits to become golden brown on top. I don’t rush this part because I want the biscuit dough cooked through while still staying soft around all that filling.
Once they’re done, I let them cool for a few minutes before serving. The filling is extremely hot right out of the oven, and giving them a little time makes them much easier to eat.
What I Like to Serve With Them
I almost always put fry sauce on the table first. Ketchup and mustard are easy choices too, and ranch works surprisingly well when I want something creamy and cool with the hot beef filling.
For a full meal, I like adding something crispy on the side. French fries or onion rings make these feel like a cheeseburger-and-fries dinner, without actually having to build individual burgers.
I also like pickle spears because there is no such thing as too much pickle flavor for me here. If I want the meal to feel a little lighter, I’ll serve a fresh salad or roasted vegetables instead.
For a casual gathering, I usually keep the sides simple and let the cheeseburger bombs do most of the work. A plate of warm bombs, a couple of dipping sauces, and something cold to drink is honestly enough for me.
Tips
- Don’t overfill the biscuits: I know it is tempting to add more beef and cheese, but leaving enough room around the edges makes sealing much easier.
- Seal the edges well: I pinch the dough firmly and place each bomb seam-side down. This helps keep the filling inside while baking.
- Use sharp cheddar for more flavor: I prefer it, but regular cheddar, mozzarella, or a cheese blend can work if that is what I have in the refrigerator.
- Leave out the pickles if needed: I can skip them completely or replace them with finely diced bell peppers or a little relish.
- Don’t worry if I don’t have an oven-safe skillet: I can bake the bombs on a parchment-lined baking sheet, in a greased baking dish, or in a pie tin. On a baking sheet, I leave a little space between them.
- Keep an eye on the tops: I want the biscuits golden brown, not overly dark. If they start browning faster than I expect, I check them closely toward the end of baking.
- Let them cool briefly: I learned this the hard way. The filling stays very hot even after the biscuit looks ready to eat.
- Make them ahead: I can prepare and assemble the bombs, then refrigerate them for up to a day before baking. This is especially handy when I know I’ll be feeding people later.
- Freeze them before baking: I place assembled bombs on a baking sheet and freeze them until solid, then move them into an airtight freezer-safe container. I can bake them straight from frozen, adding a few extra minutes to the baking time.
- Reheat leftovers in the oven: I prefer 350°F for about 10 minutes because the biscuit gets warm and stays much nicer than it does in the microwave.
The Way I Make These Work for My Own Kitchen
I don’t think I need to make these exactly the same every time. If I have ground turkey or chicken instead of beef, I can use that. I just keep the seasoning because that is what gives the filling its cheeseburger personality.
I can also play around with the cheese. Sometimes I want sharp cheddar, and other times I have a random cheese blend sitting in the refrigerator that needs to be used. These are forgiving enough that I don’t stress about it.
When I have leftover cheeseburger bombs, I let them cool completely before putting them into an airtight container in the refrigerator. I keep them for up to three days, then reheat them in a 350°F oven for about 10 minutes.
I can use the microwave when I’m in a hurry, usually for 20 to 30 seconds, but I don’t love the texture as much that way. The outside loses some of that nice biscuit texture, so I save the microwave for those moments when I’m hungry and patience is not happening.
What I like most about this recipe is that it gives me the fun part of a cheeseburger without making me assemble eight separate burgers. I get the browned beef, melted cheddar, pickles, soft biscuit, buttery garlic topping, and sesame seeds all in one bite. Once I started making them this way, regular burgers suddenly felt like a lot more assembly than I remembered.
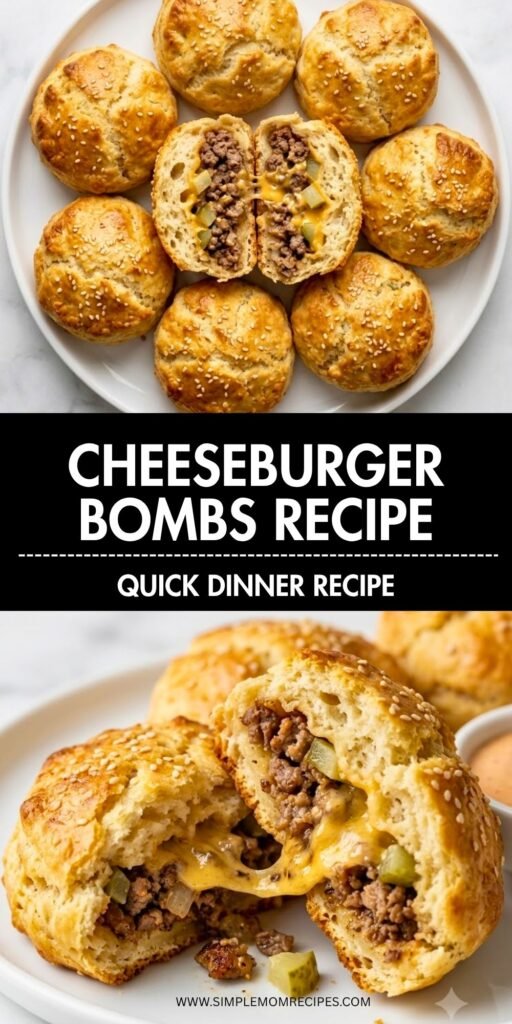
Cheeseburger Bombs Recipe
Description
I tuck seasoned ground beef, sharp cheddar, and tangy dill pickles inside soft buttermilk biscuits, then bake them until golden and buttery. I serve these warm with fry sauce for an easy cheeseburger-inspired dinner, game-day snack, or casual party food.
ingredients
Instructions
Prepare the Filling
Cook the beef and onion
I heat the oven to 375°F and spray a 10-inch oven-safe skillet with nonstick cooking spray. I cook the ground beef and finely diced onion together in a medium nonstick skillet over medium heat, breaking the beef apart as it cooks.Once the beef begins browning, I add the hamburger seasoning, seasoned salt, and black pepper. I continue cooking until the beef is completely browned and no longer pink, then drain excess grease if needed. I let the mixture cool slightly before assembling.
Assemble the Bombs
Flatten the biscuits
I place the eight refrigerated biscuits on a clean work surface and roll each one into roughly a 5-inch circle about 1/8-inch thick.I avoid rolling the dough paper-thin because I need enough dough around the filling to seal each bomb securely.Fill the biscuits
I place about 1 tablespoon of shredded cheddar in the center of each flattened biscuit. I add about 1/3 cup of the cooked beef mixture and about 1 tablespoon of diced dill pickles.I leave enough empty dough around the edges so I can bring the biscuit together without overfilling it.Seal each bomb
I carefully bring the biscuit edges together and pinch them firmly closed around the filling. I check each seam before placing the biscuits seam-side down in the prepared skillet, spacing them evenly.A well-sealed seam helps keep the beef, cheese, and pickles inside while the biscuits bake.
Finish and Bake
Add the garlic butter
I mix the melted unsalted butter with the garlic powder in a small bowl. I brush the mixture generously over the tops of the sealed biscuits, then sprinkle sesame seeds over each one.The garlic butter adds richness and helps the biscuit tops brown nicely.Bake until golden
I bake the cheeseburger bombs for 23 to 25 minutes, until the biscuits are golden brown and cooked through.I watch the tops closely toward the end so they become golden without getting too dark.Cool and serve
I let the cheeseburger bombs cool for about 5 minutes before serving them warm with fry sauce.The filling stays extremely hot after baking, so the short cooling time makes them easier and safer to eat.
Nutrition Facts
Servings 8
- Amount Per Serving
- Calories 610kcal
- % Daily Value *
- Total Fat 35 gg54%
- Saturated Fat 17 gg85%
- Trans Fat 1 gg
- Cholesterol 90 mgmg30%
- Sodium 1250 mgmg53%
- Potassium 410 mgmg12%
- Total Carbohydrate 47 gg16%
- Dietary Fiber 2 gg8%
- Sugars 7 gg
- Protein 27 gg54%
- Calcium 185 mg mg
- Iron 4 mg mg
* Percent Daily Values are based on a 2,000 calorie diet. Your daily value may be higher or lower depending on your calorie needs.
Note
I avoid overfilling the biscuits because leaving room around the edges makes sealing much easier. I place each bomb seam-side down to help keep the filling inside. I can assemble the bombs up to a day ahead and refrigerate them before baking, or freeze them unbaked and add a few extra minutes to the baking time. For leftovers, I refrigerate them in an airtight container for up to 3 days and reheat them at 350°F for about 10 minutes. The nutrition estimate is per cheeseburger bomb and does not include a measured amount of fry sauce because no serving quantity was provided.

