

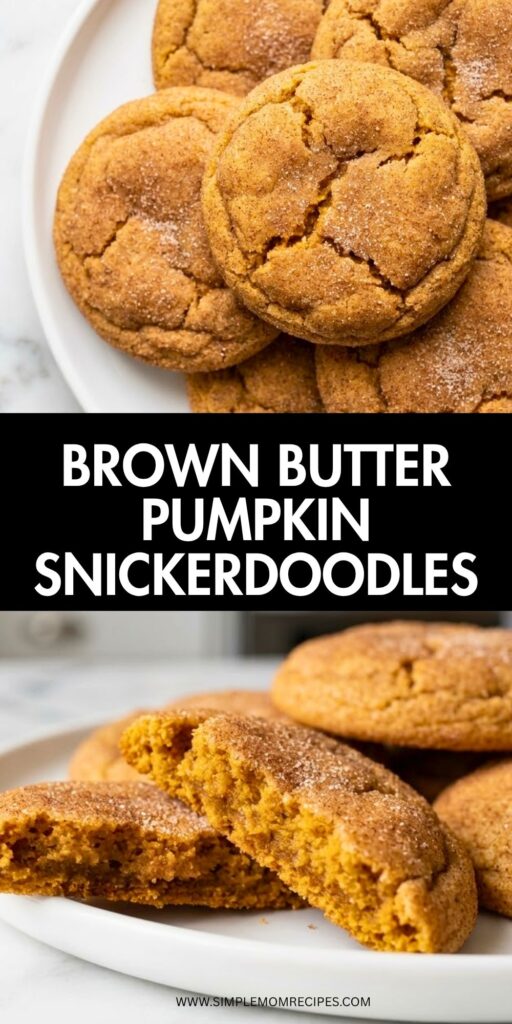
I love a pumpkin cookie that actually tastes like a cookie. Soft and chewy in the middle, a little crisp around the edges, and covered in that sweet cinnamon-spice coating that sticks to your fingers just enough. That is exactly what I get with these brown butter pumpkin snickerdoodles.
I started making these when I wanted something more interesting than my usual pumpkin bread, but I didn’t want a complicated baking project either. The browned butter does a lot of the heavy lifting here. It gives the cookies this warm, nutty flavor that makes the pumpkin taste deeper instead of just sweet.
The one thing I learned pretty quickly is that pumpkin can make cookies cakey. I don’t want that texture in a snickerdoodle. So I blot most of the extra liquid from the pumpkin before mixing the dough. It sounds like a tiny step, but it makes a surprisingly big difference.
A Few Things I Like About These Cookies
These are the kind of cookies I can make without pulling out every bowl and gadget in my kitchen. I usually brown the butter in one saucepan, let it cool, and then mix everything together. I don’t even bother with a mixer when I don’t feel like dragging mine out.
The texture is my favorite part. The edges get lightly crisp while the centers stay chewy and tender. The outside gets rolled in sugar, cinnamon, and pumpkin spice, so every bite has a little extra sweetness and warmth.
I also really like that the pumpkin flavor isn’t overpowering. The brown butter gives the cookies a richer base, while the pumpkin spice brings in cinnamon and those cozy fall flavors. Sometimes I add chocolate chips when I’m feeling extra, but honestly, I think they’re great without them.
Ingredients I Used for the Recipe
- 1/2 cup (113.5 g) unsalted butter: I brown the butter first, which gives the cookies their nutty, toasted flavor.
- 1/2 cup (110 g) brown sugar: This helps give the cookies a chewy center and adds a deeper sweetness.
- 1/3 cup (66.67 g) granulated sugar: I use this in the dough for sweetness and a little texture around the edges.
- 1/3 cup (81.67 g) pumpkin puree: I blot most of the moisture from the pumpkin so the finished cookies stay chewy instead of turning cakey.
- 1 large egg yolk: The yolk adds richness and helps keep the cookies tender without adding too much liquid.
- 2 teaspoons vanilla extract: I use vanilla to round out the brown butter, pumpkin, and spices.
- 1/2 teaspoon baking soda: This gives the cookies just enough lift and helps with spreading.
- 1/2 teaspoon salt: I never like skipping salt in cookies because it keeps the sweetness from tasting flat.
- 1 teaspoon pumpkin pie spice: This gives the dough its main pumpkin-spice flavor.
- 1/2 teaspoon cinnamon: I add a little extra cinnamon because I like the warmth it brings to the dough.
- 1 cup (140 g) all-purpose flour: This gives the cookies enough structure while keeping them soft.
- 1/4 cup (50 g) granulated sugar: I use this for the coating on the outside.
- 1 teaspoon pumpkin pie spice: This goes into the coating for another layer of fall flavor.
- 1 teaspoon cinnamon: I mix this with the sugar and pumpkin spice for that classic snickerdoodle finish.
How to Make Brown Butter Pumpkin Snickerdoodles?
Step 1 – Brown the Butter
I start with the butter because it needs time to cool before I can make the dough. I melt 1/2 cup of butter in a medium saucepan over medium heat and keep cooking it after it starts bubbling and foaming.
I stir it often and watch it closely. The butter will eventually turn golden brown and smell nutty and toasted. This is the part where I don’t walk away, because brown butter can go from perfect to burnt way faster than I expect.
As soon as it’s browned, I pour it into a bowl and let it cool completely. If I’m in a hurry, I put the bowl in the refrigerator for about 10 to 15 minutes.
Step 2 – Blot the Pumpkin
I measure 1/3 cup of pumpkin puree and spread it onto a paper plate. Then I press paper towels over the pumpkin to soak up the extra liquid.
I keep blotting until the paper towel isn’t getting noticeably wet anymore. The pumpkin should end up closer to 3 tablespoons, or about 50 grams. I used to skip this when I was in a hurry, and my cookies were definitely softer and more cakey than I wanted.
Step 3 – Mix the Butter and Sugars
Once the browned butter has cooled and thickened a little, I mix it with the brown sugar and 1/3 cup granulated sugar. I usually use a stand mixer, but a regular bowl and wooden spoon work too.
I don’t try to whip the mixture into anything fancy. I just mix until the butter and sugars are combined and look evenly blended.
Step 4 – Add the Pumpkin, Egg Yolk, and Vanilla
I add the blotted pumpkin, egg yolk, and vanilla and mix until everything comes together. This is when the dough starts smelling really good. The browned butter and pumpkin spice combination gets me every time.
I make sure the browned butter is completely cool before adding the egg yolk. I learned that one the annoying way with another batch of cookies.
Step 5 – Mix in the Dry Ingredients
I add the flour, baking soda, salt, cinnamon, and pumpkin pie spice. I mix on low just until the dough comes together, and I stop before it looks perfectly smooth.
There can still be a few streaks of flour around the bowl when I stop. I would rather have slightly under-mixed dough than tough cookies from mixing too much.
Step 6 – Shape and Coat the Cookies
I scoop the dough into large balls, usually around 3 tablespoons each. They are fairly generous cookies, which I like because it gives me those soft centers.
In a small bowl, I mix 1/4 cup granulated sugar with 1 teaspoon pumpkin pie spice and 1 teaspoon cinnamon. Then I roll each dough ball through the mixture until it’s nicely coated.
I place only 4 to 5 cookies on each parchment-lined baking sheet. I like giving them plenty of room because they spread as they bake.
Step 7 – Bake Until the Centers Are Just Set
I bake the cookies at 350°F for about 9 to 11 minutes. I don’t wait for them to look completely firm in the center because that usually means I’ve gone too far.
I look for a center that no longer has shiny raw dough, while the edges look lightly set. The cookies can still look soft when they come out. That’s okay.
Step 8 – Let Them Cool Before Moving Them
I leave the cookies on the baking sheet for several minutes before moving them to a cooling rack. They are delicate when they’re hot, and moving them too soon can make them lose their shape.
Once they’re cool enough to handle, I transfer them carefully. Sometimes I sprinkle a tiny bit more of the spiced sugar over the tops because I like that extra little crunch.
Tips That Made My Batches Better
- Don’t rush the browned butter: I keep stirring and watching it once it starts foaming. The color changes quickly near the end.
- Cool the butter completely: Warm butter can make the dough behave differently, so I give it time to cool and thicken before mixing.
- Blot the pumpkin: This is probably the most important step for getting a chewy cookie instead of a cakey one.
- Weigh the flour if possible: Too much flour can make the cookies thick and prevent them from spreading properly.
- Don’t overbake: I pull them when the centers are set but still soft. They continue firming up on the baking sheet.
- Give the cookies room: I usually put only 4 to 5 large dough balls on one baking sheet.
- Adjust crumbly dough carefully: If my dough feels unusually crumbly after blotting the pumpkin, I add another tablespoon or two of pumpkin until it becomes easier to scoop.
- Chocolate chips are totally fair game: I can add about 1 cup of chocolate chips when I want a more dessert-like cookie.
- Don’t move them too early: I let the cookies cool on the baking sheet first so they can finish setting and hold together better.
How I Store These Pumpkin Snickerdoodles
I keep these cookies in an airtight container at room temperature, and they usually stay good for about 3 to 4 days. Honestly, mine rarely last that long because someone always finds the container.
If I want to save them for later, I freeze the baked cookies in an airtight container for up to about 2 to 3 months. I let them thaw at room temperature before serving.
I can also freeze the shaped cookie dough balls. That’s probably my favorite option when I know I won’t need a whole batch at once. I freeze the portions, then thaw them before baking so I can make a few fresh cookies whenever I feel like it.
The Little Things I Notice When I Make Them
I think the best part of these cookies is how much flavor comes from such ordinary ingredients. Butter, sugar, flour, pumpkin, and spices don’t sound especially exciting on their own, but browning the butter changes the whole personality of the cookie.
I also like that I don’t have to fight with a cakey pumpkin cookie. Pumpkin naturally brings extra moisture, so taking a few minutes to blot it feels like one of those small baking habits that actually pays off.
And that sugar coating is not optional in my kitchen. The cinnamon and pumpkin spice cling to the outside and give me a little crisp sweetness before I get to the soft center. It’s simple, but it makes the cookie feel finished.
If I make these on a cool afternoon, I usually let them sit on the counter while I clean up. Then I grab one while it’s still slightly warm. That’s when the center is at its softest, and the brown butter flavor really stands out.
These brown butter pumpkin snickerdoodles have become one of those recipes I make when I want something that feels seasonal without turning baking into an all-day project. I get chewy centers, lightly crisp edges, plenty of cinnamon, and that rich toasted butter flavor in every bite. For me, that’s pretty much everything I want from a pumpkin cookie.
Brown Butter Pumpkin Snickerdoodles Recipe
Description
These brown butter pumpkin snickerdoodles are soft and chewy in the center, lightly crisp around the edges, and coated in cinnamon, sugar, and pumpkin spice. Browned butter gives them a warm, nutty flavor, while blotted pumpkin keeps the cookies chewy instead of cakey. They are an easy fall cookie with plenty of cozy flavor in every bite.
ingredients
Cookie Dough
Cinnamon Pumpkin Spice Coating
Instructions
Make the Cookie Dough
Brown the Butter
Melt the butter in a medium saucepan over medium heat. Continue cooking while stirring often as it foams, then watch closely until the milk solids turn golden brown and the butter smells nutty and toasted. Pour the browned butter into a bowl and let it cool completely.Brown butter can burn quickly near the end, so keep a close eye on it.Blot the Pumpkin
Spread the pumpkin puree onto a paper plate or a layer of paper towels. Press additional paper towels over the pumpkin to remove as much excess moisture as possible. Continue blotting until the pumpkin is noticeably drier and reduced to roughly 50 grams.Removing excess moisture helps prevent cakey cookies.Mix the Butter and Sugars
Add the cooled browned butter, brown sugar, and 1/3 cup granulated sugar to a mixing bowl. Mix until the butter and sugars are evenly combined.A stand mixer is optional; a wooden spoon or hand mixer works too.Add Pumpkin and Wet Ingredients
Mix in the blotted pumpkin, egg yolk, and vanilla extract until the mixture is evenly combined.Make sure the browned butter is completely cool before adding the egg yolk.Add the Dry Ingredients
Add the flour, baking soda, salt, pumpkin pie spice, and cinnamon. Mix on low just until the dough comes together. Do not overmix.Stop mixing as soon as there are no large pockets of dry flour.Prepare the Coating
In a small bowl, combine 1/4 cup granulated sugar, 1 teaspoon pumpkin pie spice, and 1 teaspoon cinnamon.Shape the Cookies
Scoop the dough into large portions of about 3 tablespoons each and roll each portion into a ball. Roll each dough ball generously in the cinnamon pumpkin spice sugar coating.If the dough feels unusually crumbly, add another tablespoon or two of pumpkin puree until it becomes easier to scoop.Arrange on Baking Sheets
Place the coated dough balls on parchment-lined baking sheets, leaving plenty of space between them. Arrange only 4 to 5 large cookies on each sheet.The cookies spread while baking, so avoid overcrowding the pan.Bake
Bake at 175°C (350°F) for 9 to 11 minutes, or until the edges look lightly set and the centers no longer appear shiny or raw.The centers should still look soft when the cookies come out of the oven.Cool
Leave the cookies on the baking sheet for several minutes before carefully transferring them to a cooling rack. Let them cool until firm enough to handle.The cookies continue setting on the baking sheet, so avoid moving them immediately after baking.
Nutrition Facts
Servings 14
- Amount Per Serving
- Calories 183 kcalkcal
- % Daily Value *
- Total Fat 9.1 gg14%
- Saturated Fat 5.6 gg28%
- Trans Fat 0.3 gg
- Cholesterol 39 mgmg13%
- Sodium 124 mgmg6%
- Potassium 48 mgmg2%
- Total Carbohydrate 24.2 gg9%
- Dietary Fiber 0.7 gg3%
- Sugars 14.1 gg
- Protein 2.1 gg5%
- Calcium 2 % mg
- Iron 5 % mg
* Percent Daily Values are based on a 2,000 calorie diet. Your daily value may be higher or lower depending on your calorie needs.
Note
- Blot the pumpkin: I recommend removing excess moisture from the pumpkin puree because it helps keep these cookies chewy instead of cakey.
- Watch the butter: Brown butter changes color quickly near the end, so I keep stirring and watching it closely to avoid burning it.
- Cool the butter: I let the browned butter cool completely before mixing in the egg yolk.
- Don't overmix: I stop mixing as soon as the dry ingredients are incorporated so the cookies stay tender.
- Don't overbake: I take the cookies out when the edges are lightly set but the centers still look soft.
- Chocolate chips: I can add about 1 cup of chocolate chips when I want an extra rich, dessert-like version.
- Storage: I keep baked cookies in an airtight container at room temperature for about 3 to 4 days.
- Freezing: I can freeze baked cookies for about 2 to 3 months or freeze portioned dough balls for later baking.

