

I love the kind of breakfast that makes the kitchen smell completely unreasonable before anyone has even sat down to eat. These apple cinnamon rolls do exactly that. I get soft, buttery rolls, little pockets of tender apple, plenty of cinnamon and brown sugar, then a sweet caramel icing that melts into all those warm layers.
I started making these when I wanted something that felt like cinnamon rolls but had more of that cozy apple pie feeling. It turned out to be a very good decision. The apples keep the filling juicy, the brown sugar gets a little sticky around the edges, and the dough stays soft instead of turning into something heavy.
I also used to get nervous about yeast dough. I thought I had to somehow know exactly what the dough was thinking at every stage. I really don’t. Once I stopped fussing over every little thing and learned what soft, properly kneaded dough actually feels like, these became much less intimidating.
A little table of contents before I start
- What I use for the dough, filling, and caramel icing
- How I make the apple cinnamon rolls from scratch
- Little things I learned while making them
- How I handle overnight and freezer prep
- My favorite way to serve them
Ingredients I Used for the Recipe
I keep the ingredient list pretty straightforward because the dough already has plenty going on. I don’t like adding extra things just for the sake of it.
- 1 cup (240 ml) whole milk, warmed: I use whole milk because it gives the dough a softer, richer texture. I warm it gently, not piping hot.
- 2/3 cup (135 g) granulated sugar, divided: I use some with the yeast and the rest in the dough for sweetness and tenderness.
- 1 1/2 tablespoons (14 g) instant yeast: This gets the dough rising and gives me those fluffy rolls. Active dry yeast can work too, although I may need to give the dough a little more time.
- 1/2 cup (113 g) unsalted butter, softened: I use butter in the dough for richness and again in the filling for that classic cinnamon roll flavor.
- 2 large eggs, room temperature: I use eggs to give the dough structure and a tender texture.
- 1/2 teaspoon salt: I never skip the salt. Without it, the sweet flavors taste flat to me.
- 4 1/2 cups (563 g) all-purpose flour or bread flour: I use this to build the dough. I add the flour gradually because I don’t want to accidentally make the rolls dry.
- 6 tablespoons (85 g) unsalted butter, softened: This goes over the rolled-out dough and helps the brown sugar and cinnamon cling to it.
- 1/2 cup (100 g) packed brown sugar: I use light or dark brown sugar for a deeper, almost caramel-like filling.
- 1 1/2 tablespoons ground cinnamon: This is the warm spice that makes the apples taste like they belong inside a cinnamon roll.
- 2 cups (250 g) peeled and chopped apples: I use about two medium apples. I chop them fairly small so they fit nicely inside each roll.
- 1 cup (120 g) confectioners’ sugar: This forms the base of my quick icing.
- 1/2 teaspoon pure vanilla extract: I add this to round out the sweetness in the icing.
- 2 tablespoons milk: This loosens the icing until I get a drizzleable consistency.
- 2 tablespoons warm salted caramel: I stir this into the icing because, honestly, apple cinnamon rolls and caramel just make sense together.
How to Make Apple Cinnamon Rolls?
I don’t rush the dough. That’s probably the biggest change in how I make cinnamon rolls now compared with when I first started. I give the dough the time it needs, and I pay more attention to how it feels than to trying to force it along.
Step 1 – Wake Up the Yeast
I start by adding the warm milk, 2 tablespoons of the sugar, and the yeast to the bowl of my mixer. I let it sit for about 5 minutes.
I look for a little foam on top. That tells me the yeast is getting active. If I don’t have a stand mixer, I use a large bowl and a sturdy wooden spoon or silicone spatula. It takes more effort, but it works.
Step 2 – Build the Dough
I add the remaining sugar and softened butter, then mix in the eggs and salt. The butter may still look like little pieces at this point, and I don’t worry about that.
Then I add the flour gradually, about a cup at a time. After the first 4 cups are incorporated, I add the remaining 1/2 cup and keep mixing until the dough pulls away from the sides of the bowl.
The dough should be soft. I try very hard not to dump in extra flour just because it looks sticky. That’s one of the mistakes I made early on, and my rolls were noticeably heavier because of it.
Step 3 – Knead Until the Dough Feels Right
I knead the dough for about 5 minutes in the mixer, or I knead it by hand on a lightly floured surface. If it’s extremely sticky, I add flour a teaspoon at a time.
I like the little finger test here. When I gently press the dough, it should slowly bounce back. That’s usually enough reassurance for me that it’s ready for its first rise.
Step 4 – Let the Dough Rise
I lightly grease a large bowl and put the dough inside, turning it once so the surface gets lightly coated. I cover the bowl and leave it somewhere reasonably warm for about 2 hours, or until the dough has doubled.
I don’t put it in an overly hot place. A comfortable room-temperature spot on my kitchen counter works just fine for me.
Step 5 – Roll Out the Dough
Once the dough has risen, I gently punch it down to release the air. Then I transfer it to a lightly floured surface and roll it into roughly a 12-by-18-inch rectangle.
If the dough keeps shrinking while I roll it, I stop. I cover it loosely and let it rest for about 10 minutes. I learned this one the annoying way after fighting with dough that absolutely refused to cooperate. A short rest makes a huge difference.
Step 6 – Add the Apple Cinnamon Filling
I spread the softened butter evenly over the dough. In a small bowl, I mix the brown sugar and cinnamon, then scatter that mixture across the butter.
Next comes the chopped apples. I spread them as evenly as I can because I want every roll to get some apple, not three rolls with all the good stuff and nine without much of it.
Step 7 – Roll and Cut Everything
I roll the dough tightly from one long side into an 18-inch log. I try to keep the pressure even as I roll so the filling doesn’t get pushed out at one end.
Then I cut the log into 12 rolls. I arrange them in a greased 9-by-13-inch baking dish, cover the pan tightly, and get ready for the second rise.
Step 8 – Let the Rolls Get Puffy
I let the shaped rolls rise for about 45 to 60 minutes. They should look noticeably puffier before they go into the oven.
This is also where I can decide whether I’m baking them that morning or making them ahead. When I’m preparing breakfast for guests, I usually choose the overnight option because it saves me from doing all the work before I’ve had coffee.
Step 9 – Bake Until Golden
I heat the oven to 375°F (191°C), then bake the rolls for about 25 minutes, until they’re lightly golden on top.
About halfway through baking, I loosely tent the pan with aluminum foil. I started doing this because I prefer soft, golden tops rather than tops that get dark before the centers are fully baked.
Step 10 – Make the Caramel Icing
While the rolls cool for about 10 minutes, I whisk together the confectioners’ sugar, vanilla, milk, and warm salted caramel.
I don’t wait until the rolls are completely cold. I want them warm enough that the icing slips into the little spaces between the rolls, but not so hot that the icing disappears completely.
Step 11 – Drizzle and Serve
I spoon the caramel icing over the warm rolls, making sure I get some around the edges too. Then I serve them while they’re still warm.
That first bite is my favorite part. The roll is soft, the apples are tender, the cinnamon filling is sweet and buttery, and the caramel icing makes everything just a little more indulgent.
Tips I Actually Find Useful
- Don’t over-flour the dough: I would rather deal with slightly tacky dough than dry, stiff dough. Extra flour can make the finished rolls heavier.
- Warm the milk gently: I want it warm, not scorching hot. Extremely hot liquid can interfere with the yeast.
- Cut the apples fairly small: Smaller pieces distribute better through the rolls and make them easier to slice.
- Give the dough enough time to rise: I don’t force the timing. If my kitchen is cool, the dough can take longer.
- Let stubborn dough rest: If my rectangle keeps shrinking, I stop rolling and give it about 10 minutes. It usually becomes much easier to handle.
- Cover the rolls if they brown too quickly: A loose piece of foil over the pan keeps the tops from getting darker than I want.
- Don’t drown the rolls immediately: I let them sit for around 10 minutes after baking before adding the icing. They stay warm but don’t turn into a completely melted mess.
- Use the caramel icing: I know there are other icing options, and vanilla or cream cheese would both work, but salted caramel is the one I reach for with apples.
When I Make These Ahead
When I want these for a weekend breakfast, I often prepare the rolls the night before. I shape them, put them in the baking dish, cover them tightly, and refrigerate them for about 8 to 12 hours.
The next morning, I take them out and let them sit on the counter for roughly 1 to 2 hours. I want them to get puffy before baking, so I don’t skip this part just because I’m impatient.
I can also freeze the rolls when I know I won’t need them right away. I prefer freezing them after shaping and before the second rise. I thaw them in the refrigerator overnight, then give them about 1 1/2 to 2 hours at room temperature before baking.
I’ve also frozen fully baked rolls, especially when I accidentally made more than my family could finish. They can be stored frozen for up to about 3 months, although I personally think freshly baked tastes best.
How I Like to Serve Apple Cinnamon Rolls
I usually serve these warm with coffee and nothing else. They’re already sweet and rich enough that I don’t feel like adding a complicated breakfast around them.
For a brunch, though, I like putting out fresh fruit alongside them. Something crisp and slightly tart works especially well because it balances the buttery rolls and caramel icing.
And if I have leftovers, I keep them tightly covered. At room temperature, I use them within about 2 days. In the refrigerator, I keep them for up to 5 days and warm individual rolls before serving.
What I like most about this recipe is that it doesn’t feel like I’m choosing between apple pie and cinnamon rolls. I get the best parts of both. The apples bring that familiar fall sweetness, the cinnamon filling gives me the classic roll I was craving, and the caramel icing ties everything together.
I’ve made plenty of cinnamon rolls where the dough was the part I tolerated just to get to the filling. These aren’t like that. The dough is soft, buttery, and tender enough that I actually notice it. And once the whole pan is warm and covered in caramel, I have a very hard time waiting for breakfast to officially begin.
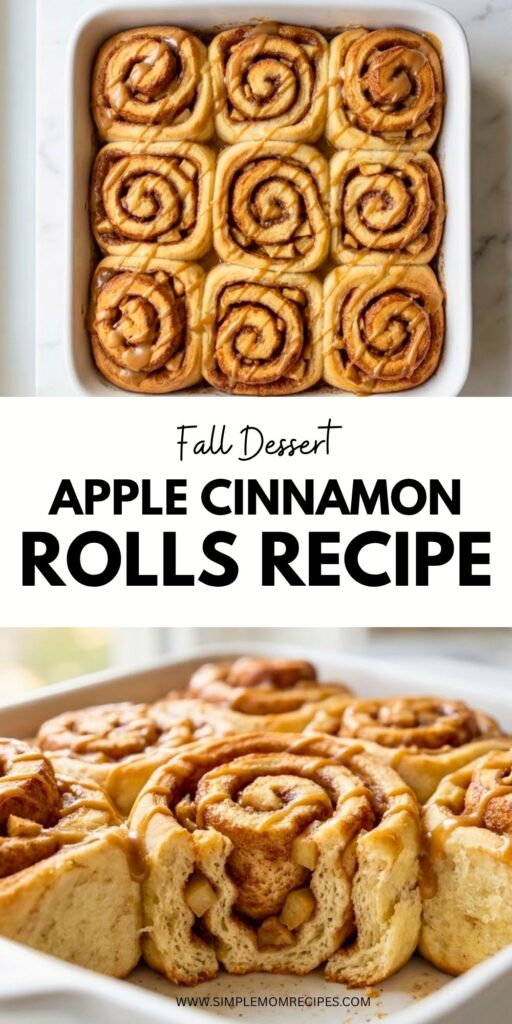
Apple Cinnamon Rolls Recipe
Description
These apple cinnamon rolls are soft, buttery, and filled with tender apples, brown sugar, and plenty of cinnamon. I finish them with a simple salted caramel icing that melts over the warm rolls and settles into all those cozy layers. They make a wonderful weekend breakfast or brunch treat.
ingredients
For the Dough
For the Apple Cinnamon Filling
For the Caramel Icing
Instructions
Make the Dough
Wake Up the Yeast
Add the warm milk, 2 tablespoons of the sugar, and the yeast to the bowl of a stand mixer. Let it sit for about 5 minutes until a little foamy.If using active dry yeast, give it a few extra minutes if needed.Build the Dough
Add the remaining sugar, softened butter, eggs, and salt. Mix until combined, then gradually add the flour, about 1 cup at a time, until the dough pulls away from the sides of the bowl.The dough should be soft and slightly tacky rather than dry.Knead
Knead the dough for about 5 minutes in the mixer, or knead by hand on a lightly floured surface. Add flour only a teaspoon at a time if the dough is extremely sticky.When gently pressed, the dough should slowly spring back.First Rise
Place the dough in a lightly greased bowl, cover it, and let it rise in a reasonably warm place for about 2 hours, or until doubled in size.A cool kitchen may require additional rising time.
Shape and Fill the Rolls
Roll Out the Dough
Gently punch down the risen dough, transfer it to a lightly floured surface, and roll it into a rectangle approximately 12 by 18 inches.If the dough keeps shrinking, let it rest for about 10 minutes before continuing.Add the Filling
Spread the softened butter evenly over the dough. Mix the brown sugar and cinnamon, scatter the mixture over the butter, then distribute the chopped apples evenly across the surface.Keep the apple pieces fairly small so they distribute well inside the rolls.Roll and Cut
Roll the dough tightly from one long side into an 18-inch log. Cut the log into 12 even rolls and arrange them in a greased 9-by-13-inch baking dish.Try to keep the rolling pressure even so the filling stays distributed.Second Rise
Cover the shaped rolls and let them rise for about 45 to 60 minutes, until they look noticeably puffy.For overnight preparation, refrigerate the covered rolls for 8 to 12 hours instead.
Bake and Ice
Bake
Preheat the oven to 375°F (191°C). Bake the rolls for about 25 minutes, until lightly golden on top.Loosely tent the pan with aluminum foil about halfway through baking if the tops are browning too quickly.Make the Caramel Icing
While the rolls cool for about 10 minutes, whisk together the confectioners' sugar, vanilla extract, milk, and warm salted caramel until smooth and drizzleable.Add a small splash of milk if the icing is too thick.Drizzle and Serve
Spoon the caramel icing over the warm rolls, letting it flow between the rolls and around the edges. Serve warm.The rolls are best served while still warm and soft.
Nutrition Facts
Servings 12
- Amount Per Serving
- Calories 480kcal
- % Daily Value *
- Total Fat 22g34%
- Saturated Fat 12g60%
- Trans Fat 0.5g
- Cholesterol 75mg25%
- Sodium 230mg10%
- Potassium 145mg5%
- Total Carbohydrate 66g22%
- Dietary Fiber 3g12%
- Sugars 35g
- Protein 7g15%
- Calcium 7 mg
- Iron 12 mg
* Percent Daily Values are based on a 2,000 calorie diet. Your daily value may be higher or lower depending on your calorie needs.
Note
- Don't over-flour the dough: I prefer slightly tacky dough because adding too much flour can make the finished rolls heavy.
- Use small apple pieces: Smaller pieces spread more evenly through the rolls and are easier to eat.
- Let stubborn dough rest: If the dough keeps shrinking while I roll it, I let it rest for about 10 minutes before trying again.
- Overnight option: Shape the rolls, cover tightly, and refrigerate for 8 to 12 hours. Let them sit at room temperature for about 1 to 2 hours before baking.
- Freezer option: Freeze shaped rolls before the second rise. Thaw overnight in the refrigerator, then let them rise at room temperature for about 1 1/2 to 2 hours before baking.
- Keep leftovers: Store tightly covered at room temperature for up to 2 days or refrigerate for up to 5 days. Warm individual rolls before serving.
- Best flavor: I like serving these warm with coffee and fresh fruit on the side. The slightly tart fruit balances the sweet caramel icing.

