

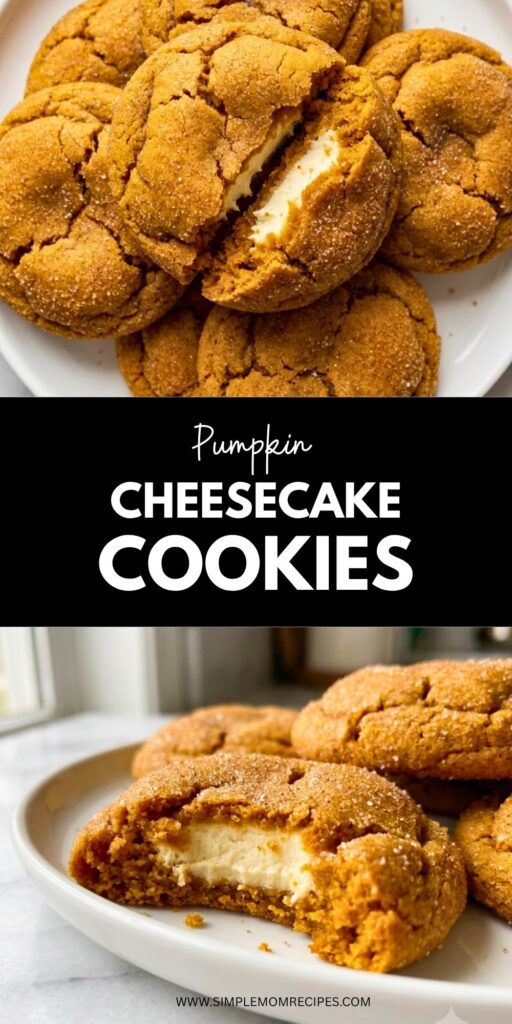
I start wanting pumpkin desserts as soon as the weather gets that first little hint of fall, and these pumpkin cheesecake cookies are one of the recipes I get especially excited about. I love that they look like a regular pumpkin cookie at first, then I bite into the middle and get that soft, sweet cheesecake filling.
I have made plenty of pumpkin cookies that ended up more like little cakes than cookies. They can still taste good, but sometimes I want that chewy cookie texture. The trick here is drying the pumpkin before it goes into the dough. It takes a few extra minutes, but I really don’t skip it anymore.
These cookies also get rolled in pumpkin spice sugar before baking, so the outside has this lightly crisp, warmly spiced coating while the inside stays soft. I think they are especially good after they have cooled completely, when the cheesecake center has had time to firm up.
A Few Things I Like to Know Before I Start
The dough is rich and soft, and the cheesecake filling needs to be frozen before I try stuffing the cookies. I learned the hard way that skipping this step makes filling the dough much messier, and the cream cheese has a much better chance of staying tucked inside during baking when it is really firm.
I also make sure I have two parchment-lined baking sheets ready before I start shaping everything. I bake only six cookies at a time, which gives them enough room to spread without running into each other.
The pumpkin is the slightly unusual part. I start with 1/2 cup of canned pumpkin puree, then press it repeatedly with paper towels until it reduces to just under 1/4 cup. I know it feels strange to dry pumpkin on a plate, but this is what keeps the finished cookies chewy instead of cakey.
Ingredients I Used for the Recipe
- 6 oz (170 g) cold cream cheese: I use this for the creamy cheesecake centers.
- 3 tbsp (38 g) granulated white sugar: This sweetens the cheesecake filling.
- 1/2 tsp vanilla: I add this to give the cheesecake center a little more flavor.
- 1/4 cup (50 g) granulated white sugar: I mix this with pumpkin pie spice for the coating on the cookies.
- 1/2 tsp pumpkin pie spice: This gives the outside that extra warm fall flavor.
- 1/2 cup (122 g) canned pumpkin puree: I dry this down before adding it to the dough so the cookies don’t become cakey.
- 1 3/4 cups (219 g) all-purpose flour: I use properly measured flour to give the cookies enough structure while keeping them tender.
- 1 tbsp pumpkin pie spice: This goes into the cookie dough for plenty of pumpkin spice flavor.
- 1/2 tsp baking powder: I use this for a little lift.
- 1/2 tsp baking soda: This works along with the baking powder to keep the cookies from being too dense.
- 1/2 tsp salt: I add this because it makes the butter, pumpkin, sugar, and spices taste more balanced.
- 3/4 cup (168 g) unsalted butter, softened: This gives the dough its rich texture and helps it cream properly with the brown sugar.
- 1 cup (220 g) light brown sugar: I use brown sugar instead of white sugar in the cookie dough because I love the chewy texture it gives these cookies.
- 2 egg yolks, at room temperature: These add richness and help create a soft, tender cookie.
- 2 tsp vanilla: I use vanilla in the cookie dough to round out all those warm pumpkin spices.
How to Make Pumpkin Cheesecake Cookies?
Step 1 – Make the Cheesecake Filling
I start with the cheesecake filling because it needs time in the freezer. I add the cold cream cheese, 3 tablespoons of sugar, and 1/2 teaspoon of vanilla to a small bowl, then beat everything with an electric mixer on medium-high speed for about 2 minutes.
I want the mixture fluffy and smooth, with the sugar mostly dissolved. I scoop it into 16 portions of about 2 teaspoons each onto a small parchment-lined baking sheet. There may be a little filling left in the bowl, which I consider a perfectly acceptable cook’s snack.
Step 2 – Freeze the Cheesecake Centers
I put the cheesecake portions straight into the freezer and leave them there until they are completely frozen and very firm. This part matters more than it might seem.
I keep the cheesecake balls in the freezer while I work on the cookie dough and only take them out when I’m ready to stuff each batch. If they start getting soft, I put them back in the freezer for a little while.
Step 3 – Dry the Pumpkin
This is the step I never skip now. I spread the 1/2 cup of pumpkin puree onto a plate and cover it with paper towels, then gently press down so the towels absorb the extra liquid.
I repeat this at least four more times, using fresh paper towels as needed. I keep going until hardly any liquid transfers onto the towel. I want the pumpkin to reduce from 1/2 cup to just under 1/4 cup.
It looks a little odd sitting there, but this is one of those small recipe details that makes a huge difference. If I leave too much moisture in the pumpkin, I end up with a softer, cakier cookie instead of the chewy texture I’m after.
Step 4 – Mix the Dry Ingredients
In a medium bowl, I whisk together the flour, 1 tablespoon of pumpkin pie spice, baking powder, baking soda, and salt. Once everything is evenly mixed, I set the bowl aside.
I also pay attention to how I measure the flour. I spoon it into the measuring cup and level the top instead of scooping directly into the flour bag. When I have my kitchen scale nearby, I prefer weighing the flour at 219 grams because it takes all the guessing out of it.
Step 5 – Cream the Butter and Brown Sugar
I add the softened butter and brown sugar to a large bowl and beat them with an electric hand mixer on high speed for about 2 minutes. I want the mixture to look fluffy rather than just mixed together.
Getting the butter properly softened helps here. I don’t want it melted or greasy. I usually leave it on the counter ahead of time so it is soft enough to beat easily but still holds its shape.
Step 6 – Add the Egg Yolks, Vanilla, and Pumpkin
I add the two room-temperature egg yolks and 2 teaspoons of vanilla, then mix on medium speed for about a minute. The mixture should look pale and fluffy.
Next, I add the dried pumpkin and mix until it is incorporated. At this point, the dough starts smelling like pumpkin spice in the best possible way, and I usually have to remind myself that I’m not allowed to eat the raw dough.
Step 7 – Finish the Cookie Dough
I add the dry ingredients and mix on low speed just until everything comes together. I try not to keep mixing once I no longer see dry flour because I want the finished cookies soft and chewy.
Then I make the spiced sugar by mixing 1/4 cup of granulated sugar with 1/2 teaspoon of pumpkin pie spice in a small bowl. I keep it close because the cookie dough balls need to go straight into it after they are stuffed.
Step 8 – Stuff and Coat the Cookies
I divide the dough into 16 portions using a 2-tablespoon cookie scoop and roll each portion into a ball. I gently flatten one ball, place a frozen cheesecake center in the middle, then bring the cookie dough completely around it.
I roll it back into a smooth ball and check the bottom and sides to make sure no cheesecake is showing. I really don’t want little gaps because the filling can leak out while baking.
Once each cookie is sealed, I roll it in the pumpkin spice sugar. I like making sure the whole outside gets a good coating because that spiced sugar becomes one of my favorite parts once the cookies bake.
Step 9 – Bake the Cookies
I heat my oven to 350°F and line two baking sheets with parchment paper. I place six stuffed cookie dough balls on a sheet at a time, leaving plenty of space around them.
I bake the cookies for about 12 to 13 minutes. I don’t wait for them to look completely firm in the oven because they continue setting as they cool. If they look slightly soft in the center when I pull them out, I’m usually right where I want to be.
Step 10 – Cool Before Serving
I let the cookies sit on the baking sheet for 10 minutes before moving them to a wire rack. This gives them time to settle and makes them much easier to handle.
I try very hard not to cut into one immediately. The cheesecake center is much too soft when the cookies are hot. Once the cookies have cooled completely, the filling becomes creamy and firm instead of runny, and the whole cookie is easier to eat.
If my cookies spread a little unevenly, I sometimes use a large round cookie cutter to gently scoot them into a neater circle while they are still warm. I don’t press down on them. I just use the cutter to nudge the edges into shape.
Tips I Actually Use When I Make Them
- Dry the pumpkin properly. I repeat the paper towel process until the pumpkin has lost most of its extra liquid. This is probably the most important step for getting chewy cookies.
- Freeze the cheesecake centers completely. I want them very firm before they go inside the dough. Soft filling is much harder to wrap and more likely to escape during baking.
- Use canned pumpkin instead of fresh pumpkin puree. I find canned pumpkin much easier to work with here because the consistency is more predictable. Fresh pumpkin can contain even more moisture.
- Measure the flour carefully. I spoon flour into my measuring cup and level it, or I weigh out 219 grams. Too much flour can make the cookies heavier than I want.
- Don’t overmix after adding the flour. I stop mixing as soon as the dry ingredients disappear into the dough.
- Keep the cheesecake balls frozen between batches. I only pull out the ones I need. If they soften while I’m shaping the first batch, I put the remaining ones back into the freezer.
- Let the cookies cool completely. I know it is tempting to eat one warm, but the cheesecake center needs time to firm up.
- Don’t crowd the baking sheet. I bake six cookies at a time so they have room to spread and bake evenly.
- Use room-temperature egg yolks. I find they blend much more easily into the butter and sugar mixture.
- Watch the pumpkin amount, not just the starting measurement. I start with 1/2 cup, but after drying, I want just under 1/4 cup. That reduction is a useful check that enough moisture has been removed.
How I Store the Finished Cookies
I keep leftover cookies in an airtight container for up to three days. Since there is a cheesecake filling in the middle, I don’t leave them sitting around for a long time at room temperature.
If I know I won’t eat them within a few days, I freeze them for up to two weeks. I like separating them so they don’t stick together, then letting them thaw before serving.
For me, these are at their best once they have completely cooled. The pumpkin cookie stays soft and chewy, the spiced sugar gives the outside a little extra texture, and that creamy cheesecake middle makes the whole thing feel like a pumpkin cheesecake and cookie decided to become one dessert.
Pumpkin Cheesecake Cookies Recipe
Description
Soft and chewy pumpkin spice cookies are wrapped around sweet, creamy cheesecake centers for a cozy fall dessert. A pumpkin spice sugar coating adds a lightly crisp outside while the cheesecake filling stays rich and creamy.
ingredients
Cheesecake Filling
Pumpkin Cookie Dough
Pumpkin Spice Sugar Coating
Instructions
Prepare the Cheesecake Filling
Make the filling
Add the cold cream cheese, 3 tablespoons of granulated sugar, and 1/2 teaspoon of vanilla to a small bowl. Beat with an electric mixer on medium-high speed for about 2 minutes, until smooth and fluffy.The sugar should be mostly dissolved and the mixture should be easy to portion.Portion the filling
Scoop the cheesecake mixture into 16 portions of about 2 teaspoons each onto a small parchment-lined baking sheet.Keep the portions reasonably even so each cookie gets a similar amount of cheesecake filling.Freeze the centers
Freeze the cheesecake portions until completely frozen and very firm. Keep them in the freezer while preparing the cookie dough and only remove the portions needed for each batch.If the cheesecake centers begin to soften, return them to the freezer before continuing.
Prepare the Pumpkin and Cookie Dough
Dry the pumpkin
Spread the canned pumpkin puree onto a plate. Cover it with paper towels and gently press to absorb excess moisture. Repeat at least four more times with fresh paper towels until very little liquid transfers and the pumpkin reduces to just under 1/4 cup.Do not skip this step because removing excess moisture helps keep the cookies chewy instead of cakey.Mix the dry ingredients
Whisk the flour, 1 tablespoon of pumpkin pie spice, baking powder, baking soda, and salt together in a medium bowl until evenly combined.Measure the flour carefully by spooning it into a measuring cup and leveling it, or weigh 219 g.Cream the butter and sugar
Beat the softened butter and brown sugar together in a large bowl with an electric mixer on high speed for about 2 minutes, until fluffy.The butter should be softened enough to cream easily but should not be melted or greasy.Add yolks, vanilla, and pumpkin
Add the room-temperature egg yolks and 2 teaspoons of vanilla. Mix on medium speed for about 1 minute, then add the dried pumpkin and mix until incorporated.The mixture should look pale and fluffy before the dry ingredients are added.Finish the dough
Add the dry ingredients and mix on low speed just until no dry flour remains and the dough comes together.Avoid overmixing to keep the cookies soft and chewy.
Stuff and Coat the Cookies
Prepare the coating
Mix 1/4 cup of granulated sugar with 1/2 teaspoon of pumpkin pie spice in a small bowl.Keep the spiced sugar nearby so the stuffed cookie dough can be coated immediately.Shape and fill
Divide the cookie dough into 16 portions using a 2-tablespoon cookie scoop. Roll one portion into a ball, gently flatten it, place a frozen cheesecake center in the middle, and completely wrap the dough around the filling.Make sure the cheesecake is fully enclosed with no gaps or exposed filling.Coat the cookies
Roll each sealed cookie dough ball in the pumpkin spice sugar until the outside is evenly coated.A complete coating gives the baked cookies their lightly crisp, warmly spiced exterior.
Bake and Cool
Prepare the oven
Preheat the oven to 350°F and line two baking sheets with parchment paper.Bake only six cookies at a time on each sheet so the cookies have plenty of room to spread.Bake the cookies
Place six stuffed and coated cookie dough balls on a prepared baking sheet and bake for 12 to 13 minutes.The centers may still look slightly soft when the cookies come out. They will continue setting as they cool.Cool before serving
Let the cookies cool on the baking sheet for 10 minutes, then transfer them to a wire rack and cool completely.The cheesecake centers are very soft when hot and become creamy and firmer after cooling. If needed, gently nudge uneven cookie edges into shape with a large round cookie cutter while the cookies are still warm.
Nutrition Facts
Servings 16 cookies
- Amount Per Serving
- Calories 250kcal
- % Daily Value *
- Total Fat 16.3g26%
- Saturated Fat 9.8g50%
- Trans Fat 0.5g
- Cholesterol 68mg23%
- Sodium 165mg7%
- Potassium 92mg3%
- Total Carbohydrate 27.1g10%
- Dietary Fiber 0.8g4%
- Sugars 17.7g
- Protein 4.0g8%
- Calcium 35 mg
- Iron 1.3 mg
* Percent Daily Values are based on a 2,000 calorie diet. Your daily value may be higher or lower depending on your calorie needs.
Note
For the best chewy texture, dry the pumpkin thoroughly before adding it to the dough. Keep the cheesecake centers completely frozen while shaping the cookies, and return them to the freezer if they begin to soften. Cool the baked cookies completely before serving so the cheesecake filling can firm up. Store leftovers in an airtight container for up to 3 days and freeze for up to 2 weeks.

