Let’s talk about a little kitchen magic that feels almost too good to be true. You know that craving for a warm, chewy bagel? The kind that feels substantial and satisfying.
Now, picture getting that exact texture, but with a whopping 11 grams of protein per bagel. And you make it yourself, with just two main ingredients. No yeast, no boiling, no waiting around.
It’s not a trick. These protein bagels are a real, delicious game-changer. I’m Kelsey, and I fell for them completely after a trip to New York left me dreaming about bagels back home in Australia.
I wanted that experience, but with a healthy twist I could feel good about any day of the week. This recipe was my answer, and honestly, I’ve never looked back.
Why You’ll Love This Recipe
First off, the simplicity is just stunning. If you can mix two things together and shape dough, you’re already a bagel pro. There’s no fancy equipment or advanced baking skills required here.
You get that classic, soft-yet-chewy bagel texture, which is the whole point, right? But it comes with a nutritious boost that makes starting your day with one feel like a real win.
They’re incredibly versatile, perfect for meal prep, and they freeze like a dream. Once you realize how easy and rewarding homemade bagels are, the store-bought ones just won’t hit the same.
Ingredients Needed for the Recipe
Gathering your ingredients is the quickest part. Here’s what you need and why each one matters.
- Self-Raising Flour: This is the magic flour that makes the bagels puff up beautifully without any yeast. It already has leavening agents mixed in. I love using whole wheat for extra fiber and nutrients, but white self-raising flour works perfectly too.
- Greek Yogurt: The superstar. This is what packs in the protein, calcium, and gives the dough its wonderful texture. Non-fat or full-fat both work great—just use what you have.
- A Pinch of Salt: Just a little, to wake up all the flavors in the dough. It’s simple but essential.
- For Topping (Optional): An egg wash or olive oil spray helps toppings stick. And for seasoning, I’m obsessed with my homemade everything bagel blend—sesame seeds, poppy seeds, garlic, the works. It takes minutes to mix up.
Smart Swaps and Substitutions
Don’t have self-raising flour? No problem at all. That’s the beauty of this recipe.
You can use plain all-purpose flour. Just add 2.5 teaspoons of baking powder to it. The result is just as light and puffy.
For a vegan version, you could experiment with a thick, plant-based yogurt. I haven’t tested it myself, but many readers have with good success. A coconut-based yogurt might be a great place to start.
And if you need gluten-free, a 1-to-1 gluten-free flour blend should work. You may need to add a touch more baking powder to help it rise.
How to make Protein Bagels?
Ready? Let’s make some bagels. The process is straightforward, even fun. You get to play with dough, and the reward is instant.

Step 1 – Make the Dough
Start by preheating your oven to 350°F (175°C). In a large bowl, combine your self-raising flour (or all-purpose flour with baking powder) with that pinch of salt.
Add in the Greek yogurt. Stir it with a spoon at first, until it starts to clump together. Then, just dive in with your hands.
It’s easier, trust me. Squeeze and press until it forms one big, shaggy ball.
Step 2 – Knead to Smoothness
Dust a clean counter with a little flour. Turn your dough ball out onto it and knead for just a few minutes.
You’re not looking for bread-level kneading here. Just work it until it’s smooth and no longer sticky. If it sticks to your hands, sprinkle on a tiny bit more flour.
Different yogurt brands have different moisture levels, so trust the feel of the dough.
Step 3 – Divide and Shape
Roll your smooth dough into a log. Cut it evenly into four pieces. Take each piece and roll it into a neat little ball between your palms.
This is the foundation for your bagel shape.
Step 4 – Form the Bagels
Here’s the fun part. Take a dough ball and poke your thumb right through the center.
Gently use your fingers to stretch and widen that hole, spinning the dough around until it looks like a little doughnut. Make the hole a bit bigger than you think.
The bagels will rise and expand in the oven, and you want that classic hole to stay visible.
Step 5 – Top and Bake
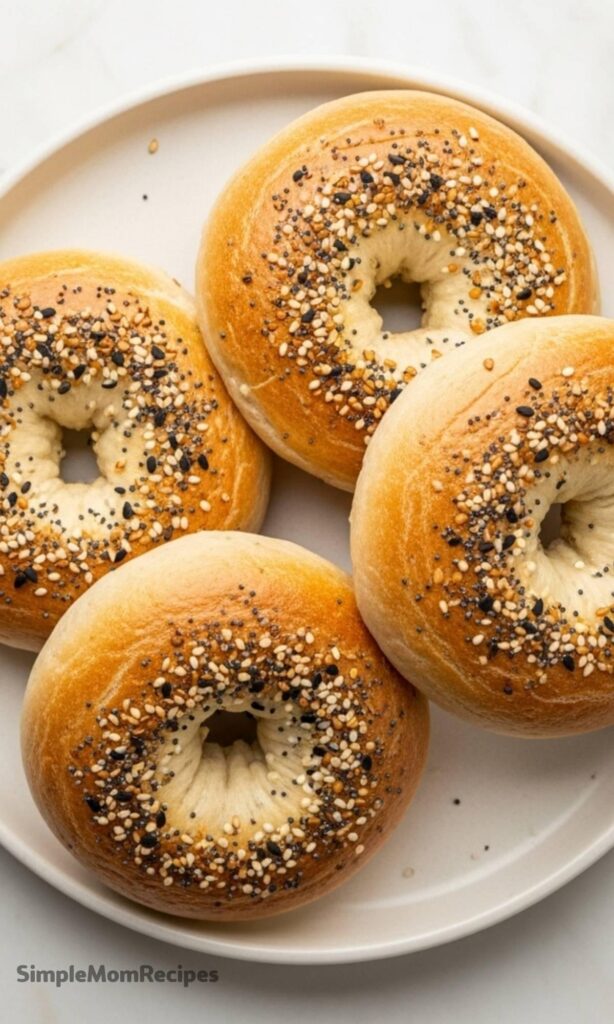
Line a baking tray with parchment paper. Place your shaped bagels on it. Now, for that professional look, brush the tops lightly with an egg wash or spray with olive oil.
This gives them a lovely golden color. Immediately sprinkle your seasoning over the top, pressing it in gently so it sticks.
Slide the tray into your preheated oven. Bake for 25 to 30 minutes. You’ll know they’re done when they’re beautifully golden brown all over.
Step 6 – Cool and Enjoy
This might be the hardest step. Let the bagels rest on a cooling rack for 10 to 15 minutes before you slice into them.
This rest time helps the texture set perfectly. Then, slice, toast if you like, and load them up with your favorite fillings. You did it.
Endless Ways to Top and Fill Them
The blank canvas you’ve just created is the best part. The topping and filling possibilities are literally endless, which means you’ll never get bored.
Before baking, go beyond everything seasoning. Try a mix of just sesame and poppy seeds, or a sprinkle of flaky salt.
For a sweet twist, a little cinnamon and brown sugar before baking is delightful. You could even press in some grated cheddar cheese or red pepper flakes for a kick.
Once they’re baked and sliced, the real fun begins. Of course, classic cream cheese is a winner. But why stop there?
Slather on some almond butter and sliced banana. Pile high with avocado, tomato, and a sprinkle of salt. Make a hearty sandwich with scrambled eggs and spinach.
For lunch, try them with hummus and cucumber, or a flavorful chickpea salad. They’re sturdy enough to hold anything you can dream up.
Tips
- Flour your surface well before kneading and shaping. This dough can be a bit sticky, and a light dusting prevents a frustrating mess.
- Make that hole generous. Seriously, stretch it bigger than seems right. As the bagels bake and rise, the hole will shrink. A good start ensures a perfect finish.
- Add toppings right after glazing. The egg wash or oil is what makes your seeds and seasonings stick. Sprinkle them on while it’s still wet, and give a gentle press to secure them.
- Let them cool completely before you store them. This keeps the texture perfect and prevents any sogginess.
Storing Your Homemade Bagels
These bagels are fantastic for making ahead. To keep them at their best, let them cool fully after baking.
Store them in an airtight container at room temperature for up to two days. If your kitchen is warm, pop the container in the fridge, where they’ll stay fresh for about a week.
For long-term storage, freezing is your friend. First, freeze the cooled bagels in a single layer on a baking sheet for an hour.
This “flash freeze” stops them from sticking together later. Then, transfer them to a freezer bag or container.
They’ll keep beautifully for one to two months. When you’re ready, just toast them straight from the freezer—no need to thaw.
High Protein Bagels Recipe
Description
These high Protein Bagels are crazy easy to make with only 2 ingredients and don't require any yeast or boiling! With 11 grams of protein each, they're perfect for breakfast, lunch, or a snack. They're also similar to the viral cottage cheese bagels that are totally worth the hype!
These Protein Bagels are so easy to make with a simple 2 ingredient dough. It uses Greek yogurt as the base providing extra nutrients, calcium and a whopping 11 grams of protein per bagel! This is before you include any fillings too 😊.
These homemade bagels also freeze well which makes them great for meal prep. I love making a batch and popping them into the freezer for an easy last minute brunch or lunch idea.
Ingredients
Main Dough
Toppings (Optional)
Instructions
- Preheat oven to 175°C (350°F).
- In a large bowl, combine self-raising flour, pinch of salt, and Greek yogurt. If using plain all-purpose flour, add 2.5 teaspoons of baking powder. Mix with a spoon until a shaggy dough forms, then use your hands to bring it together into a ball.
- Transfer dough to a lightly floured surface and knead for 2–3 minutes until smooth. If too sticky, sprinkle in a bit more flour as needed.
- Roll the dough into a large ball and cut into 4 equal pieces. Shape each piece into a smooth ball.
- Form bagels by poking a hole through the center of each ball and gently stretching it to create a donut shape. Make sure the hole is large enough—it will shrink slightly while baking.
- Place bagels on a parchment-lined baking tray. Brush with egg wash or spray with olive oil, then generously sprinkle with everything bagel seasoning or preferred toppings. Gently press toppings into the surface so they stick.
- Bake for 25–30 minutes, or until golden brown and firm to the touch.
- Let cool on a wire rack for 10–15 minutes before slicing. Toast if desired and enjoy with your favorite fillings!
Nutrition Facts
Servings 4
- Amount Per Serving
- Calories 180kcal
- % Daily Value *
- Total Fat 3g5%
- Saturated Fat 1.5g8%
- Cholesterol 5mg2%
- Sodium 320mg14%
- Potassium 180mg6%
- Total Carbohydrate 24g8%
- Dietary Fiber 3g12%
- Sugars 4g
- Protein 11g22%
- Calcium 10 mg
- Iron 1 mg
* Percent Daily Values are based on a 2,000 calorie diet. Your daily value may be higher or lower depending on your calorie needs.
Note
- To make these healthier: Use whole wheat self-raising flour for added fiber and nutrients.
- Dough too sticky? Add flour gradually—different brands of Greek yogurt have varying water content.
- Hole size matters: Make it generous so it doesn’t close up during baking.
- Storage: Keep in an airtight container for up to 2 days at room temp, up to 1 week in the fridge, or freeze for 1–2 months.
