Golden, crisp outside, fluffy inside Belgian waffles with a simple trick that changes everything – and yes, it’s easier than it sounds.
A small habit I didn’t realize mattered
I always turn the waffle iron on way too early. Like, before I even pull the flour out. It sits there heating, clicking, getting hotter than it probably needs to be. I forget about it. Then I panic and rush the batter.
Today was the same. Light blinking, iron already hot, me still separating eggs with slightly wet hands. One yolk broke. Not fully, but enough to annoy me. I scooped it out, shrugged, kept going.
There’s something about waffles that makes me less careful but more hopeful. They feel forgiving. Even when I mess up a little, they still come out decent. Sometimes even better.
Why these waffles hit different
This post contains affiliate links.
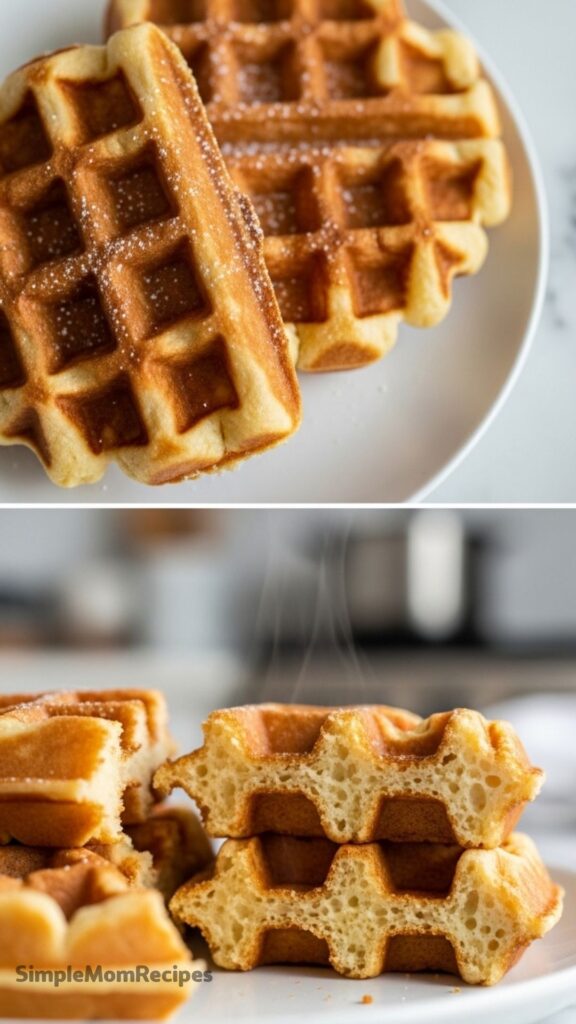
Our crispy, golden Belgian Waffles are light and fluffy on the inside with deep pockets perfect for holding syrup, butter, and fresh fruit. We use a secret ingredient (whipped egg whites!) to create the best waffles you’ll ever make from scratch!
That egg white thing sounds fussy, but it’s actually the part I enjoy most. Watching them go from slippery and clear to thick and cloud-like feels oddly satisfying. Also, it fixes a lot of problems. Heavy batter? Not anymore.
I’ve been making some version of this forever. Not perfectly. Definitely not consistently. But often enough that I know when it’s going right just by how the batter looks. Slightly airy, not too smooth, a few lumps hanging around like they belong there.
Ingredients I Used for the Recipe
- 1 3/4 cups all-purpose flour – the base, nothing fancy
- 3 teaspoons baking powder – helps lift everything up
- 1/2 teaspoon salt – balances the sweetness later
- 2 large eggs, separated – whites for fluff, yolks for richness
- 1 3/4 cups milk – makes the batter loose enough to pour
- 1/2 cup oil – keeps the waffles soft inside and crisp outside
How to make Belgian Waffles?

Step 1 – Mix the dry stuff first
I grab a big bowl and toss in flour, baking powder, and salt. I don’t always sift. Today I didn’t. I just stirred it with a fork and broke a couple tiny lumps. Good enough.
Step 2 – Separate the eggs (carefully… or not)
This is where I almost messed up. One yolk cracked into the whites but I managed to fish it out. Not perfectly. Still worked. Then I beat the whites until stiff peaks formed. Took longer than expected because I got distracted halfway through.
Step 3 – Mix the wet ingredients
In another bowl, I mixed the egg yolks with milk and oil. It looked kind of thin and yellow, nothing exciting yet. Then I poured this into the dry mix and stirred. I stopped before it got too smooth. That part matters more than I used to think.
Step 4 – Fold in the egg whites
This is the part I used to rush. Now I slow down a bit. I gently fold the whipped egg whites into the batter. Not fully blending them in. You want streaks. It looks unfinished, but that’s the point.
Step 5 – Cook in the waffle iron
The iron was already too hot. I poured the batter anyway. It sizzled louder than usual. Probably a bit too much batter too. It overflowed slightly. Classic.
I waited until the steam slowed down and opened it. Golden. Crisp edges. Slightly darker on one side but honestly, that’s the best part.
Something that almost ruined it
I almost overmixed the batter. I caught myself mid-stir and stopped. That’s one of those tiny decisions that changes everything. Overmixed batter turns dense fast, and no amount of syrup fixes that.
Also, I forgot to grease the iron on the second batch. One waffle stuck just enough to tear. Not completely ruined, but not pretty either. I still ate it. Tasted exactly the same.
Texture, smell, and that first bite
You can tell right away if they worked. The outside has that light crunch when you tap it with a fork. Not hard, just crisp. Inside feels almost airy. Like it shouldn’t hold together, but it does.
The smell is warm and slightly sweet, nothing overpowering. It fills the kitchen quietly. Not like pancakes, which hit you all at once.
First bite is always too hot. I never wait long enough. Butter melts instantly into the pockets. Syrup disappears into those deep squares like it’s meant to live there.
Tips
- Don’t overmix the batter – a few lumps are fine, actually better
- Whip egg whites until stiff peaks – soft peaks won’t give the same lift
- Fold gently – you’re trying to keep the air, not stir it out
- Preheat the waffle iron properly but don’t let it get crazy hot like I did
- Grease between batches – even if it says nonstick
- Serve immediately – they lose that crisp edge if they sit too long
I usually make these when I want something that feels a little extra but doesn’t take much brain power. They look impressive without actually being complicated. Even with the small mess-ups, they come out right most of the time.
And if one gets torn, overcooked, or uneven? That’s the one I eat standing in the kitchen before anyone else sees it.
Belgian Waffles Recipe
Description
These crispy, golden Belgian Waffles are light and fluffy on the inside with deep pockets perfect for holding syrup, butter, and fresh fruit. The secret to their airy texture is whipped egg whites folded gently into the batter. A childhood favorite that remains a family staple today!
Ingredients
Dry Ingredients
Wet Ingredients
Instructions
Prepare Dry Mix
In a large bowl, sift together the all-purpose flour, baking powder, and salt until well combined.Whip Egg Whites
Separate the egg yolks and whites into two different mixing bowls. Ensure no yolk gets into the whites. Using a hand mixer, beat the egg whites until stiff peaks form.This step is crucial for fluffy waffles.Mix Wet Ingredients
Add the milk and oil to the bowl containing the egg yolks and mix until combined. Pour this mixture into the dry ingredients and stir until just combined. Do not overmix; lumps are okay.Fold in Egg Whites
Gently fold the whipped egg whites into the batter using a spatula. Be careful not to deflate the egg whites. Stop mixing as soon as the white streaks disappear.Cook Waffles
Preheat your Belgian waffle iron and grease it lightly if necessary. Spoon the batter onto the hot iron and cook according to the manufacturer's instructions until golden brown and crispy.Serve
Serve immediately with homemade syrup, powdered sugar, fresh berries, bananas, Nutella, or whipped cream.
Nutrition Facts
Servings 6
- Amount Per Serving
- Calories 320kcal
- % Daily Value *
- Total Fat 20g31%
- Saturated Fat 3.5g18%
- Cholesterol 65mg22%
- Sodium 380mg16%
- Potassium 250mg8%
- Total Carbohydrate 28g10%
- Dietary Fiber 1g4%
- Sugars 3g
- Protein 7g15%
* Percent Daily Values are based on a 2,000 calorie diet. Your daily value may be higher or lower depending on your calorie needs.
Note
For best results, do not open the waffle iron too early. Let the steam escape naturally to ensure crispiness.
