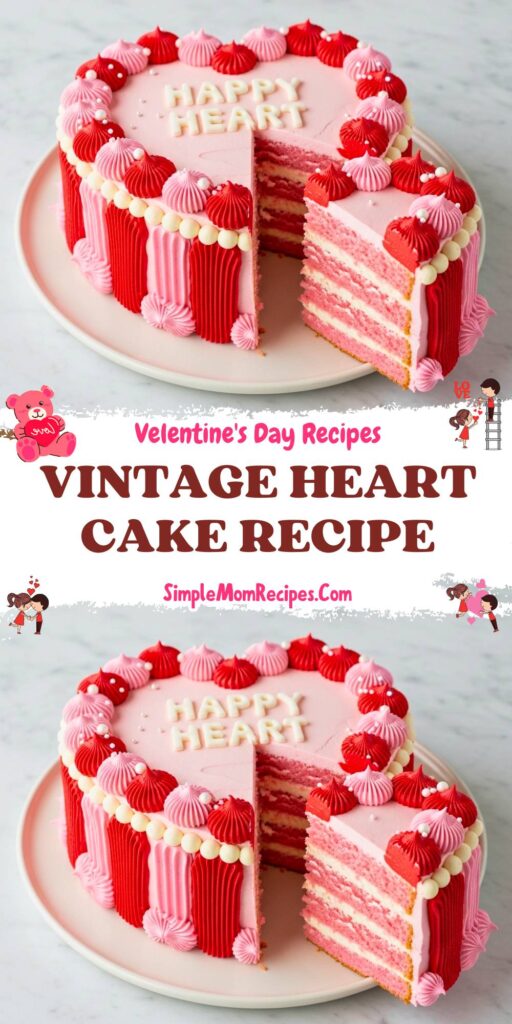
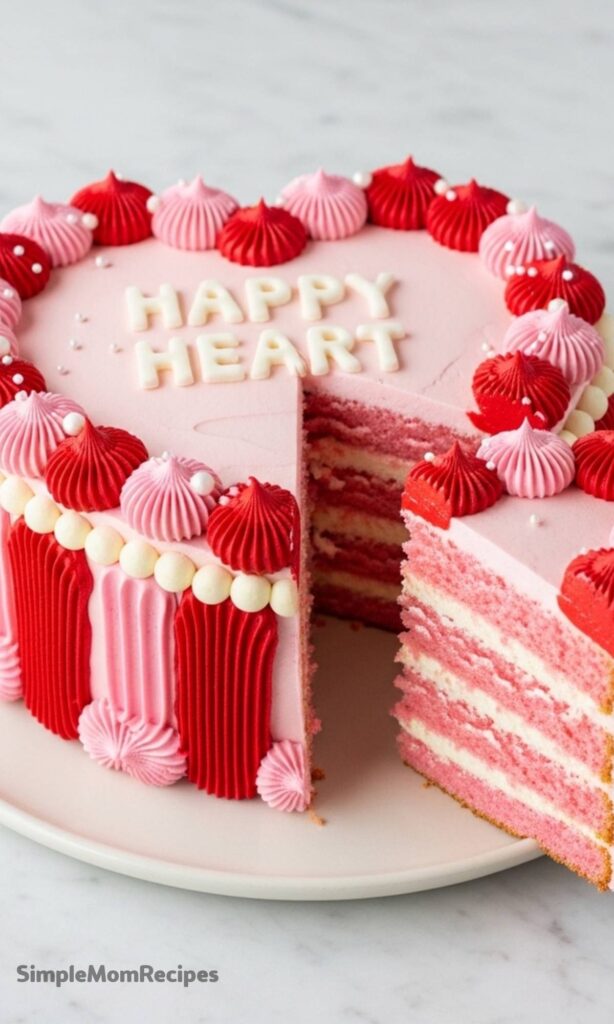
This Vintage Heart Cake is one of those desserts that feels like it carries stories with it. It is soft, pastel-toned, and unapologetically decorative, the kind of cake that turns heads before anyone even takes a bite. I have always loved how it balances nostalgia with a little bit of drama.
There is something comforting about making a cake that looks like it came from another era. The piped borders, the layers of pink and white, and that classic heart shape all work together in a way that feels thoughtful, not trendy. This is not a rush job, but it is worth every step.
I usually bring this cake out for celebrations where the cake is meant to be the centerpiece. Valentine’s Day, anniversaries, or big family gatherings all feel right. It has presence, and once it is on the table, people tend to linger.
The flavor itself is gentle and familiar. Vanilla, yoghurt for softness, and just enough sweetness to feel indulgent without being heavy. The texture is tender, especially once the layers are stacked and iced.
This is also a cake that rewards patience. Taking time with the layers, chilling between icing steps, and enjoying the decorating process makes a difference. I treat it as a project rather than a chore.
While it looks complicated, the actual cake batter is straightforward. The real work is in the assembly and decoration, which can actually be the most relaxing part if you let it be.
Ingredients Needed for the Recipe
- Caster sugar – sweetens the cake and helps create a light, creamy batter.
- Eggs – provide structure and richness to each layer.
- Neutral oil – keeps the cake moist and soft even after chilling.
- Vanilla essence – adds warmth and classic flavor.
- Plain flour – forms the base structure of the cake.
- Baking soda – helps the cake rise gently and evenly.
- Salt – balances sweetness and sharpens flavor.
- Unsweetened Greek yoghurt – adds tenderness and a subtle tang.
- Pink gel food colouring – creates the vintage pink tones, optional but charming.
- Butter – the base of the rich, smooth buttercream icing.
- Icing sugar – sweetens and thickens the buttercream.
- Cream – softens the icing and improves spreadability.
- Icing whitener – brightens the buttercream for a clean finish.
- Red gel food colouring – adds contrast for classic piping details.
- White sugar pearls – provide texture and an old-school decorative touch.
- White fondant – used for lettering or a custom message.
Before starting, I like to set everything out on the counter. This cake moves in stages, and having ingredients ready helps the process feel calmer and more enjoyable.
The icing quantity is generous, and that is intentional. A vintage cake needs bold piping and layers that look abundant. Running short halfway through is not something you want here.
How to make VINTAGE HEART CAKE?
Step 1 – Prepare the tin and oven
Start by preheating the oven and preparing a heart-shaped cake tin. Grease it well and line the base with baking paper to prevent sticking.
This step seems basic, but it sets the tone. A clean release from the tin makes everything that follows much easier.
Step 2 – Beat sugar and eggs
Place the sugar and eggs into a large bowl and beat until thick and pale. This usually takes a few minutes and is worth waiting for.
The mixture should look airy and smooth. That texture helps give the finished cake its soft crumb.
Step 3 – Add oil and vanilla
Gradually beat in the oil and vanilla essence. Pour slowly so the mixture stays emulsified and glossy.
This is where the batter starts to feel luxurious. It loosens slightly but stays cohesive.
Step 4 – Mix in dry ingredients and yoghurt
Sift the flour, baking soda, and salt over the bowl, then fold gently. Add the yoghurt and pink food colouring and mix until just combined.
Overmixing can make the cake dense, so stop as soon as everything comes together.
Step 5 – Bake the first cake
Pour the batter into the prepared tin and bake until a skewer comes out clean. Let it cool briefly before turning out.
Once cooled completely, slice the cake horizontally to create two even layers.
Step 6 – Repeat for the second cake
Make a second batch following the same steps. After slicing, you should have four layers in total.
This layering is what creates that beautiful striped effect once the cake is cut.
Layering and Color Play
This is where the personality of the Vintage Heart Cake really shows. Alternating lighter and darker pink layers gives the inside a subtle surprise.
I like to line the layers up on the counter before stacking. It helps visualize the final look and keeps things organized.
Step 7 – Make the buttercream icing
Beat half the butter until smooth, then add half the icing sugar, cream, vanilla, and salt. Mix slowly until creamy.
Repeat with the remaining ingredients to make a second batch. Large quantities are easier to manage in stages.
Step 8 – Stack the cake layers
Place the first layer on a serving plate and spread a thin layer of white buttercream on top. Continue stacking, alternating colors.
Press gently as you go so the cake stays level and stable.
Step 9 – Crumb coat the cake
Tint most of the icing pink and apply a thin layer over the entire cake. This locks in crumbs and sets the base.
Chill briefly so the icing firms up before adding the final coat.
Step 10 – Final icing layer
Spread a second, thicker layer of pink icing and smooth it carefully. Take your time here.
A smooth surface makes the decorative piping stand out more clearly.
Decorating the Vintage Way
Classic vintage cakes are all about borders and repetition. The shells, stars, and dots create texture without feeling cluttered.
I like to chill between piping steps. It keeps everything crisp and prevents colors from blending.
Step 11 – Pipe red borders
Fill a piping bag with red icing and pipe a shell border along the top and bottom edges.
This bold contrast frames the cake beautifully.
Step 12 – Add pink details
Use smaller star and petal tips to add layered pink borders inside and below the red piping.
These details give the cake depth and that unmistakable vintage charm.
Step 13 – Finish with pearls and fondant
Pipe vertical accents along the sides and gently press a sugar pearl into each one.
Finish by adding a fondant message on top, keeping it simple and centered.
Serving Suggestions
This cake slices best when slightly chilled. The layers hold their shape and the colors stay clean.
I usually serve it with plain tea or coffee. The cake itself is decorative enough without needing anything extra.
Storage and Make-Ahead Notes
The Vintage Heart Cake stores well in the refrigerator for several days. Keep it covered to protect the icing.
You can bake the layers a day ahead and assemble later. This spreads the work and keeps things relaxed.
Tips
- Use gel food colouring for stronger color without thinning the icing.
- Chill the cake between icing steps to maintain clean lines.
- Level each layer before stacking for a stable finish.
- Keep piping pressure steady for consistent borders.
- Wipe piping tips often to keep details sharp.
This Vintage Heart Cake is not about shortcuts. It is about slowing down and enjoying the process, even the messy parts.
Every time I make it, it feels a little different. That is part of the charm, and why it never feels outdated.

Vintage Heart Cake Recipe
Description
Soft and nostalgic, this heart-shaped cake is a charming throwback to classic desserts. It’s easy to bake and the best for adding a touch of vintage sweetness to any celebration.
ingredients
Cake (One batch – repeat for second batch)
Icing
Instructions
-
Bake Cake One
Preheat oven to 160°C fan bake (180°C conventional). Grease a 20cm heart-shaped tin and line with baking paper. -
Place sugar and eggs in a large bowl and beat with an electric mixer until thick and creamy (~5 minutes). Gradually beat in oil and vanilla.
-
Sift flour, baking soda, and salt over the mixture and mix until mostly incorporated. Stir in yoghurt and food colouring until smooth.
-
Pour into prepared tin. Bake for 40–45 minutes, until a skewer inserted comes out clean. Cool 10 minutes, then turn out onto a wire rack to cool completely.
-
Once cool, cut horizontally in half to make two layers (use a cake leveller for even results).
-
Bake Cake Two
Repeat steps 1–5 to make a second cake. You’ll now have four layers total. -
Make Icing (in two batches)
Beat 375g butter until smooth. Add 750g icing sugar, 3.5 Tbsp cream, 0.5 Tbsp vanilla, and 0.25 tsp salt. Beat on low until creamy. Mix by hand with a spatula to remove air bubbles. Optionally add icing whitener for brighter white. -
Repeat previous step to make second batch of buttercream.
-
Assemble Cake
Place one cake layer on a serving plate. Stack remaining layers, alternating light and dark shades, with buttercream between each. -
Colour Icing
Tint ~¾ of remaining icing pink; tint rest red. -
Crumb Coat
Spread thin pink layer over entire cake (top and sides). Chill 10–15 minutes. -
Apply second pink layer and smooth. Chill again 10–15 minutes.
-
Decorate
Fit piping bag with large star tip (e.g., Wilton 8B) and fill with red icing. Pipe shell border along top edge and bottom of cake. Chill. -
Fit smaller star tip (e.g., Wilton 4B) with pink icing. Pipe pink shell border inside top red border and above bottom red border.
-
Use petal tip with remaining pink icing to pipe border under top red border.
-
Switch to small closed star tip. Pipe another pink border on top, inside pink shell border.
-
Pipe horizontal pink line around side halfway down. At even intervals, pipe vertical red shells onto this line and press a white sugar pearl into each.
-
Add pink dots above and below the center line on the sides.
-
Roll out white fondant, cut letters, and place desired message on top.
Nutrition Facts
Servings 20
- Amount Per Serving
- Calories 787kcal
- % Daily Value *
- Total Fat 32g50%
- Saturated Fat 19g95%
- Cholesterol 107mg36%
- Sodium 316mg14%
- Potassium 180mg6%
- Total Carbohydrate 124g42%
- Sugars 109g
- Protein 5g10%
- Calcium 40 mg
- Iron 1 mg
* Percent Daily Values are based on a 2,000 calorie diet. Your daily value may be higher or lower depending on your calorie needs.
Note
- Make ahead: Cakes can be baked and frozen (wrapped well) up to 1 month ahead. Thaw before icing.
- No heart tin? Use two 8-inch round pans and carve into heart shape after cooling.
- Food colouring: Gel gives vibrant colour without thinning batter—do not substitute with liquid dye.
