Let's be honest. The store-bought veggie tray is a party classic, but it often feels like an afterthought. Limp celery, a lonely tub of dip. We can do so much better.
This is about creating a veggie platter that people actually get excited about. It's a centerpiece, a conversation starter, a colorful celebration of crunch. It’s the appetizer I, Kelsey, rely on because it’s deceptively simple and universally loved.
Every great gathering starts with good food, and a thoughtfully made veggie tray sets the perfect, welcoming tone.
Beyond the Basics: Why a Homemade Tray Wins
Pre-cutting your own vegetables makes a world of difference. The flavors are brighter, the textures are crisper. You control the variety.
It becomes an expression of the season, or simply what looks good at the market. That personal touch is what transforms a standard snack into your best veggie tray.
Plus, arranging it is the fun part. It’s where you get to play with color and shape before your guests even arrive.
Ingredients Needed for the Recipe
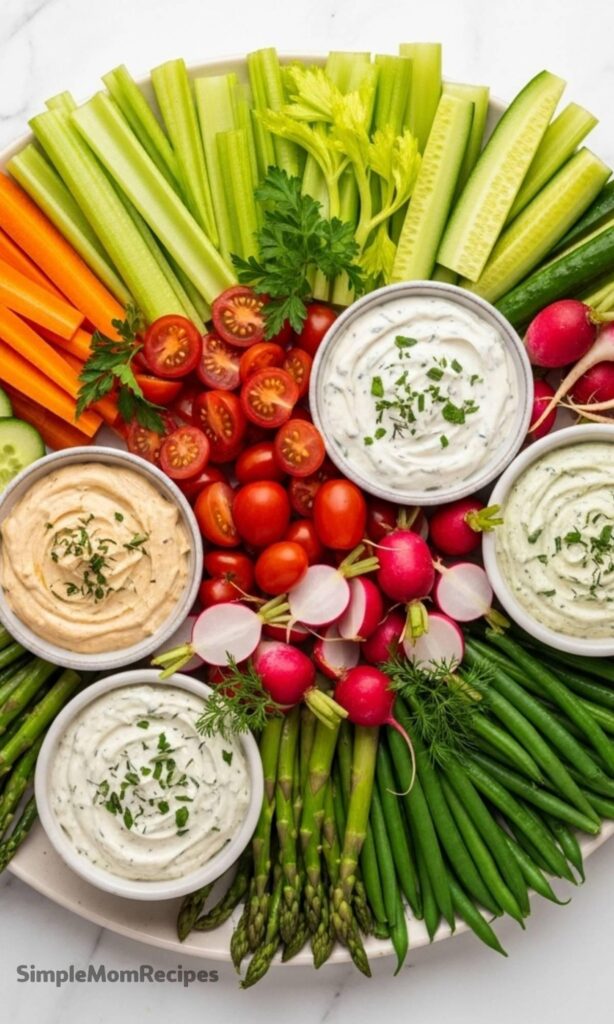
The magic lies in the mix. Aim for a rainbow on a platter, combining different colors, textures, and shapes. Here’s what you’ll need for a vibrant, crowd-pleasing spread.
Carrots (peeled): Their sweet crunch and bright orange color are non-negotiable. Peeling ensures a tender bite and prettier strips.
Celery Stalks: The ultimate dipper, offering a satisfying, watery crunch that holds up to even the thickest dips.
Cucumbers (sliced): I prefer English cucumbers for their thin skin and minimal seeds. They add a cool, refreshing element.
Cherry Tomatoes: Little bursts of juicy acidity. They break up the all-crunch texture beautifully.
Radishes: Their peppery bite and stunning red-and-white color provide a fantastic flavor and visual contrast.
Asparagus Stalks (blanched): Blanching tenderizes them just enough, turning a tough stalk into an elegant, dippable spear.
Green Beans (blanched): Same idea here. A quick blanch sweetens them and gives a perfect, snappy texture.
Assorted Dips (like ranch or hummus): The co-stars of the show. Offer at least two for variety.
Fresh Herbs for Garnish: Not just decoration. A sprinkle of dill or parsley adds a final pop of fresh aroma and color.
How to make The Best Veggie Tray?
This is less about cooking and more about composing. Think of your platter as a canvas, and the veggies as your paints. There’s no single right way, but a good process makes it effortless.
Make this recipe yours—just save it to your Pinterest board!"
Step 1 - Prepare and Blanch Your Vegetables
Wash and dry everything thoroughly. Peel the carrots and any waxy cucumbers. Slice, cut into sticks, or leave whole for items like green beans.
For asparagus and green beans, blanching is key. Bring a pot of salted water to a rolling boil. Have a bowl of ice water ready nearby.
Drop the veggies in the boiling water for just 2-3 minutes, until they turn a brighter green. Immediately plunge them into the ice bath. This stops the cooking, locking in that vibrant color and perfect snap. Pat them completely dry before arranging.
Step 2 - Strategize Your Platter Layout
Grab your largest board, platter, or even a clean baking sheet. Place your dip bowls first. Tuck them in off-center to create anchor points.
This prevents you from arranging a beautiful spread only to realize there’s no room for the dips. It’s a simple trick that makes everything else easier.
Step 3 - Build Colorful, Textural Groups
Now, have fun. Don’t just scatter randomly. Group similar veggies together in little piles or rows for visual impact.
Place a bundle of orange carrot sticks next to a pile of red radishes. Let the bright green asparagus spears fan out beside the deep green beans. This intentional grouping looks abundant and inviting.
Step 4 - Add Final Flourishes and Serve
Fill in any obvious gaps with cherry tomatoes or cucumber slices. They’re great space-fillers. Now, garnish with those fresh herbs.
A final sprinkle of green makes the whole platter sing. You can serve it right away, or cover it lightly and refrigerate for up to four hours before the party starts.
Dips That Steal the Show
The vegetables are the stars, but the dips are what make people come back for more. Moving beyond the classic ranch opens up a world of flavor.
A creamy avocado dip with lime, or a tangy dill pickle dip, can be a fantastic conversation starter. Offer one creamy option and one bean-based option, like hummus, to cater to different tastes.
This variety encourages guests to mix and match, creating their own perfect bite every time.
Tips
For a stunning base, line your platter with large lettuce leaves or vibrant purple radicchio. It adds a professional, finished look.
Short on time? The pre-cut vegetable section is your friend. Use it as a foundation, then add one or two special blanched items to elevate it.
Get creative with your dip vessels. Hollow out a small red or yellow bell pepper, or a tiny cabbage, to hold dip. It’s whimsical and reduces bowl washing.
For a change in height and presentation, stand vegetable sticks upright in short glasses or mason jars placed right on the platter.
Pat all your vegetables completely dry after washing. This is the secret to keeping your tray crisp and preventing a watery puddle.
Keeping Your Tray Fresh
A veggie tray is best enjoyed the day it’s made, but a little planning goes a long way. You can prep all your vegetables the morning of your event.
Store the blanched and cut veggies in separate airtight containers or bags in the fridge. The same goes for your dips.
Then, assemble everything on the platter just before your guests arrive. This keeps everything at peak crispness. If you must store an assembled tray, cover it loosely with damp paper towels and then plastic wrap for up to a day.
The vegetables will soften slightly, but the flavor will still be wonderful. Just avoid leaving it at room temperature for more than two hours.
This homemade veggie tray is an assortment of colorful vegetables paired with a variety of flavorful dips. A crudité platter is a must-have for any party or gathering, it’s always a big hit with both kids and adults alike!
ingredients
1cup carrots (peeled, cut into sticks)
1cup celery stalks (cut into sticks)
1cup cucumbers (sliced (English or seedless preferred))
1cup cherry tomatoes
1/2cup radishes (sliced or whole)
1cup asparagus stalks (blanched)
1cup green beans (blanched)
3cups assorted dips (such as ranch, hummus, or herb veggie dip)
fresh herbs (for garnish (e.g., parsley, dill, or cilantro))
Instructions
1
Arrange the prepared vegetables on a large platter in an attractive pattern. You can scatter them or group by type for visual appeal.
2
Place small bowls of assorted dips directly onto the platter among the vegetables.
3
Garnish with fresh herbs for added color and freshness.
4
Serve immediately, or cover and refrigerate for up to 4 hours before serving.
Nutrition Facts
Servings 12
Amount Per Serving
Calories120kcal
% Daily Value *
Total Fat5gg8%
Saturated Fat1gg5%
Trans Fat0gg
Cholesterol5mgmg2%
Sodium180mgmg8%
Potassium320mgmg10%
Total Carbohydrate16gg6%
Dietary Fiber4gg16%
Sugars8gg
Protein3gg6%
Calcium 40 mg
Iron 1 mg
* Percent Daily Values are based on a 2,000 calorie diet. Your daily value may be higher or lower depending on your calorie needs.
Note
For added color: Line your tray with lettuce or radicchio leaves.
Save time: Use pre-cut vegetables from the grocery store if you’re short on time.
Blanch tougher veggies: Blanch asparagus and green beans for 2–3 minutes, then shock in ice water to retain crispness and color.
Elegant presentation: Serve dips in hollowed-out bell peppers or small cabbage heads for a creative touch.
I’m a London-based food writer, recipe developer, and home cook who has been passionate about cooking for over 15 years. What started as a way to recreate my mother’s traditional dishes turned into a lifelong love for experimenting with flavors, writing about food, and helping others feel more confident in the kitchen.