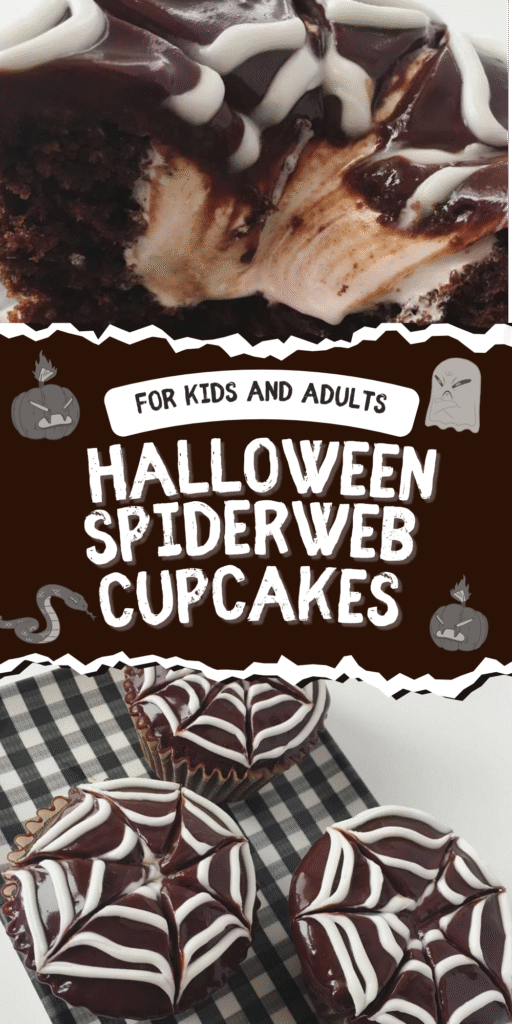
Halloween is just around the corner, and the air is getting crisp with spooky possibility. It’s the perfect time to whip up a batch of treats that are as fun to make as they are to eat, and these spiderweb cupcakes absolutely fit the bill.
They look impressively intricate, like something from a professional bakery, but I promise you, the secret technique is wonderfully simple. All it takes is a steady hand, a toothpick, and a sense of playful mischief.
Why These Cupcakes Are a Halloween Must-Make
Honestly, what’s not to love? You get a rich, devil’s food chocolate cupcake topped with a swirl of frosting that hides a magical, web-like pattern. They’re the kind of treat that makes both kids and adults do a double-take.
The best part, really, is that you don’t need any fancy piping skills or special tools. If you can swirl icing in a circle and drag a toothpick through it, you are already a spiderweb artist. It’s a fantastic project to do with little helpers, too.
Ingredients Needed for the Recipe
Gathering your ingredients is the first step to cupcake success. You’ll be surprised at how straightforward the list is, using mostly pantry staples and a few key decorative items.
- 1 package devil’s food cake mix
- 3 large eggs
- ½ cup vegetable oil
- 1 ¼ cup water
- Black baking cups
- 1 can dark chocolate frosting
- White cookie icing (the kind that comes in a squeezable tube)
- Liquid white icing color
- Toothpick
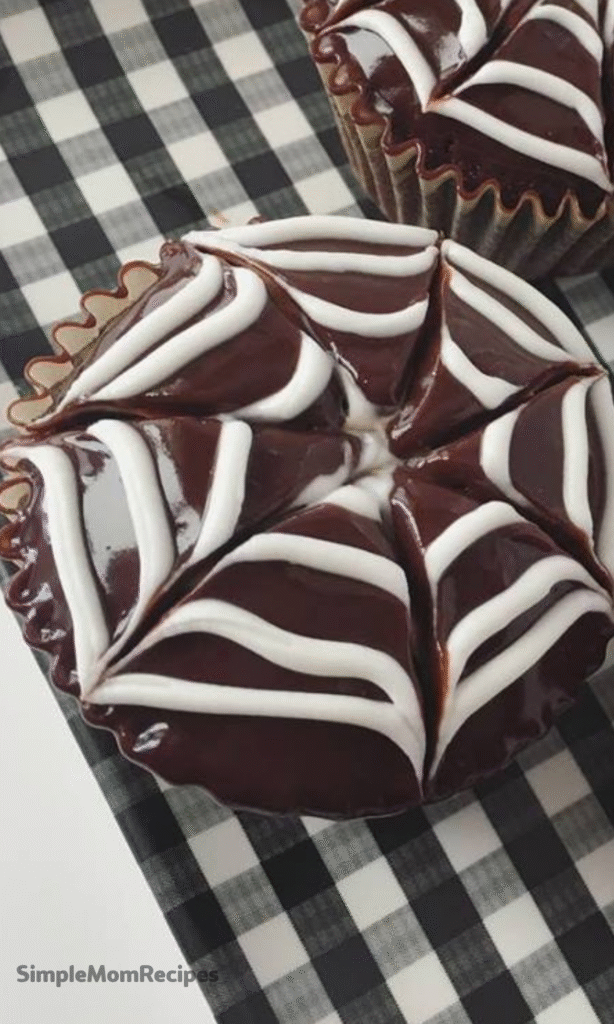
See? Nothing too crazy. The black baking cups really make the web design pop, creating a dramatic, midnight-black background for your edible artwork. It’s a small detail that makes a huge difference.
The Secret to the Perfect Cupcake Base
Starting with a boxed cake mix is a brilliant timesaver, especially during the busy Halloween season. But here’s a little tip from Kelsey to make them taste truly homemade: don’t just follow the box directions blindly.
For a richer, denser crumb that can stand up to the frosting, try using an extra egg or even substituting the water with whole milk. This small change adds a depth of flavor that makes all the difference, turning a simple mix into something truly special.
How to Make Spiderweb Cupcakes?
Preparing the Cupcake Batter
First things first, preheat your oven to 350°F (175°C). This gives the oven time to reach the perfect, even temperature while you mix your batter. In a large bowl, combine the cake mix, eggs, oil, and water.
Blend it all together on a medium-high speed for a solid two minutes. You want the batter to be completely smooth and silky, with no dry patches of mix hiding at the bottom of the bowl.
Baking to Perfection
Line your muffin tins with those stylish black baking cups. Then, carefully pour or spoon the batter into each cup, filling them only halfway. I know it’s tempting to fill them more, but trust me on this.
This gives the cupcakes just the right amount of room to rise into perfect, domed tops without spilling over the edges. Bake for 16 to 18 minutes, until a toothpick inserted into the center comes out clean.
The Crucial Cooling Step
Once they’re out of the oven, resist the urge to frost them immediately! Let the cupcakes cool in the pan for about 5 minutes before transferring them to a wire rack.
They need to cool completely, which usually takes another 15-20 minutes. If you frost a warm cupcake, the frosting will just melt into a puddle, and your beautiful web will be lost.
Creating the Chocolate Canvas
Now for the foundation of your web. Using a small offset spatula or even just a butter knife, spread a thin, even layer of the dark chocolate frosting over the top of each cooled cupcake.
You don’t need a thick layer here; think of it as a smooth, dark canvas for your web. Make it as level as you can, this will help the web design look its very best.
Mixing the Web Icing
Here’s where the magic starts. Take your tube of white cookie icing and squeeze about four to five drops of the liquid white icing color into the nozzle. Go on, don’t be shy.
Now, put the cap back on and shake that tube like you’re trying to win a maraca contest. You want the color to be fully incorporated, creating a stark, bright white icing that will stand out against the dark chocolate.
Drawing the Swirl
Hold the tip of the icing tube about three inches above the center of the cupcake. Start squeezing and slowly move your hand in a continuous, swirling motion, working your way outward to the edge.
You’re aiming for a spiral that looks like a loose coil of rope. Don’t worry if it’s not perfectly even, a little irregularity makes the web look more authentic, and natural.
Weaving the Web with a Toothpick
This is the fun part. Take a sharp toothpick and gently press the tip into the very center of the cupcake, right where your white spiral began. In one smooth motion, drag the toothpick in a straight line from the center all the way out to the edge.
See how the white icing pulls into the dark frosting? That’s your first web strand. Wipe the toothpick clean, and do it again, about a half-inch apart. Continue this until you have about eight or nine lines, like slices of a pie.
Tips for Flawless Spiderwebs Every Time
If your first web isn’t perfect, don’t fret. This technique takes a little practice. The key is to use a light touch with the toothpick; you’re dragging, not digging.
Also, make sure your white icing is fluid but not runny. If it’s too thin, it will bleed. If it’s too thick, it won’t drag properly. And always, always start with a completely cool cupcake.
How to Turn Your Cupcakes into a Spooky Centerpiece
Presentation is everything on Halloween. To really amp up the eerie factor, consider your serving platter. A slate board, a piece of weathered wood, or even a cake stand draped with black cheesecloth can create a fantastic backdrop.
Scatter a few plastic spiders and maybe some candy eyeballs around the base of the cupcake stand. You could even lightly dust the platter with a bit of powdered sugar or cocoa powder for a creepy, cobweb-dusted effect.
Ingredient Substitutions for Every Baker
No devil’s food cake mix? Any rich chocolate cake mix will work beautifully. You can also absolutely make your favorite homemade chocolate cupcake recipe from scratch—just ensure it yields about 24 cupcakes.
If you can’t find liquid white food coloring, a gel-based white color will work, though you might need to knead the tube a bit more to mix it in. For a from-scratch frosting, a simple buttercream tinted with black cocoa powder is a delicious alternative to the canned stuff.
Storing Your Creations for Maximum Freshness
These cupcakes are best enjoyed the day they are made, when the frosting is at its peak. If you need to make them ahead of time, store them in a single layer in an airtight container at room temperature for up to two days.
Avoid refrigerating them if you can, as the fridge can dry out the cupcakes and cause the frosting to become hard. The plastic spiders, of course, should be removed before storing or eating.
And there you have it. You’ve just created a batch of stunning, spooky, and seriously delicious spiderweb cupcakes that are sure to be the hit of any Halloween gathering. Now that you’re tangled in my web of baking inspiration, it’s your turn to try.
Grab your ingredients, channel your inner spider, and enjoy the process. Happy baking, and have a wonderfully spooky Halloween!

Spiderweb Cupcakes Recipe
Description
These Spiderweb Cupcakes are the perfect Halloween treat—sinfully delicious chocolate cupcakes topped with an eerie, easy-to-make spiderweb design! With just a few simple ingredients and a toothpick, you can create a show-stopping dessert that’s fun to make with kids and guaranteed to impress at any Halloween party.
ingredients
Cupcakes
Spiderweb Frosting
Instructions
-
Preheat oven to 175°C (350°F). In a large bowl, combine cake mix, eggs, oil, and water. Mix on medium-high speed for 2 minutes until smooth.
-
Line two cupcake pans with black baking cups. Fill each halfway with batter (about ¼ cup per cupcake).
-
Bake for 16–18 minutes, or until a toothpick inserted in the center comes out clean. Cool in pans for 5 minutes, then transfer to a wire rack to cool completely (about 15 minutes).
-
Using an offset spatula, frost each cupcake with a smooth, thin layer of dark chocolate frosting.
-
Add 4–5 drops of white icing color to the white cookie icing and shake well. Hold the icing tip 3 inches above a cupcake and pipe a spiral from the center outward to the edge.
-
Insert a toothpick in the center of the spiral. Drag it straight out to the edge. Repeat every ½ inch (about 8–10 lines total) to create a spiderweb.
-
Let frosting set for 5–10 minutes. Add plastic spiders on top if desired. Serve and enjoy!
Nutrition Facts
Servings 24
- Amount Per Serving
- Calories 240kcal
- % Daily Value *
- Total Fat 10gg16%
- Saturated Fat 3gg15%
- Trans Fat 0gg
- Cholesterol 25mgmg9%
- Sodium 280mgmg12%
- Potassium 120mgmg4%
- Total Carbohydrate 36gg12%
- Dietary Fiber 1gg4%
- Sugars 24gg
- Protein 2gg4%
- Calcium 40 mg
- Iron 1.5 mg
* Percent Daily Values are based on a 2,000 calorie diet. Your daily value may be higher or lower depending on your calorie needs.
Note
- Make ahead: Bake and cool cupcakes up to 2 days in advance. Frost and decorate the day of serving for best appearance.
- Frosting tip: Use store-bought frosting for ease, or make your own chocolate buttercream for a richer flavor.
- Kid-friendly: Let little ones pipe the swirls and drag the toothpick—great for developing fine motor skills!
- Storage: Keep in an airtight container at room temperature for up to 3 days.