Let’s talk about that jar of sourdough discard in your fridge, the one you feel a little guilty about every time you open the door. It doesn’t have to be wasted, not at all. In fact, it’s the secret to a fantastic, crusty loaf of bread that’s ready in just about two hours.
This recipe is a beautiful little shortcut, a way to get that homemade bread satisfaction without the long wait. You don’t need a stand mixer, or any special kneading skills. Just a bowl, your hands, and a bit of patience while it rises.
What Exactly Is Sourdough Discard?
If you’re new to the sourdough world, the term “discard” can be confusing. It sounds like something you should toss out, but that’s the opposite of the truth. Think of it as your starter’s leftover portion.
Every time you feed your sourdough starter fresh flour and water, you usually remove some of the existing mixture to keep it manageable. That removed portion is your “discard.” It’s packed with flavor, but its yeast is sleepy and inactive.
That’s perfect for our needs today. We’ll use it for its wonderful tangy taste, and let commercial yeast handle the heavy lifting of the rise. It’s the best of both worlds, really.
Ingredients Needed for the Recipe
Here’s everything you’ll gather. The beauty lies in this short, simple list. Each one has a specific, important job to do.
- Lukewarm Water: This wakes up the yeast perfectly. Too hot, and you’ll hurt it; too cold, and it sleeps in.
- Active Dry Yeast: Our reliable helper for a fast, impressive rise. Instant yeast works just as well here.
- All-Purpose Flour: The dependable backbone of our dough. It creates a lovely, chewy crumb that’s not too dense.
- Salt: This is for flavor, absolutely, but it also strengthens the gluten structure in the dough.
- Sourdough Discard: The star of the show! Use it straight from the fridge. It brings that distinct, craveable sourdough essence to the party.
The Right Tools for the Job
You don’t need a kitchen full of fancy gear. A few basics will get you a gorgeous loaf. A large mixing bowl is essential for the initial rise. A kitchen scale is my personal champion for consistent baking, as flour amounts can vary wildly by cup.
Finally, a Dutch oven is the magic trick for that professional, crackly crust. It traps steam from the dough, creating a mini bakery oven in your own kitchen. If you don’t have one, an oven-safe pot with a lid works in a pinch.
How to make Sourdough Discard Bread (No-Knead!)?
Step 1: Wake Up the Yeast
Pour your lukewarm water into a big, comfortable bowl. Sprinkle the yeast right on top and just let it be. Walk away for five minutes.
When you come back, you should see a frothy, creamy layer forming on the water. That’s your signal. The yeast is alive, happy, and ready to work.
Step 2: Mix the Dough
Now, add the flour, salt, and your sourdough discard right into the same bowl. Grab a sturdy wooden spoon, or just dive in with a clean hand.
Mix everything until you can’t see dry flour anymore. The dough will be shaggy and sticky, and that’s exactly what you want. No need to knead it smooth, promise.
Step 3: The First Rise
Cover the bowl tightly with plastic wrap or a damp kitchen towel. Find a warm, cozy spot for it on your counter. Let the dough rest here for about two hours.
This is where the transformation happens. The dough will puff up, becoming soft and airy, and it should just about double in size. It’s a lovely thing to witness.
Step 4: Shape the Loaf
Preheat your oven to 450°F (230°C) with your Dutch oven inside if you’re preheating it. Sprinkle a little flour on your counter and gently turn the dough out.
Using your hands, gently fold the edges of the dough underneath itself, turning it as you go, to form a smooth, round ball. This is called shaping a boule.
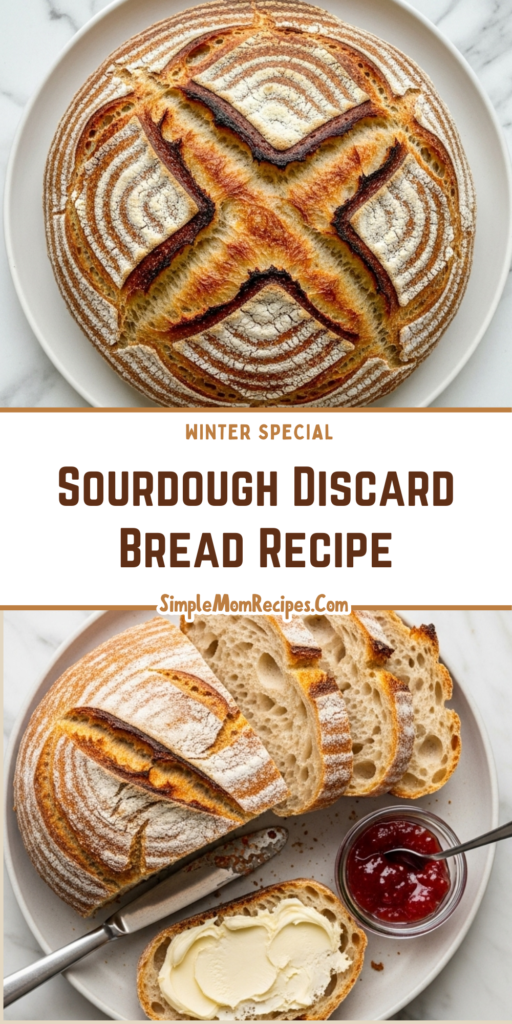
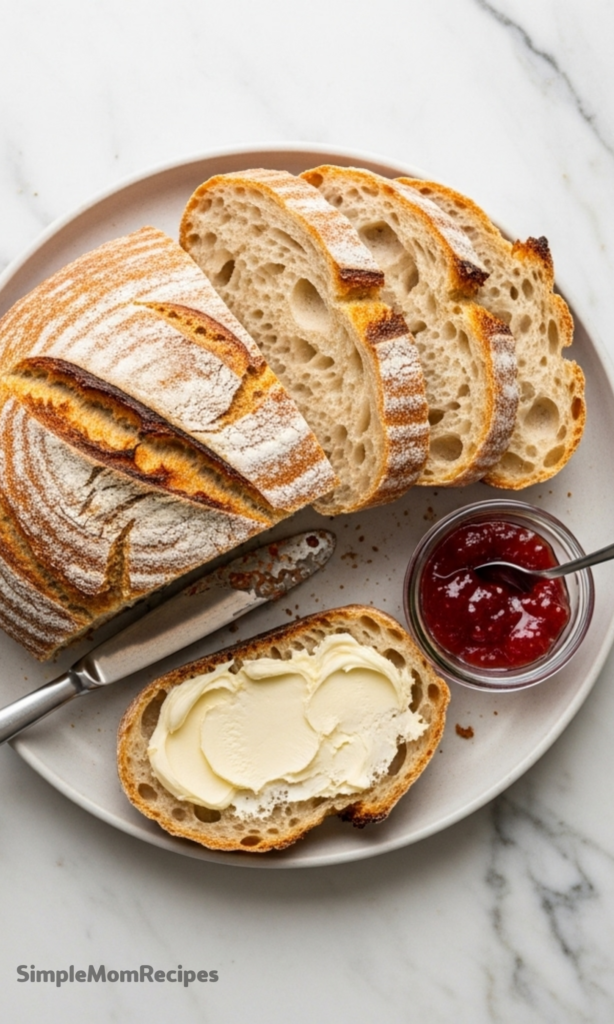
Step 5: Score and Bake
Place your shaped dough on a piece of parchment paper. Using a very sharp knife or razor, make a few quick, confident slashes about ¼-inch deep on top.
This scoring isn’t just decorative. It controls how the bread expands in the oven, giving it that beautiful, artistic burst. Carefully lower the parchment and dough into your Dutch oven.
Step 6: Steam and Finish
Bake with the lid on for 30 minutes. This creates that crucial steamy environment. Then, remove the lid.
Let it bake for another 30 minutes, uncovered, until the loaf is a deep, glorious golden brown. It should sound hollow when you tap the bottom.
Tips
- Patience is key when cooling. Let the loaf rest on a wire rack for at least an hour before slicing. The bread is still cooking inside from residual heat.
- Want to plan ahead? You can mix the dough, cover it, and let it have its first rise slowly in the fridge for up to 24 hours. The flavor deepens wonderfully.
- Feel free to play with flours. Substitute up to half of the all-purpose flour with whole wheat, rye, or spelt for a nuttier taste and heartier texture.
- If your dough feels excessively sticky when shaping, a light dusting of flour on your hands is your friend. But don’t overdo it, a little stickiness is normal.
Fun Flavor Variations
Once you master the basic loaf, the canvas is yours to paint. For a savory twist, fold in a cup of shredded cheddar cheese and some diced jalapeños before the rise.
For a sweeter breakfast bread, mix a tablespoon of cinnamon and a handful of raisins into the dry flour. Chocolate chips and orange zest make a stunning dessert loaf.
Chopped olives, sun-dried tomatoes, or fresh herbs can transform your bread into the centerpiece of a cheese board. The possibilities are truly endless.
Storing Your Masterpiece
Once completely cool, store your bread at room temperature. A simple plastic bag or bread box works perfectly for up to five days. The crust will soften, but the flavor remains.
For longer storage, slice it and freeze the slices in a bag. You can pop them straight into the toaster. And never throw away stale bread.
Stale sourdough is a treasure. It makes the best breadcrumbs, croutons, or a truly exceptional bread pudding. Every last crumb has a purpose.

Sourdough Discard Bread Recipe (No-Knead!)
Description
When you’re craving fresh, crusty bread but don’t want to wait all day—or feed your starter—this Sourdough Discard Bread is your perfect solution! Ready in under two hours with minimal effort and no kneading required, it’s ideal for beginner bakers and sourdough enthusiasts alike. Made with unfed sourdough discard and a touch of commercial yeast, this loaf delivers a subtle tang, excellent oven spring, and a satisfying chew—without the long fermentation.
ingredients
Instructions
-
In a large mixing bowl, combine lukewarm water and active dry yeast. Let sit for 5 minutes until slightly frothy.Ensure water is not too hot—it should feel warm but not scalding, or it may kill the yeast.
-
Add the flour, salt, and sourdough discard to the bowl. Mix with a wooden spoon or your hands until a shaggy, slightly sticky dough forms.No need to overmix—just combine until no dry flour remains.
-
Cover the bowl tightly with plastic wrap or a damp kitchen towel. Let the dough rise in a warm place for 2 hours, or until roughly doubled in size.For best results, place near a warm oven or on the counter away from drafts.
-
While the dough rises, preheat your oven to 450°F (232°C) with a Dutch oven inside for at least 30 minutes.Preheating the Dutch oven is optional but recommended for better oven spring and crust.
-
Turn the risen dough onto a lightly floured surface. Shape into a tight boule by folding the edges toward the center and rotating to create surface tension.See guide on how to shape a sourdough boule for best results.
-
Place a sheet of parchment paper on the counter. Transfer the dough onto it, seam-side down. Score the top with a sharp knife or bread lame, about ¼ inch deep.Scoring helps control expansion during baking and enhances appearance.
-
Carefully remove the hot Dutch oven from the oven. Lift the dough using the parchment paper and lower it into the pot.Use oven mitts! The pot will be very hot.
-
Cover with the lid and bake for 30 minutes. Then remove the lid and bake uncovered for another 25–30 minutes, until the crust is deep golden brown and the loaf sounds hollow when tapped.Internal temperature should read ~205–210°F (96–99°C) when done.
-
Transfer the bread to a wire rack and let cool completely before slicing (at least 1 hour).Cooling ensures proper crumb structure and prevents gumminess.
Nutrition Facts
Servings 8
- Amount Per Serving
- Calories 210kcal
- % Daily Value *
- Total Fat 0.8g2%
- Saturated Fat 0.1g1%
- Sodium 303mg13%
- Potassium 50mg2%
- Total Carbohydrate 44g15%
- Dietary Fiber 1.5g6%
- Sugars 0.3g
- Protein 6g12%
- Calcium 10 mg
- Iron 2.2 mg
* Percent Daily Values are based on a 2,000 calorie diet. Your daily value may be higher or lower depending on your calorie needs.
Note
- No Dutch oven? Bake on a parchment-lined baking sheet and cover with a large oven-safe bowl or pot for the first 30 minutes.
- Make ahead: The dough can be refrigerated for up to 24 hours after mixing. Bring to room temperature 1 hour before baking.
- Flour variations: Substitute up to 100g of all-purpose flour with whole wheat, rye, or spelt—but adjust water slightly as needed.
- Storage: Keep in a zip-top bag at room temperature for up to 5 days or freeze for up to 3 months.