I don’t really decorate cookies the rest of the year. I wish I did, but life gets busy and I default to drop cookies and call it a day. But when March rolls around, I pull out my rolling pin, crank up some music, and make these shamrock cookies like it’s a yearly ritual.
There’s something about soft sugar cookies and bright green icing that just feels cheerful. Not fancy cheerful. More like messy kitchen counters, powdered sugar on my shirt, and someone sneaking cookie scraps when they think I’m not looking.
The first time I made these, I overworked the dough and they baked up tough. Still ate them. Still loved them. That’s when I realized these cookies aren’t about perfection. They’re about slowing down and having fun with the process.
Now I make them softer, a little thicker, and with a simple ombre icing that looks impressive but is actually very forgiving. If you can stir and spread, you can pull this off.
Ingredients I Used for the Recipe
- 2 3/4 cups all-purpose flour – This gives the cookies structure so they hold their shamrock shape.
- 1 teaspoon baking powder – Adds a light lift without making them puffy.
- 1/2 teaspoon salt – Balances the sweetness and keeps the flavor from tasting flat.
- 1 cup unsalted butter, softened – The key to a tender cookie. I always use real butter for flavor.
- 1 cup granulated sugar – Sweetens and helps create that classic sugar cookie texture.
- 1 large egg – Binds everything together and adds richness.
- 1 1/2 teaspoons vanilla extract – Gives that warm bakery-style flavor.
- 1/2 teaspoon almond extract (optional) – I like adding just a touch for depth.
- 2 to 3 tablespoons milk – Helps bring the dough together if it feels dry.
- 3 cups powdered sugar – The base of the glacé icing.
- 4 to 5 tablespoons milk for icing – Thins the icing to a smooth, spreadable consistency.
- 1 teaspoon vanilla extract for icing – Keeps the icing from tasting overly sweet.
- Green food coloring – Used to create the ombre shades.
How to make Lucky Shamrock Sugar Cookie Recipe with Ombre Icing?

Step 1 – Mix the Dry Ingredients
I whisk together the flour, baking powder, and salt in a bowl. Nothing fancy here. Just make sure it’s evenly combined so you don’t get random salty bites.
I used to skip whisking and regretted it. Now I take the extra minute.
Step 2 – Cream Butter and Sugar Until Light
In another bowl, I beat the butter and sugar until it looks fluffy and slightly pale. This step matters more than people think. It helps give the cookies that soft texture instead of dense centers.
If the butter is too cold, I wait. Trying to rush this step never works.
Step 3 – Add Egg and Flavoring
I mix in the egg, vanilla, and almond extract. The smell at this point is already amazing. It’s that classic sugar cookie scent that makes you feel like you’re doing something right.
Step 4 – Combine Wet and Dry Mixtures
I slowly add the dry ingredients into the butter mixture. I don’t dump it all in at once because that usually ends with flour all over the counter. Learned that the hard way.
If the dough feels crumbly, I add a splash of milk until it comes together.
Step 5 – Chill the Dough
I wrap the dough and chill it for about an hour. This keeps the cookies from spreading and helps the flavors settle.
I used to skip chilling when I was impatient. Those cookies turned into blobs. Still tasty, just not shamrocks.
Step 6 – Roll and Cut the Shamrocks
I roll the dough to about 1/4 inch thickness. Slightly thicker cookies stay softer, which I prefer.
Then I cut out shamrock shapes and transfer them to a lined baking sheet. The scraps get rerolled, and yes, I snack on some of them.
Step 7 – Bake Until Just Set
I bake at 350°F for 8 to 10 minutes. The edges should look set but not browned.
Overbaking is the fastest way to ruin sugar cookies. I pull them out when they still look a little pale.
Step 8 – Let Them Cool Completely
I let the cookies cool on a rack before icing. If you rush this, the icing melts and slides off. I’ve done that too. It’s frustrating.
Step 9 – Make the Glacé Icing
I stir powdered sugar, milk, and vanilla until smooth. The consistency should be thick but pourable. Think glue, but tastier.
If it’s too thick, I add drops of milk. Too thin, more sugar.
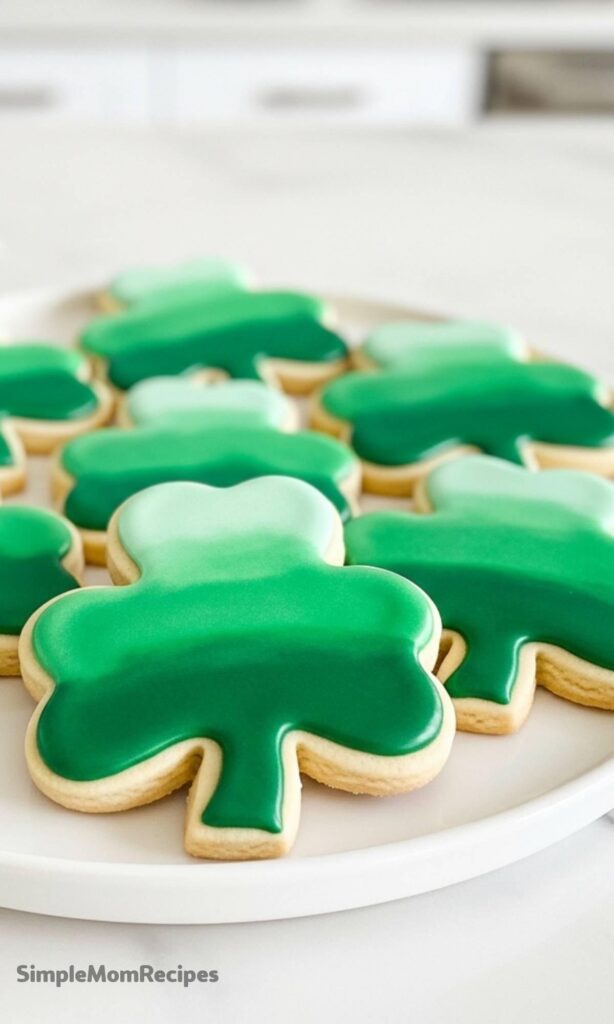
Step 10 – Create the Ombre Effect
I divide the icing into three or four bowls. One stays light green, the others get progressively darker with more food coloring.
Then I spread or dip each cookie using different shades. Sometimes I swirl them together for that soft gradient look.
No two cookies ever look the same. That’s part of the charm.
My Favorite Part About the Ombre Icing
I used to think decorated cookies required piping bags and serious skill. This icing changed my mind completely.
It settles into a smooth finish on its own. No outlining. No flooding. Just spread and let it do its thing.
The ombre effect makes them look like I spent way more time than I actually did. I’m not above taking credit for that.
Sometimes I even leave a few with visible spatula marks because they feel handmade. Perfect edges can feel a little too perfect.
Tips
Don’t Overmix the Dough
Once the flour goes in, I mix just until combined. Overmixing makes the cookies firm instead of tender.
Thickness Matters More Than You Think
Rolling slightly thicker dough gives you that soft bakery-style bite. Thin cookies turn crisp fast.
Watch the Bake Time Closely
They should not brown. If you see golden edges, they’ve already gone too far.
Adjust Icing Consistency Slowly
A few drops of liquid can change everything. I always add milk a little at a time.
Let the Icing Set Naturally
I leave the cookies out for a few hours to dry. No shortcuts. The finish becomes smooth and slightly glossy.
Embrace Imperfection
Some of my cookies lean sideways. Some have uneven color. They still disappear from the plate just as fast.
What I Learned After Making These Again and Again
These cookies taught me to relax a little in the kitchen. Not everything has to look like it came from a bakery box.
They also reminded me that baking can be simple. Butter, sugar, flour. A little color. A little patience.
Every year when I pull these out of the oven, it feels like the unofficial start of spring. The light’s different. The mood’s lighter. And suddenly I don’t mind spending an afternoon rolling dough.
If you’re making these for a party, great. If you’re making them just because you want something cheerful on your counter, even better.
Either way, expect a little mess, a lot of sweetness, and cookies that look lucky even before you take the first bite.
Shamrock Sugar Cookie Recipe
Description
These festive shamrock sugar cookies are soft, buttery, and perfect for St. Patrick's Day celebrations. Made with a classic sugar cookie dough and topped with beautiful ombre glacé icing, these cookies are fun to make with family and delicious to share. The shamrock shape adds a lucky touch to your holiday treats!
ingredients
Sugar Cookies
Glacé Icing
Instructions
Sugar Cookies
- Preheat oven to 325°F (163°C). Line baking sheets with parchment paper.
- In a large mixing bowl with paddle attachment, cream butter and sugar together until light and fluffy, about 3-4 minutes.
- Add eggs one at a time, mixing well after each addition. Mix in vanilla extract and lemon zest.
- In a separate bowl, whisk together baking powder, salt, and flour. Gradually add to wet ingredients and mix just until combined. Do not overmix.
- Turn dough onto a lightly floured parchment paper. Gently knead into a disc, turning over a few times. Do not over-handle the dough.
- Using a lightly floured rolling pin, roll dough to about 1/4-inch thickness. Cut into shamrock shapes with a cookie cutter.
- Place cookies on prepared baking sheets, spacing about 2 inches apart. Bake for 9-10 minutes until edges just begin to turn golden.
- Allow cookies to cool on baking sheet for 5 minutes before transferring to a wire rack to cool completely before icing.
Glacé Icing & Ombre Decoration
- In a mixing bowl with paddle attachment, mix confectioners' sugar and water on low speed until creamy, about 3 minutes.
- Add corn syrup and almond extract. Beat until fully incorporated and smooth. If icing is too runny, add more powdered sugar; if too thick, add water 1 tsp at a time.
- Divide icing evenly among 4 small bowls for ombre effect.
- Add green gel food coloring: 1 drop to first bowl, 3-4 drops to second, 6 drops to third, and 9 drops to fourth. Mix each until color is uniform.Use gel coloring for vibrant results without thinning icing
- Starting with the lightest shade, pipe or spread icing onto cooled cookies. Layer progressively darker shades to create the ombre effect on each shamrock.Work quickly and allow each layer to set slightly before adding the next
- Allow cookies to dry completely at room temperature, about 2-4 hours, before stacking or storing.
- Store finished cookies in an airtight container at room temperature for up to 3 days, or refrigerate icing in sealed containers for up to 1 week.
Nutrition Facts
Servings 24
- Amount Per Serving
- Calories 426kcal
- % Daily Value *
- Total Fat 16gg25%
- Saturated Fat 9.5gg48%
- Trans Fat 0gg
- Cholesterol 39mgmg13%
- Sodium 300mgmg13%
- Potassium 45mgmg2%
- Total Carbohydrate 65gg22%
- Dietary Fiber 0.8gg4%
- Sugars 44gg
- Protein 4gg8%
- Calcium 3% mg
- Iron 4% mg
* Percent Daily Values are based on a 2,000 calorie diet. Your daily value may be higher or lower depending on your calorie needs.
Note
- For softer cookies: Do not overbake; remove when edges are just golden. Store with a slice of bread to maintain softness.
- Ombre tip: Use gel food coloring instead of liquid to avoid thinning the icing and to achieve vibrant shades.
- Make ahead: Cookie dough can be wrapped and refrigerated up to 3 days or frozen up to 1 month. Thaw before rolling and cutting.
- Kid-friendly: Let children help with cutting shapes and adding food coloring for a fun family baking activity.
- Icing consistency: For outlining, keep icing thicker; for flooding, thin with a few drops of water until it flows smoothly.
