I still remember the first time I nailed seared scallops at home, and yes, it felt like a small miracle. Scallops have a reputation for being fussy, dramatic even, but the truth is kinder than that. Once you understand what they need, they’re surprisingly forgiving.
This recipe is all about simplicity and confidence. No fancy tricks, no cluttered flavors, just heat, timing, and a little respect for the ingredient. When it works, and it will, you get that golden crust and tender center that feels straight out of a restaurant kitchen.
I’ve cooked scallops in stressful moments and celebratory ones, and they always demand the same thing: focus. You can’t wander off or scroll your phone while they cook. They’re fast, intense, and totally worth your attention.
What I love most is how minimal the ingredient list is. Scallops don’t need much help to shine. In fact, adding too much is usually what gets people into trouble.
Before we even talk about heat and pans, there’s one thing that matters more than anything else. Moisture. Or rather, getting rid of it. Dry scallops are the quiet heroes of this whole story.
Once you solve that problem, the rest feels almost too easy. A hot pan, the right oil, and patience for about a minute per side. That’s it.
That’s the whole list, and I mean it. When a recipe only has three ingredients, every one of them matters. Quality isn’t optional here, it’s the whole point.
If your scallops look milky or are sitting in liquid, walk away. Those will steam instead of sear, and no amount of wishful thinking will save them. Dry scallops look slightly translucent and feel firm to the touch.

Lay the scallops on a paper towel–lined plate and season them lightly with kosher salt on all sides. Cover them with another layer of paper towels and gently press down. This step pulls surface moisture out where it belongs.
Let the scallops rest in the refrigerator for about 15 minutes. When you take them out, pat them dry again. They should feel dry to the touch, not slick or damp.
Place a stainless steel or cast iron skillet over high heat and add the oil. Let it heat until it just begins to smoke lightly. This isn’t the moment to be timid.
A properly heated pan is what creates that caramelized crust. If the oil isn’t hot enough, the scallops will release moisture and ruin your chances before you even start.
Add the scallops to the pan, leaving space between each one. The sizzle should be immediate and confident. Once they’re down, don’t touch them.
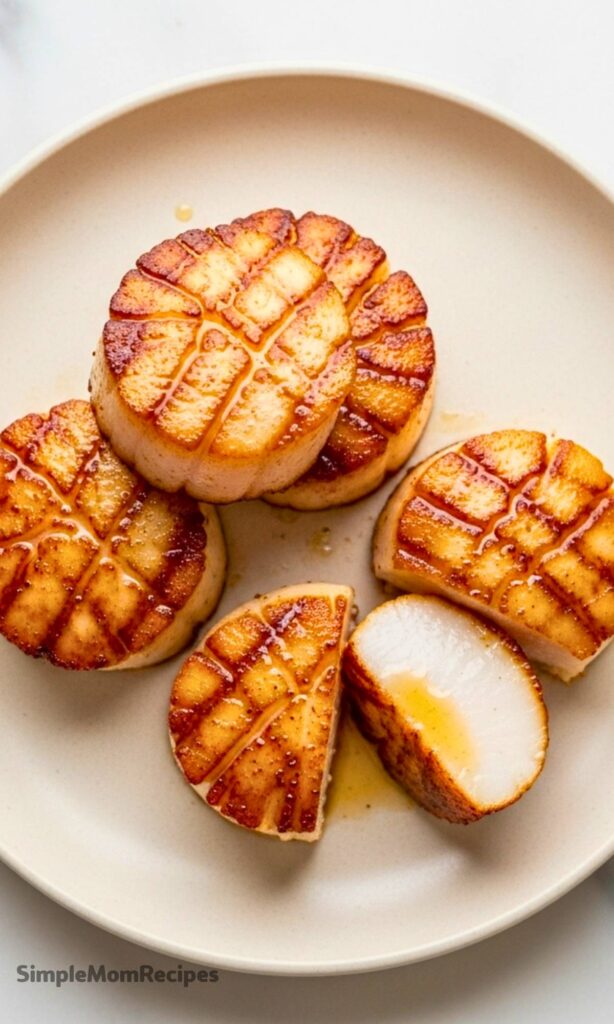
Let the scallops cook on the first side for about one minute. Peek underneath one gently. If you see a deep golden crust, they’re ready to flip.
Turn the scallops carefully and cook for about one more minute. The second side cooks faster, so stay close. You want browned, not overdone.
Transfer the scallops to a paper towel–lined plate as soon as they’re done. This keeps excess oil from soaking in while you plate the rest of the meal.
Seared scallops love bright, fresh companions. Sweet corn, juicy tomatoes, or tender peas balance the richness beautifully. You don’t need a sauce if the vegetables are good.
Sometimes I serve them over a simple puree, sometimes right on the plate with nothing but flaky salt. They’re flexible like that, elegant but not demanding.
If you’re cooking for guests, keep the sides simple. Let the scallops be the moment everyone talks about. They don’t like competition.
Seared scallops are best eaten right away, no debate there. If you do end up with leftovers, store them in an airtight container in the refrigerator.
Reheating is tricky, and I’ll be honest, they’ll never be as good as day one. A quick warm-up in a pan over low heat is better than the microwave, but expectations should stay realistic.
That said, leftover scallops can be lovely sliced cold over a salad. Different experience, still enjoyable, just not the same showstopper.
This recipe has taught me patience, restraint, and respect for heat. Every time I cook it, I’m reminded that great food doesn’t need to be complicated. It just needs you to pay attention.

I’m a London-based food writer, recipe developer, and home cook who has been passionate about cooking for over 15 years. What started as a way to recreate my mother’s traditional dishes turned into a lifelong love for experimenting with flavors, writing about food, and helping others feel more confident in the kitchen.
