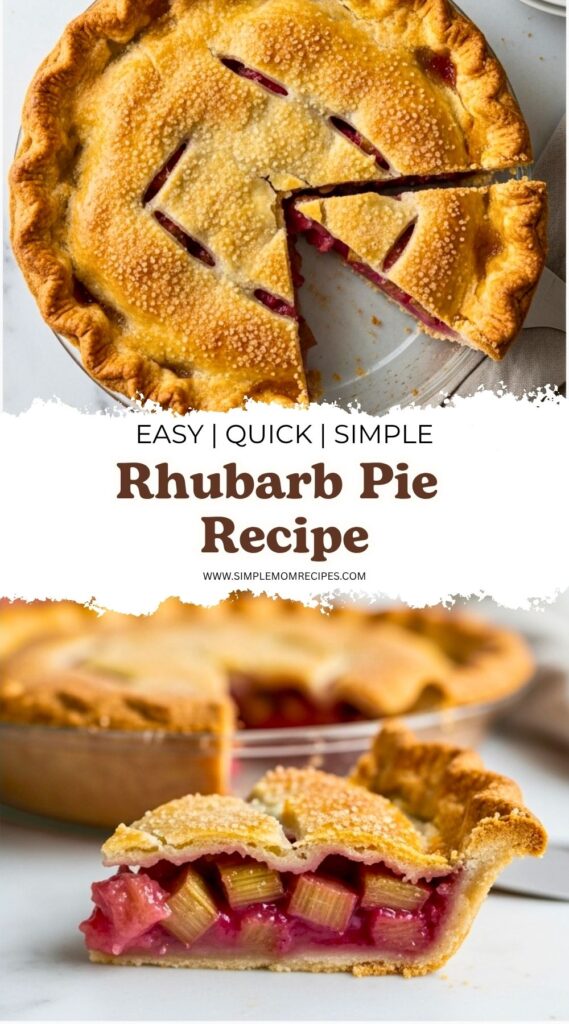
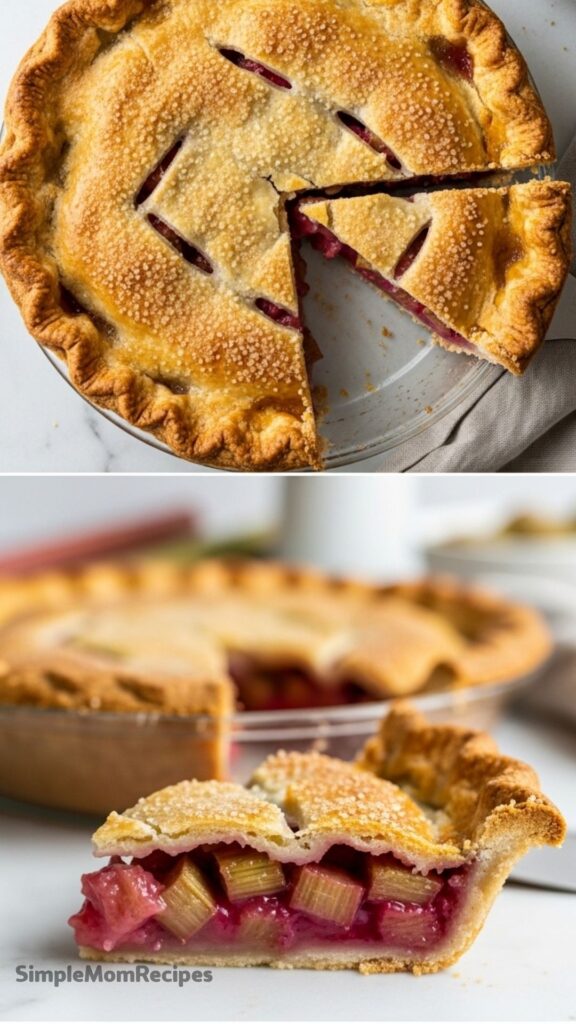
Sweet-tart rhubarb tucked in a flaky crust, bubbling just enough to stain the edges pink – this pie has a stubborn charm that keeps pulling you back
A quick moment before everything started
I was already halfway through rolling the dough when I realized I hadn’t even chopped the rhubarb yet. That’s how this usually goes for me. I start confident, then something small slips. The counter had flour everywhere, one elbow mark right through it, and the butter was getting softer than I wanted. I almost stopped. Almost.
But rhubarb doesn’t wait politely. It sits there, looking all crisp and sour, like it knows you’re hesitating. So I just kept going. Wasn’t perfect. Wasn’t planned. But that’s kind of the point with this pie.
Ingredients I Used for the Recipe
- 6 cups chopped rhubarb – the main thing, sharp and tangy, I like uneven chunks
- 1 cup + 1 tablespoon sugar – softens the bite, I hold a little back sometimes
- 1/4 cup tapioca flour – thickens everything without making it gluey
- 1 teaspoon orange zest – just enough to brighten it, not overpower
- 1 1/2 tablespoons butter – dotted on top for richness
- 1 pie crust (top and bottom) – homemade if I feel patient, store-bought if I don’t
- Optional: pinch of cinnamon or nutmeg – I forget this half the time
- 1 tablespoon coarse sugar – for the bottom crust so it doesn’t go soggy
Something that almost ruined it
I once skipped the tapioca flour thinking it wouldn’t matter. Big mistake. The filling turned into this loose, pink puddle that looked fine until I cut into it. It just ran. Not in a dramatic way, more like a quiet disappointment spreading across the plate.
Now I don’t mess with that part. If anything, I double-check it like I’m suspicious of myself. Thick filling matters more than you think with rhubarb. It releases a lot of liquid, more than berries, more than apples. It needs structure.
How to make Rhubarb Pie?
Step 1 – Preheat and pretend you’re organized
I set the oven to 400°F and tell myself I’m ahead of schedule. I’m not. But preheating early helps me feel like I am.
Step 2 – Mix the filling
In a big bowl, I throw in the sugar, tapioca flour, and orange zest. I mix it with a fork, not carefully. Then I add the rhubarb and toss it all together. The pieces don’t need to be perfect. Some small, some bigger. It cooks down anyway.
Step 3 – Deal with the crust
I roll out the bottom crust and press it into the pie dish. Sometimes it tears. I patch it. No one notices later. I sprinkle that tablespoon of coarse sugar across the bottom. This part actually matters. Keeps things from turning soggy.
Step 4 – Fill it up
I pour in the rhubarb mixture. It looks like too much. It always does. Then I dot butter across the top. Not evenly. Just small pieces here and there.
Step 5 – Top crust and seal
Second crust goes on top. I press the edges together, sometimes too hard. I’ve squished filling out the sides before. It’s fine. I cut a few slits in the top so steam can escape. If I forget this, the pie puffs weirdly and cracks later.
Step 6 – Bake and watch too closely
Into the oven for about an hour. Around halfway, I usually panic about the crust getting too dark and throw some foil over it. Not neatly. Just enough to cover the edges.
Step 7 – The hardest part, waiting
It has to cool for at least 4 hours. I rarely make it that long without checking. If you cut it too early, it falls apart. I’ve done it. Still tastes good, just messy.
Texture, smell, and the part I always notice
There’s this moment when it’s almost done. You can smell the sharpness of the rhubarb softening into something warmer. Not fully sweet, never fully sweet. That’s what makes it interesting.
The top crust gets these uneven golden patches. Some spots darker than others. I like that. It means it wasn’t fussed over too much.
When it finally cools, the filling settles into this soft, jammy texture. Not stiff. Not runny. Somewhere in between. The color turns deeper, less bright pink, more muted. Kind of like it calmed down.
A small habit I follow without thinking
I never measure the rhubarb too precisely. If I have a little extra, it goes in. If I’m short, I don’t stress. The sugar adjusts things anyway. That’s something I learned by accident after being too lazy to go back and chop more.
Also, I don’t always peel the stalks. If they’re tough, sure. But younger ones? I leave them. Adds a bit more texture. Slight bite. I like that contrast against the soft filling.
And I don’t always use a fancy lattice top. Most days it’s just a full crust with rough edges. Quick cuts on top and done. It still looks good. Maybe better because it’s not trying too hard.
Tips
- Don’t skip the thickener – rhubarb needs it more than most fruits
- Let it cool fully – this is not optional unless you want a sloppy slice
- Use cold dough – I forget this sometimes and regret it immediately
- Tent the crust if it browns too fast – foil works fine, no need to be neat
- Taste your rhubarb before baking – some batches are way more sour than others
- Patch cracks in the dough – it won’t show later
- If the filling bubbles over, just let it – cleaning the oven is easier than stressing mid-bake
There’s a line I remember seeing once, something like this post contains affiliate links, and it made me laugh because this pie feels like the opposite of that kind of polished thing. It’s simple. Six ingredients, give or take. A little messy. A little unpredictable.
And yeah, I get why people get attached to it. It’s not flashy. Not overly sweet. It kind of holds its ground. You either like that sharp edge or you don’t. I didn’t expect to care this much about it, honestly.
But here we are. Flour on the counter again. Probably too much sugar this time. I’ll adjust next round. Or not.
Rhubarb Pie Recipe
Description
This classic Rhubarb Pie recipe delivers the perfect balance of sweet and tart flavors, encased in a flaky, buttery homemade crust. With just six simple ingredients for the filling, this old-fashioned dessert is a heartfelt tribute to family traditions and springtime harvests. The bright citrus zest cuts through the tanginess of the rhubarb, creating a sophisticated yet comforting treat that is best served cool.
Ingredients
Pie Crust
Rhubarb Filling
Optional Flavor Enhancements
Instructions
Preparation
Preheat your oven to 400°F (200°C). Ensure you have your homemade pie crust ready, rolled out into two circles (one for the bottom, one for the top).Make the Filling
In a large mixing bowl, combine 1 cup of granulated sugar, tapioca flour, orange zest, and optional spices if using. Add the chopped rhubarb to the bowl and toss gently until the rhubarb pieces are evenly coated with the sugar mixture.Assemble the Bottom Crust
Place the first rolled-out pie crust into a 9-inch pie plate. Sprinkle 1 tablespoon of coarse sugar evenly over the bottom of the crust. This helps create a barrier to prevent the crust from becoming soggy.Add Filling and Butter
Pour the rhubarb filling into the prepared bottom crust, spreading it out evenly. Dot the top of the filling with small pieces of butter.Top and Seal
Place the second pie crust over the filling. Trim any excess dough and seal the edges of the top and bottom crusts together by crimping with your fingers or a fork. Cut several slits or a small 'X' in the center of the top crust to allow steam to escape during baking.Bake
Bake at 400°F for approximately 1 hour. If the crust begins to brown too quickly, loosely tent the top of the pie with aluminum foil partway through the cooking time.Cool and Serve
Remove the pie from the oven and allow it to cool completely on a wire rack for at least 4 hours. This cooling time is crucial for the filling to set properly. Refrigerate leftovers for up to 4 days.
Nutrition Facts
Servings 8
- Amount Per Serving
- Calories 310kcal
- % Daily Value *
- Total Fat 10g16%
- Saturated Fat 4g20%
- Cholesterol 15mg5%
- Sodium 180mg8%
- Potassium 180mg6%
- Total Carbohydrate 52g18%
- Dietary Fiber 2g8%
- Sugars 32g
- Protein 3g6%
* Percent Daily Values are based on a 2,000 calorie diet. Your daily value may be higher or lower depending on your calorie needs.
Note
Make Ahead: You can prepare the rhubarb filling and store it in the refrigerator for a few days before assembling. The pie crusts can also be made ahead and frozen.
Freezing: Bake and cool the pie completely. Wrap tightly in plastic wrap and aluminum foil. Freeze for up to 3 months. Thaw in the refrigerator before serving.
Variation: For a Strawberry Rhubarb Pie, substitute 2.5 cups of the rhubarb with fresh chopped strawberries.
