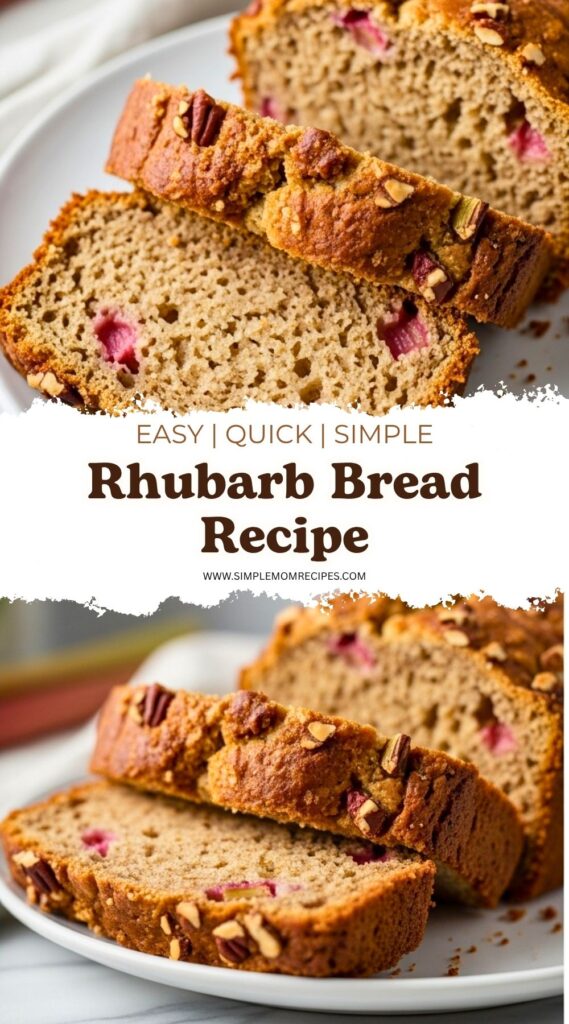
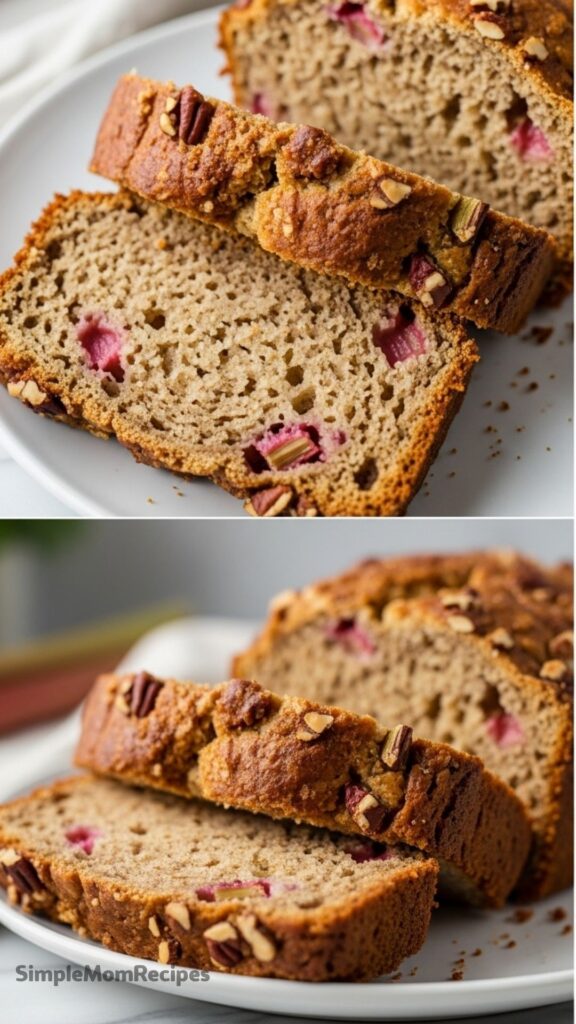
A little tart, a little sweet, and somehow better on day two, this rhubarb bread leans soft in the middle with crisp edges that never last long.
I was already halfway through mixing when I realized I forgot to grease the pans. Batter on my fingers, flour on the counter, and now I’m digging through cabinets trying to find the least scratched loaf pan. This is usually how it goes. Not a clean start, but somehow it always works out.
Rhubarb bread feels like one of those recipes that shouldn’t be this forgiving. The rhubarb itself is sharp and almost aggressive when raw. I always nibble a tiny piece just to check, and it makes me squint every time. But once it hits the batter and goes into the oven, it softens into something mellow and slightly jammy. Not too sweet. That’s the part I like.
I don’t treat this like a “perfect loaf” kind of situation. It’s more like something I throw together when I want the kitchen to smell warm and a little spicy, with that faint tang in the background.
A small thing I always do before starting
I line up everything on the counter, then immediately ignore half of it.
I’ll measure the sugar and oil, crack the egg, then suddenly decide the rhubarb pieces look too big. So I stop and chop them smaller. Then smaller again. I like them almost tiny, so they disappear into the bread instead of sitting in big chunks.
Also, I never trust myself to remember if I added vanilla. I’ve forgotten it enough times that now I leave the bottle right in front of the bowl until the batter is done. If it’s still there, I didn’t add it. Simple system.
Ingredients I Used for the Recipe
- 1 1/3 cups brown sugar – gives that deep, slightly sticky sweetness
- 2/3 cup oil – keeps the bread soft even after a day or two
- 1 egg – holds everything together without making it dense
- 1 teaspoon vanilla extract – adds warmth, easy to forget
- 1 cup buttermilk – tangy and helps soften the crumb
- 2 1/2 cups all-purpose flour – the base, nothing fancy
- 3/4 teaspoon salt – balances all the sweet
- 1/2 teaspoon cinnamon – just enough to notice, not enough to dominate
- 1 teaspoon baking soda – for lift
- 1 1/2 to 2 cups rhubarb, finely diced – the main character, tart and bright
- 1/2 cup chopped nuts – I used pecans, adds crunch
How to make Rhubarb Bread?
Step 1 – Mix the wet ingredients
I grab a bowl that’s bigger than I think I need. Sugar and oil go in first. It looks grainy and kind of dull at this point. Then the egg goes in, and I stir until it loosens up a bit. Not perfectly smooth, just combined.
This is usually where I realize I almost skipped the vanilla. I pour it in, give it another quick mix, then add the buttermilk. The batter suddenly looks pale and a little thinner.
Step 2 – Combine the dry stuff separately
In another bowl, I mix flour, salt, cinnamon, and baking soda. I don’t sift. I just stir it around with a fork and break up any obvious clumps. Good enough.
I’ve overmixed at this stage before by dumping everything in at once and aggressively stirring. The bread came out tight and a bit rubbery. So now I add the dry mix gradually, folding it in instead of beating it.
Step 3 – Bring it all together
The batter thickens pretty quickly once the flour goes in. I stop mixing when there are still a few streaks left. Then I add the rhubarb and nuts.
This part feels messy. The rhubarb doesn’t want to distribute evenly right away, so I keep folding gently until it looks balanced. I don’t chase perfection. A few heavy spots are fine.
Step 4 – Into the pans, eventually
Now I remember the ungreased pans from earlier. I fix that, slightly annoyed at myself.
I divide the batter between two loaf pans. It’s not exact. One is always a little fuller. I smooth the tops just a bit, but not too much. I like those uneven ridges that bake into a rough crust.
Step 5 – Bake and check too early
I put them in at 350°F and immediately start wondering if I should have used just one pan instead.
At around 30 minutes, I open the oven even though I know it’s early. The tops look set but still soft in the center. I close it and wait another 10 to 15 minutes.
A toothpick comes out mostly clean, maybe with a tiny crumb. That’s when I pull them out. I’ve overbaked this before and it loses that soft middle, so I err on the side of slightly under.
Something that almost ruined it once
I used frozen rhubarb without thinking it through.
I thawed it, but didn’t dry it enough. It went into the batter wet and kind of limp. The bread baked up heavier, almost damp in the center, even after extra time in the oven.
Now if I use frozen, I press it between paper towels and let it sit for a bit. Or I just accept that fresh works better and move on.
Another near mistake was skipping the salt once. I figured it wouldn’t matter much. It did. The bread tasted flat, like something was missing but I couldn’t name it at first. Salt fixed everything the next time.
What it’s like once it cools
The hardest part is waiting.
Fresh out of the oven, it smells warm and sweet with that faint sour note from the rhubarb. The edges pull slightly away from the pan. I let it sit for about 10 minutes, then flip it out.
Sometimes it sticks a little, especially if I rushed the greasing. I just nudge it loose with a knife and pretend that was the plan.
Once cooled, the texture settles. The crumb is soft but not cake-like. There’s a slight chew in places where the rhubarb melted in. The nuts give little pockets of crunch that break it up nicely.
I always slice one piece too soon. It’s warm and a bit fragile, and the knife drags through instead of cutting cleanly. Still tastes good though. Better, maybe.
By the next day, it slices neatly and somehow tastes more balanced. The tartness blends into the sweetness instead of standing out.
Tips
- Dice the rhubarb small – big chunks stay too sharp and uneven
- Don’t overmix once the flour goes in – stop early, even if it looks imperfect
- Use fresh rhubarb if possible – less moisture issues
- Check the bread a little before the timer – ovens vary more than you think
- Let it cool properly before slicing – or accept messy slices
- Grease the pans well – especially the corners where it loves to stick
- If the top browns too fast, loosely cover with foil halfway through baking
I don’t make this in a perfectly planned way. It’s more of a “I have rhubarb, let’s see what happens” kind of recipe. And somehow, even with the small mistakes and shortcuts, it turns out better than expected.
That’s probably why I keep coming back to it. Not for perfection. Just for that soft, slightly tangy slice that disappears quicker than I think it will.
Rhubarb Bread Recipe
Description
Embrace the tart and sweet flavors of spring with this moist and tender Rhubarb Bread. Perfect for using up fresh garden rhubarb, this loaf features a rich brown sugar base, warm cinnamon notes, and crunchy nuts. The buttermilk ensures a soft crumb, while the rhubarb adds delightful bursts of tangy flavor in every bite. It's an easy-to-make quick bread that pairs beautifully with morning coffee or afternoon tea.
Ingredients
Wet Ingredients
Dry Ingredients
Mix-ins
Instructions
Prep and Preheat
Preheat your oven to 350°F (175°C). Grease two 8x4-inch loaf pans thoroughly. If using solid fat like butter, you can melt it in the pan in the warm oven for easier coating.Combine Wet Ingredients
In a large mixing bowl, combine the packed brown sugar and canola oil. Blend in the beaten egg, vanilla extract, and buttermilk until smooth and well incorporated.Mix Dry Ingredients
In a separate medium bowl, whisk together the all-purpose flour, salt, ground cinnamon, and baking soda.Combine Batter
Gradually add the dry ingredient mixture to the wet ingredients. Stir gently until just combined; do not overmix. Fold in the finely diced rhubarb and chopped nuts until evenly distributed throughout the batter.Bake
Divide the batter evenly between the two prepared loaf pans. Bake for approximately 45 minutes, or until a toothpick inserted into the center of the loaves comes out clean.Cool and Serve
Allow the bread to cool in the pans for 10 minutes. Then, carefully remove the loaves from the pans and transfer them to wire racks to cool completely before slicing.
Nutrition Facts
Servings 32
- Amount Per Serving
- Calories 129kcal
- % Daily Value *
- Total Fat 6g10%
- Saturated Fat 1g5%
- Cholesterol 7mg3%
- Sodium 109mg5%
- Total Carbohydrate 17g6%
- Sugars 10g
- Protein 2g4%
* Percent Daily Values are based on a 2,000 calorie diet. Your daily value may be higher or lower depending on your calorie needs.
Note
For best results, use fresh rhubarb. Frozen rhubarb can release too much moisture. Store cooled bread in an airtight container at room temperature for up to 3 days, or freeze individual slices for longer storage. Avoid aluminum pans as rhubarb acidity can react with the metal.
