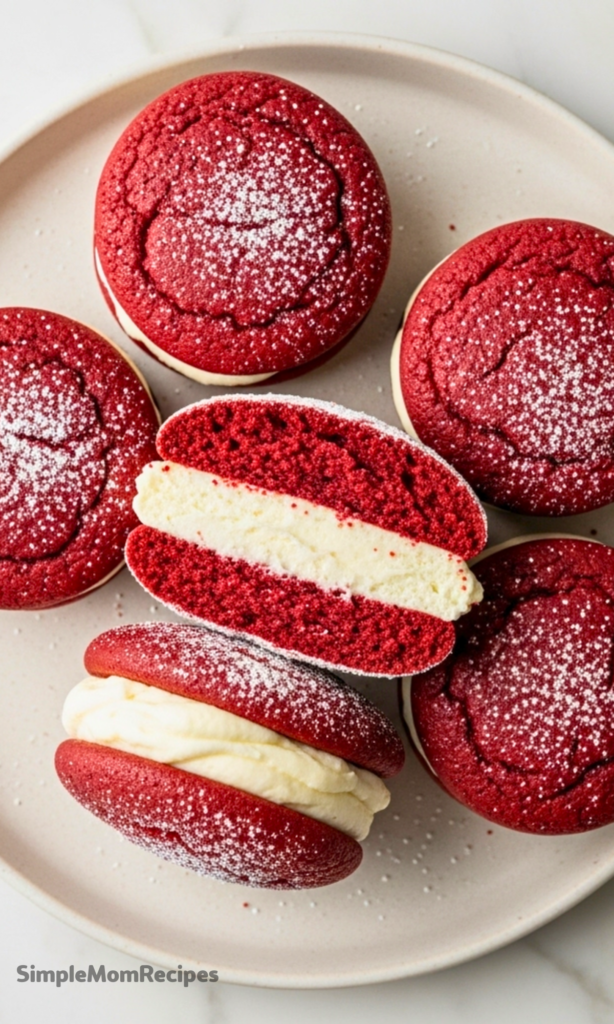
Red velvet whoopie pies have a way of stopping people mid-bite. They look playful, almost nostalgic, but the flavor is surprisingly rich and grown-up. Soft red velvet cookies with a gentle cocoa note, hugged together by tangy cream cheese filling, they hit that sweet spot between cake and cookie.
I made these after years of baking classic chocolate whoopie pies and thinking, why not take that same comfort and give it a red velvet twist. The result feels familiar but also a little special, like something you would wrap up for a holiday tin or bring to a party you actually care about.
What I love most is how approachable they are. No layers to stack, no frosting to swirl perfectly. Just scoop, bake, sandwich, and suddenly you have handheld red velvet cake that feels both fun and generous.
These are the kinds of treats that disappear fast. People pick one up casually, then come back for a second with zero shame. I take that as the highest compliment.
Ingredients Needed for the Recipe
- All-purpose flour – forms the structure of the soft, cakey cookies.
- Natural unsweetened cocoa powder – adds subtle chocolate flavor and depth.
- Baking soda – helps the cookies rise and stay light.
- Salt – balances sweetness and sharpens flavor.
- Unsalted butter – brings richness and tenderness to the dough.
- Light brown sugar – keeps the cookies moist with a hint of caramel.
- Egg – binds everything together and adds structure.
- Buttermilk – gives classic red velvet tang and softness.
- Pure vanilla extract – rounds out the cocoa and butter notes.
- Gel red food coloring – creates that deep, signature red hue.
- Cream cheese – forms the tangy base of the filling.
- Confectioners’ sugar – sweetens and smooths the filling.
- Additional butter for filling – adds richness and spreadability.
Why These Whoopie Pies Work So Well
The cookie portion is soft without being fragile. It holds together beautifully but still has that tender, cake-like crumb that makes whoopie pies so satisfying. Brown sugar plays a quiet but important role here.
The filling is thick and creamy with just enough tang to cut through the sweetness. Cream cheese keeps everything balanced so the dessert never feels heavy, even though it is undeniably indulgent.
And then there is the red velvet flavor itself. Not overly chocolatey, not plain vanilla either. It sits comfortably in between, familiar yet just different enough to feel special.
How to make Red Velvet Whoopie Pies?

Step 1 – Prep the Oven and Pans
Start by heating the oven to 350°F and lining two large baking sheets with parchment paper or silicone mats. This keeps the cookies from sticking and helps them bake evenly.
Having everything ready before mixing makes the process feel calm and unhurried. It also means the batter can go straight into the oven once it is mixed.
Step 2 – Mix the Dry Ingredients
Whisk the flour, cocoa powder, baking soda, and salt together in a bowl. This evenly distributes the cocoa and leavening so there are no bitter or flat spots later.
It is a small step, but it makes a noticeable difference in texture and flavor.
Step 3 – Cream the Butter and Sugar
Beat the butter until smooth and creamy, then add the brown sugar and continue mixing until light and fluffy. This step builds air into the batter, which helps keep the cookies soft.
Take a moment here. Well-creamed butter and sugar set the tone for the entire recipe.
Step 4 – Add the Wet Ingredients
Beat in the egg, scraping down the bowl so everything blends evenly. Add the vanilla and buttermilk and mix until combined, even if it looks slightly curdled.
That uneven look is normal and will smooth out once the dry ingredients are added.
Step 5 – Combine Wet and Dry
With the mixer on low speed, gradually add the dry ingredients to the wet mixture. Mix just until everything comes together.
Add gel food coloring a little at a time until the batter reaches a deep red color that feels right to you.
Step 6 – Scoop and Bake
Scoop about 1 and 1/2 tablespoons of batter for each cookie, spacing them a few inches apart. This gives them room to spread slightly without touching.
Bake for 10 to 12 minutes until the centers look set. Let them cool completely before filling.
Step 7 – Make the Cream Cheese Filling
Beat the cream cheese until smooth, then add the butter and mix until creamy. Gradually beat in the confectioners’ sugar and vanilla.
The filling should be thick but spreadable, with no lumps.
Step 8 – Assemble the Whoopie Pies
Pair cookies of similar size together. Spread filling onto the flat side of one cookie and gently sandwich with another.
If you like, dust the tops with a little extra confectioners’ sugar for a simple finish.
Texture and Flavor Notes
Once assembled, the cookies soften slightly as they sit with the filling. This makes the whole whoopie pie feel cohesive, almost like a single dessert instead of two cookies stuck together.
The flavor deepens after a few hours in the fridge. The cocoa, vanilla, and cream cheese meld into something that tastes balanced and intentional.
They are excellent the day they are made, but somehow even better the next day.
Tips
- Use natural cocoa powder, not Dutch-process, for proper flavor and color.
- Let the cookies cool fully before filling to prevent melting.
- Gel food coloring gives stronger color without thinning the batter.
- Pair cookies by size for neater sandwiches.
- Chill assembled pies briefly if the filling feels too soft.
Simple Variations to Try
You can add mini chocolate chips to the batter for extra texture. It turns the cookies into something closer to a bakery-style treat.
A touch of lemon zest in the filling brightens the flavor and plays nicely with the cocoa. It is subtle but noticeable.
For a holiday twist, sprinkle crushed peppermint on the filling before sandwiching. It adds crunch and a festive feel.
Storage and Make-Ahead Notes
Once assembled, these whoopie pies should be stored in the refrigerator. The cream cheese filling stays firm and fresh this way.
They keep well for up to a week when covered tightly. The texture stays soft and the flavor continues to develop.
You can also freeze them individually wrapped. Thaw overnight in the fridge before serving.
When to Serve Them
These are perfect for holiday trays, bake sales, or casual gatherings where you want something homemade but not fussy.
I also love making them for small celebrations. Birthdays, anniversaries, or even a quiet weekend that deserves a treat.
Red velvet whoopie pies feel celebratory without asking too much of you, and that balance makes them worth coming back to again and again.

Red Velvet Whoopie Pies Recipe
Description
Homemade red velvet whoopie pies with cream cheese filling are decadent, moist, and flavorful! These soft, cake-like cookies sandwiched with tangy cream cheese filling deliver all the classic red velvet taste in a fun, handheld treat. Perfect for holiday baking, cookie exchanges, or anytime you're craving a little indulgence.
ingredients
Whoopie Pie Cookies
Cream Cheese Filling
Instructions
-
Preheat the oven to 350°F (177°C). Line two large baking sheets with parchment paper or silicone baking mats. Set aside.
-
Whisk the flour, cocoa powder, baking soda, and salt together in a medium bowl. Set aside.
-
In a large bowl using a handheld or stand mixer fitted with a paddle attachment, beat the butter for 1 minute on medium-high speed until completely smooth and creamy. Add the brown sugar and beat on medium-high speed until fluffy and combined.
-
Beat in the egg on high speed, scraping down the sides and bottom of the bowl as needed. Once fully combined, beat in the vanilla and buttermilk. The mixture may look curdled; that’s okay.
-
On low speed, slowly mix the dry ingredients into the wet ingredients until just combined. Add enough gel red food coloring (about 1 teaspoon) to achieve a deep red hue.
-
Scoop mounds of batter, about 1½ tablespoons each, onto prepared baking sheets—about 3 inches apart.
-
Bake the cookies for 10–12 minutes or until centers appear set. Allow to cool completely on the baking sheets before assembling.
-
For the filling: In a large bowl using a handheld or stand mixer, beat the cream cheese for 1 minute on high speed until smooth. Beat in the butter until combined. Add confectioners’ sugar and vanilla; beat on medium-high until creamy.
-
Pair cooled cookies by size. Spread cream cheese filling onto the flat side of one cookie and sandwich with another. Sprinkle with extra confectioners’ sugar if desired.
Nutrition Facts
Servings 12
- Amount Per Serving
- Calories 270kcal
- % Daily Value *
- Total Fat 12gg19%
- Saturated Fat 7gg35%
- Trans Fat 0gg
- Cholesterol 45mgmg15%
- Sodium 230mgmg10%
- Potassium 120mgmg4%
- Total Carbohydrate 38gg13%
- Dietary Fiber 1gg4%
- Sugars 26gg
- Protein 3gg6%
- Calcium 60 mg
- Iron 1 mg
* Percent Daily Values are based on a 2,000 calorie diet. Your daily value may be higher or lower depending on your calorie needs.
Note
- Make Ahead & Freezing: You can prepare the batter, cover it tightly, and refrigerate for up to 3 days. Let it come to room temperature and bake as directed. Baked whoopie pies freeze well for up to 3 months—wrap individually and thaw overnight in the refrigerator.
- Buttermilk Substitute: Add 1½ tsp vinegar or lemon juice to a measuring cup, then fill with whole milk to reach ⅔ cup. Let sit 5 minutes before using.
- Color Tip: Gel food coloring is preferred—it gives vibrant color without thinning the batter.