These pink velvet waffles started as a small weekend experiment and somehow turned into one of those recipes people ask for again and again. They look playful, almost dramatic on a plate, but the flavor is what keeps them from feeling like a gimmick.
Technically, they are red velvet waffles. I just lean into the pink side of things because it feels softer and more fun, especially for brunch. The cocoa, buttermilk, and vinegar combo gives them that familiar velvet flavor without turning them chocolate-heavy.
I make these for Valentine’s Day, Mother’s Day, and honestly random Sundays when the week needs something cheerful. They also freeze beautifully, which means future me is usually very thankful.
They feel special without being fussy. One bowl, a whisk, a waffle iron, and suddenly breakfast looks like it came from a café.
Ingredients Needed for the Recipe
- All-purpose flour – This gives the waffles structure while still keeping them soft and fluffy.
- Baking powder – Helps the waffles rise and stay light instead of dense.
- Cocoa powder – Adds that subtle red velvet flavor without overpowering the batter.
- Buttermilk – Key to the classic velvet taste and a tender texture.
- White vinegar – Reacts with the buttermilk and cocoa to deepen flavor and softness.
- Eggs – Bind everything together and help create structure.
- Oil – Keeps the waffles moist and prevents dryness.
- Sugar – Adds a gentle sweetness without making them dessert-level sweet.
- Vanilla extract – Rounds out the flavor and adds warmth.
- Pink or red food coloring – Gives the waffles their signature color.
Every ingredient has a purpose here. Nothing feels extra, and nothing can really be skipped without changing the final texture or flavor.
Why These Waffles Work So Well
What I love about this recipe is how balanced it feels. The cocoa is barely there, the tang from the buttermilk is subtle, and the sweetness stays in check.
They are fluffy on the inside with just enough crispness on the outside from the waffle iron. That contrast is everything, especially when syrup hits those pockets.
The pink color adds joy, but it does not distract from the fact that these are genuinely good waffles. That matters more to me than looks.
How to make Pink (Red) Velvet Waffles?

Step 1 – Whisk the Base
Start with a large mixing bowl and whisk together the eggs, oil, and sugar. Take a minute here and really combine them until the mixture looks smooth and slightly glossy.
This step helps trap air early, which makes a difference in how fluffy the waffles turn out.
Step 2 – Add Flavor Builders
Pour in the vanilla extract and vinegar, then whisk again. The smell might be sharp for a second, but it mellows quickly.
This is one of those quiet steps that gives red velvet its signature taste.
Step 3 – Incorporate the Buttermilk
Add the buttermilk and whisk until everything looks pale yellow and evenly mixed. The batter should already feel looser and smoother.
If your buttermilk is cold, that is fine. Just make sure it blends fully.
Step 4 – Add the Color
Drop in the pink or red food coloring and whisk until the color is evenly distributed. I usually stop at a soft pink, but you can go bolder if you want.
The color will deepen slightly as the batter rests.
Step 5 – Mix in Dry Ingredients
Add the flour, baking powder, and cocoa powder to the bowl. Whisk gently until just combined.
Stop as soon as you no longer see dry streaks. Overmixing is the fastest way to ruin waffle texture.
Step 6 – Cook the Waffles
Preheat and lightly grease your waffle iron. Ladle about half a scoop of batter into the center and close the lid.
Cook until the waffle iron signals it is done or for about two minutes. Repeat until all the batter is used.
Tips
- Do not overmix the batter or the waffles will turn chewy.
- Let the waffle iron fully preheat before cooking the first waffle.
- Use room temperature eggs for smoother mixing.
- Grease the waffle iron lightly between batches if needed.
- Keep cooked waffles warm in a low oven if serving a crowd.
Recipe Variations and Serving Ideas
These waffles are great on their own, but they also play well with extras. I like how flexible the base recipe is without losing its identity.
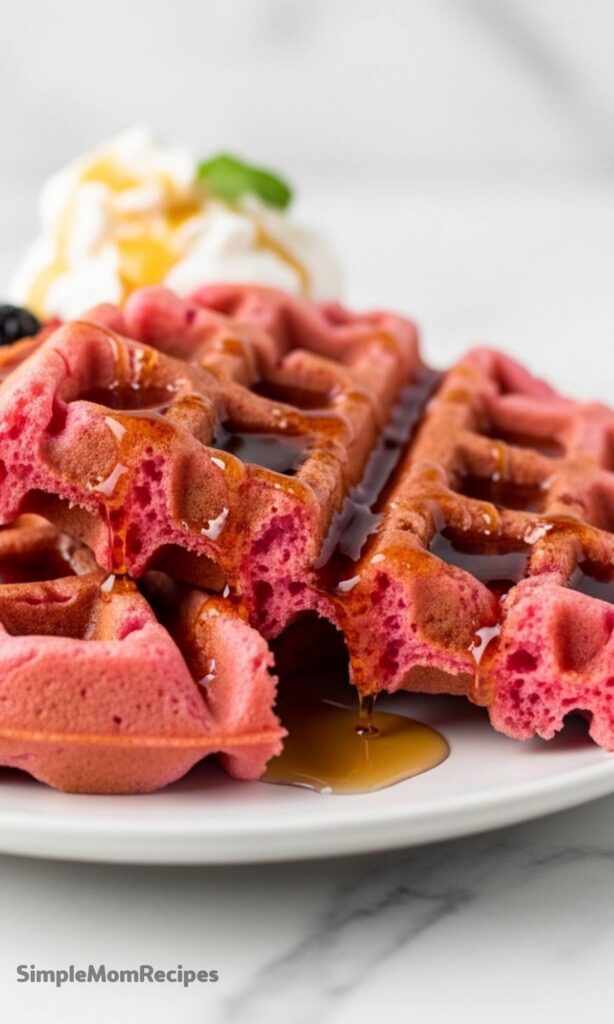
For a classic brunch plate, I keep it simple with syrup and whipped cream. The pink color really pops against white toppings.
If you want something more playful, fresh berries or chocolate chips folded into the batter work beautifully. Sprinkles make them especially fun for kids.
You can also turn this batter into pancakes with a little extra oil added. The flavor stays the same, just softer and less crisp.
Recipe Swaps and Substitutions
This recipe is forgiving, which I appreciate. If you need to adjust for dietary needs, there are a few easy swaps.
Gluten-free all-purpose flour works well, though the texture will be slightly different. I notice they come out a bit softer, which is not a bad thing.
Dairy-free milk like almond or oat milk can be used, but the flavor will change since buttermilk is part of the velvet profile. Dairy-free buttermilk is the best option if you can find it.
Coconut sugar can replace regular sugar in a one-to-one swap. I still prefer cane sugar here, but both work.
Kitchen Equipment and Why It Matters
Waffles are one of those recipes where the tools really matter. A good waffle iron makes all the difference.
I use both a standard waffle iron and a mini one, depending on the mood. Mini waffles are especially great for brunch boards or meal prep.
A kitchen scale is optional but helpful, especially for flour. Measuring accurately keeps the batter consistent every time.
If you do not use a scale, the scoop and level method is your best friend.
How to Store and Freeze These Waffles
These pink velvet waffles store surprisingly well, which makes them great for busy weeks.
Let the waffles cool completely, then store them in an airtight container in the fridge for up to four days.
For freezing, layer them in a freezer-safe bag with parchment paper in between. They keep well for about a month.
Reheat straight from frozen in a toaster or warm oven until crisp again.
Little Ways to Make Them Feel Extra Special
Sometimes I sandwich vanilla ice cream between two waffles and call it dessert. No regrets there.
You can also cut the waffles into quarters and serve them as part of a brunch spread. They always disappear first.
These waffles feel celebratory without needing a reason, which might be my favorite thing about them.
Whether it is a holiday morning or just a slow weekend, pink velvet waffles bring a little joy to the table every time.
Pink Velvet Waffles Recipe
Description
These pink velvet waffles are technically red velvet, but with a playful pink hue instead. Fluffy, flavorful, and utterly delicious, they make the perfect brunch treat for loved ones—or just for yourself! Great for Valentine’s Day, Mother’s Day, or any cozy weekend morning, these waffles also freeze beautifully for easy meal prep.
ingredients
Instructions
- Whisk together the eggs, oil, and sugar until fully combined. Pour in the vanilla and vinegar, and whisk again.
- To the same bowl, pour in the buttermilk and whisk until incorporated and the mix is a pale yellow.
- Add the drops of pink coloring and whisk until the batter becomes a barbie pink. To the bowl, add in the flour, baking powder, and cocoa powder, and whisk until just combined. Do not over-mix.
- Preheat and lightly grease your waffle iron with nonstick spray. Ladle about ½ cup of batter (or half scoop) into the iron.
- Cook until the waffle iron indicator light turns off or for about 2 minutes, until golden and crisp. Repeat with remaining batter.
- Serve warm with maple syrup, whipped cream, or fresh berries.
Nutrition Facts
Servings 4
- Amount Per Serving
- Calories 210kcal
- % Daily Value *
- Total Fat 9g14%
- Saturated Fat 2g10%
- Cholesterol 95mg32%
- Sodium 320mg14%
- Potassium 180mg6%
- Total Carbohydrate 26g9%
- Dietary Fiber 1g4%
- Sugars 6g
- Protein 6g12%
- Calcium 100 mg
- Iron 1 mg
* Percent Daily Values are based on a 2,000 calorie diet. Your daily value may be higher or lower depending on your calorie needs.
Note
- Gluten-free option: Substitute all-purpose flour with Bob's Red Mill Gluten-Free All-Purpose Flour.
- Dairy-free version: Use dairy-free milk + 1 tsp vinegar as a buttermilk substitute if dairy-free buttermilk isn’t available.
- Make it fun: Sandwich ice cream between two waffles for a decadent dessert!
- Storage tip: Freeze cooled waffles in a ziplock bag for up to 1 month. Reheat in a toaster or oven.
