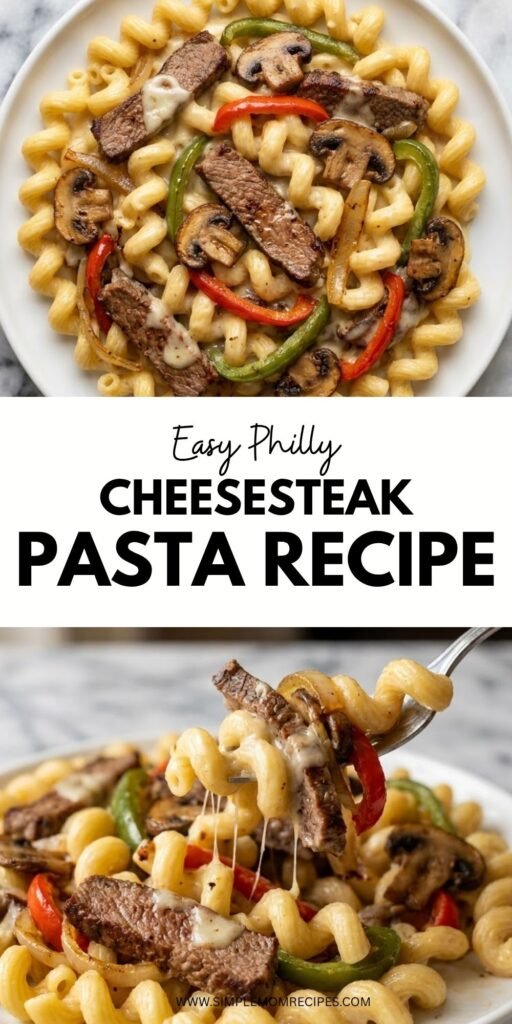
I have a weakness for anything that tastes like a really good Philly cheesesteak. Thin slices of beef, soft peppers and onions, mushrooms, and that salty, melty cheese situation gets me every time. But I don't always want to deal with making sandwiches, and honestly, I don't always have good rolls sitting around when the craving hits.
That's where this Philly cheesesteak pasta comes in for me. I get all those familiar flavors, but everything ends up in one skillet with pasta and a creamy sauce. It's cozy, filling, and feels like the kind of dinner I can put on the table without making my entire kitchen look like I cooked for twenty people.
I also really like that the pasta cooks right in the skillet. The noodles pick up the beefy broth, cream, garlic, and all those little browned bits left behind from the steak. That part makes a bigger difference than I expected the first time I made it.
The Little Things That Make This Pasta Work for Me
I use skirt steak when I have it, although rib eye works too. I slice it very thinly across the grain because thick pieces of steak can feel a little awkward in pasta. One trick I started using is putting the steak in the freezer for about 10 minutes before slicing it. It firms up just enough that I can get much thinner pieces without fighting the knife.
I don't rush the vegetables either. I used to turn the heat way up and try to get everything cooked quickly, but the onions and peppers are so much better when they have time to soften. The mushrooms especially need a little patience. Once they start browning, they bring a deeper savory flavor to the whole skillet.
And then there is the provolone. I like using plenty because this is not the place where I want to be shy with cheese. Some melts into the sauce, while the rest helps make the finished pasta creamy and rich without needing a complicated sauce.
Ingredients I Used for the Recipe
- 2 tablespoons neutral oil, divided: I use this for browning the steak and cooking the vegetables without adding a strong competing flavor.
- 1 pound skirt steak or rib eye: I slice the beef very thinly across the grain so it stays tender and easy to eat with the pasta.
- 1 teaspoon Italian seasoning: I toss this with the steak for a little extra savory flavor.
- Kosher salt, to taste: I use it to season the steak, vegetables, and overall dish.
- Freshly ground black pepper, to taste: I add this with the salt to give the beef a little bite.
- 8 ounces cremini or white mushrooms, sliced: I use these for their earthy flavor and meaty texture.
- 1 medium yellow onion, thinly sliced: I like the sweetness the onion develops as it softens in the skillet.
- 1 green bell pepper, thinly sliced: This gives the pasta that classic cheesesteak flavor and a little freshness.
- 1 red bell pepper, thinly sliced: I like adding a red pepper alongside the green for extra sweetness and color.
- 4 garlic cloves, minced: Garlic goes in near the end of cooking the peppers so it stays fragrant instead of burning.
- 1 3/4 cups low-sodium beef broth: I use this as the flavorful liquid that cooks the pasta and ties everything together.
- 3/4 cup heavy cream: This makes the broth rich and creamy as the pasta cooks.
- 8 ounces cavatappi: I like this shape because the twists catch the creamy sauce and little pieces of beef and vegetables.
- 6 ounces shredded provolone: I stir this in at the end for that unmistakable cheesesteak-style cheesy finish.
How to Make Philly Cheesesteak Pasta
Step 1 - Slice and Season the Steak
I start by getting the steak as thin as I can. If it feels difficult to slice, I put it in the freezer for about 10 minutes while I prep the other ingredients. That small trick has saved me from some very uneven steak slices.
Once it's sliced, I toss the beef with the Italian seasoning and season it with salt and pepper. I want the seasoning to be simple because the beef, vegetables, broth, cream, and provolone are already doing a lot of work.
Step 2 - Quickly Brown the Beef
I heat 1 tablespoon of oil in a large skillet over medium-high heat. Once the pan is hot, I spread the steak out in a single layer and leave it alone for about 2 minutes so the underside can brown.
Then I stir it and let it cook for another 1 to 2 minutes, just until the beef is no longer pink. I don't keep cooking it because it will go back into the skillet later. I transfer the browned steak to a bowl and move on.
Step 3 - Give the Mushrooms Time to Brown
I lower the heat to medium and put the sliced mushrooms into the same skillet. I add a small pinch of salt and cook them for about 8 to 10 minutes, stirring now and then.
This is one spot where I used to get impatient. The mushrooms release moisture first, so they can look like they're just sitting there doing nothing. After a while, though, they start browning and smelling much better. I transfer them to the bowl with the steak.
Step 4 - Soften the Peppers and Onion
I add the remaining tablespoon of oil to the skillet, then add the sliced onion and both bell peppers. I season them lightly with salt and cook them over medium heat for about 8 to 10 minutes, stirring often.
I want the peppers softened but not completely falling apart. When they're close, I add the minced garlic and cook it for about a minute. The garlic smells amazing at this point, and I know I'm getting close to the good part.
Step 5 - Build the Creamy Pasta
I increase the heat to medium-high and pour the beef broth into the skillet. I scrape the bottom as the broth goes in because all those browned bits are worth keeping. They add so much flavor to the pasta.
I stir in the heavy cream and bring everything to a simmer. Then I add the cavatappi in a single layer and let it simmer again. I cover the skillet and cook the pasta for about 10 to 12 minutes, stirring occasionally so nothing sticks together.
I start checking around the 10-minute mark. I want the pasta cooked through but still with a little bite, and I want the sauce to have thickened enough to cling to it. If the skillet looks dry before the pasta is ready, I keep a close eye on it rather than letting it cook unattended.
Step 6 - Bring Everything Back Together
Once the pasta is ready, I stir in the shredded provolone. This is where the skillet suddenly starts looking like the meal I had in my head. The cheese melts into the creamy sauce and makes everything thicker and richer.
Then I return the steak, mushrooms, peppers, and onions to the skillet. I toss everything together until the beef and vegetables are coated in the sauce. I usually give it a minute to settle before serving because the sauce thickens a little more as it sits.
What I Learned After Making It
The biggest thing for me is not overcrowding the steak. When I first made a skillet like this, I was tempted to dump all the beef in and stir it constantly. That gave me more of a steamed texture than the browned edges I wanted. Giving the steak room and leaving it alone for those first couple minutes makes a noticeable difference.
I also don't treat the cooking times as an absolute rule. Pasta can cook differently depending on the brand and shape, and the skillet I'm using can change how quickly the liquid reduces. I start checking the pasta before the full cooking time is up instead of blindly waiting for a timer.
If I want the sauce extra creamy, I make sure I don't let the pasta sit uncovered for too long after cooking. The sauce thickens quickly. I like it creamy enough to coat the noodles, but not so thick that it turns into a heavy paste.
For me, the cavatappi is especially good here. The little curves grab the sauce, and I get bits of steak, mushroom, and pepper in almost every forkful. I wouldn't say another pasta shape won't work, but I really like having those twists involved.
Tips
- Slice the steak very thinly: I chill it in the freezer for about 10 minutes first because firmer meat is much easier to slice evenly.
- Cut across the grain: I pay attention to the direction of the muscle fibers because it helps keep the steak easier to chew.
- Don't constantly stir the steak: I let it sit against the hot skillet long enough to brown before stirring.
- Let the mushrooms brown: I give them the full cooking time they need instead of rushing them with the peppers.
- Scrape the skillet: When I add the beef broth, I scrape up the browned bits from the bottom. I don't want to leave that flavor behind.
- Watch the pasta: I stir it occasionally while it simmers and start checking it around 10 minutes so it doesn't go too soft.
- Add the cheese at the end: I wait until the pasta is cooked before stirring in the provolone so it melts smoothly into the sauce.
- Don't walk away after adding the pasta: I learned this one the slightly annoying way. The liquid can disappear faster than expected, especially in a wide skillet.
- Serve it hot: I like this pasta right after the cheese melts because that's when the sauce is at its creamiest.
A Cozy Dinner I Can Actually Get Excited About
I like recipes that take something I already love and make it easier to turn into dinner. That's really what this Philly cheesesteak pasta does for me. I don't need sandwich rolls, and I don't have to build individual sandwiches one at a time. I can brown the steak, cook the vegetables, simmer the pasta, and finish everything in the same skillet.
It also feels like more than just pasta with some steak thrown in. The beefy broth, softened peppers and onions, mushrooms, cream, and provolone all become part of the same sauce. Every time I make it, I end up scraping the skillet for that last cheesy bite.
And yes, it's a rich dinner. I don't try to pretend otherwise. But sometimes that's exactly what I want at the end of a long day. A warm skillet full of creamy pasta and tender beef is pretty hard for me to argue with.
If I'm making this on a busy night, I do as much slicing and chopping as possible before I turn on the stove. Once the cooking starts, everything moves pretty quickly. Having the steak, peppers, onion, mushrooms, and garlic ready to go keeps me from scrambling around the kitchen while something is already cooking.
That little bit of prep is probably my favorite part of making this recipe now. I know what comes next, the whole thing stays in one pan, and dinner ends up tasting like the kind of comfort food I was craving in the first place.