There's something about peanut butter fudge that feels like a warm, edible hug. It’s that perfect crossroads where creamy meets crumbly, and salty flirts shamelessly with sweet. Maybe it reminds you of a holiday table, or perhaps a simple, deeply satisfying treat you can whip up on a quiet afternoon.
Whatever the memory, this recipe is here to capture that feeling, without any fuss. No candy thermometer, no complicated stages—just pure, uncomplicated delight.
I’m Kelsey, and after testing this more times than I’d care to admit, I’ve landed on a version that’s gloriously foolproof. The goal was simple: create a fudge that’s rich, smooth, and sets up perfectly every single time.
This is it. It’s the kind of recipe that makes you look like a confectionery genius, even if you’ve never made candy before. Let’s get into it.
Why This Fudge Just Works
The magic here is in the simplicity and the ingredients playing their parts just right. Traditional fudge can be finicky, requiring precise temperatures and a lot of stirring.
This method sidesteps all that by using powdered sugar as the key to a perfect set. It dissolves beautifully into the warm peanut butter and butter, creating a mixture that firms up into a sliceable, dreamy texture as it cools. You’re essentially creating a no-bake candy that comes together in one saucepan.
The result is deeply peanut-buttery, luxuriously creamy, and has that classic melt-in-your-mouth quality. A reader, Maria, told me she made it on Christmas Day and was amazed at how quick it was.
She even melted chocolate on top for a Reese’s-inspired finish. That’s the beauty of it—it’s a fantastic base for creativity, or just perfect all on its own.
Ingredients Needed for the Recipe
Gathering your ingredients is the first step to fudge success. Each one has a specific job, and using the right types makes all the difference. Here’s what you’ll need:
Creamy Peanut Butter (1 cup): This is the star, providing the dominant flavor and creamy foundation. Use a shelf-stable, “no-stir” brand like Jif or Skippy for the ideal texture and consistency.
Unsalted Butter (1 cup): It adds richness, helps the fudge set, and creates that sublime melt-on-your-tongue feel. Using unsalted lets you control the salt level perfectly.
Powdered Sugar (3 cups, sifted): This is the workhorse that thickens and sets the fudge without cooking to a specific temperature. Sifting is crucial for a perfectly smooth, lump-free result.
Vanilla Extract (2 teaspoons): It’s the supporting actor that rounds out the flavors, adding a layer of warm, aromatic complexity that makes the peanut butter taste even better.
The Right Tools for the Job
You don’t need much equipment, but having the right pan and a good saucepan sets you up for an easy cleanup. An 8-inch square baking pan is ideal for getting the classic, thick fudge squares.
Lining it with parchment paper or foil (with a bit of overhang) is a non-negotiable step for easy removal. You’ll also need a medium-sized saucepan for melting everything together, a sturdy spatula for stirring, and a knife for cutting.
That’s truly it. No mixers, no special gadgets. Just a few everyday kitchen items waiting to make something extraordinary.
How to make Peanut Butter Fudge?
The process is straightforward, but each step builds towards that perfect final texture. Follow along, and you’ll have a pan of fudge setting in no time.
Make this recipe yours—just save it to your Pinterest board!"
Step 1 - Prep Your Pan
Lightly butter an 8-inch square baking dish, then line it with parchment paper or foil. Leaving some overhang on the sides is your future self’s best friend—it creates handy “handles” to lift the whole slab of fudge out later. This simple trick guarantees clean, unmangled squares.
Step 2 - Melt the Base
In your medium saucepan, combine the full cup of peanut butter and the cup of unsalted butter. Place it over medium heat. Cook this, stirring occasionally, until the mixture comes to a gentle boil and everything is completely smooth and melted together. You’ll see it transform into a single, glorious, fragrant liquid.
Step 3 - Incorporate the Sugar
Remove the pan from the heat immediately. Now, stir in the sifted powdered sugar and the vanilla extract. Keep stirring until the mixture is utterly silky and no lumps of sugar remain.
This is where your arm might get a little workout, but it’s worth it. For that iconic salty-sweet balance, you can add a pinch (about ¼ teaspoon) of salt here, too.
Step 4 - Set and Slice
Pour the thick, velvety mixture into your prepared pan. Use a spatula to spread it into an even layer. Now, let it cool at room temperature for several hours, or speed things up by placing it in the refrigerator for about an hour.
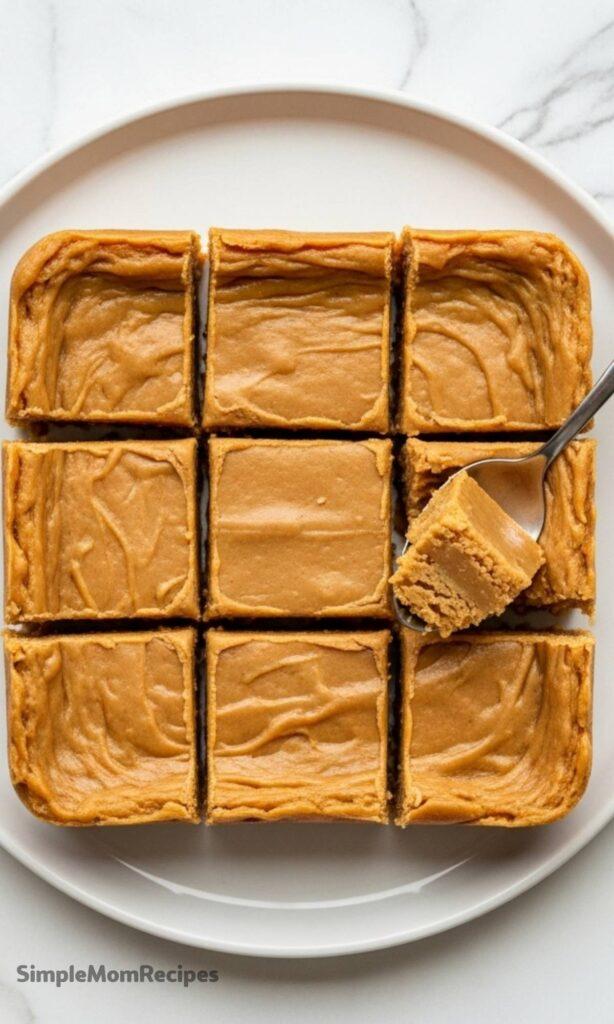
Once it’s completely firm, lift it out using the parchment paper and place it on a cutting board. Cut into 1-inch squares for the perfect bite-sized treat.
Easy Substitutions & Variations
This recipe is wonderfully adaptable. Once you’ve mastered the basic version, feel free to play around and make it your own.
Nut Butter Swap: Try using almond butter or cashew butter for a different flavor profile. Just ensure it’s the “no-stir” kind for the right consistency.
Make It Vegan: Use a high-quality vegan butter stick and double-check that your peanut butter and powdered sugar are vegan-friendly.
Mix-Ins Galore: After removing the pan from the heat, fold in a handful of mini chocolate chips, chopped salted peanuts, or even crushed pretzels for a sweet-and-salty crunch.
Chocolate Swirl or Dip: For a marbled effect, make a batch of simple chocolate fudge and swirl the two together in the pan. Or, dip the tops of your cut squares into melted chocolate for an elegant, candy-shop finish.
Tips
A few small pieces of advice can elevate your fudge from good to absolutely exceptional. Keep these in mind.
For the cleanest cuts, dip your knife in hot water and wipe it dry between each slice. This glides through the fudge like magic, preventing cracks and crumbles.
While the fridge speeds up setting, the fudge’s texture is ultimately creamier at room temperature. If you chill it, let the squares sit out for 15-20 minutes before serving.
If you only have a 9-inch square pan, that’s fine. Your fudge will be slightly thinner, so consider cutting slightly larger squares, about 1.5 inches each.
Always sift your powdered sugar, even if it looks lump-free. It’s the single best guarantee against a gritty texture in your finished fudge.
Storing & Gifting Your Creation
Proper storage keeps your fudge tasting fresh and makes it gift-ready. Store the squares in an airtight container at room temperature for up to a week, keeping them in a cool, dry spot. For longer storage, they’ll keep in the refrigerator for up to a month. Let chilled fudge come closer to room temperature before serving for the best mouthfeel.
This fantastic keeping ability makes it an ideal homemade gift. Stack a few squares in a small box or tin, separate layers with parchment paper, or wrap individual pieces for a delightful, personal treat for friends, neighbors, or teachers. It’s a sweet gesture that always feels special.
Troubleshooting Common Questions
Sometimes things don’t go exactly as planned, but most issues have a simple fix. If your fudge turns out grainy, the culprit is usually natural or crunchy peanut butter, or powdered sugar that wasn’t sifted or fully incorporated.
Stick to smooth, no-stir peanut butter and stir that sugar in thoroughly. If your fudge is too soft to cut, it likely just needs more time to set. The fridge is your ally here—an hour should firm it up nicely.
And yes, you can freeze it! Wrap the whole block or individual squares tightly in plastic wrap, then place them in a freezer bag for up to three months. Thaw in the fridge overnight. Remember, this is supposed to be fun and rewarding. Even the “mistakes” are usually still delicious.
If you love the creamy, melt-in-your-mouth texture of old-fashioned fudge but want something a bit more foolproof, this salty-sweet peanut butter fudge recipe is it. Made with just four simple ingredients—creamy peanut butter, butter, vanilla, and powdered sugar—this fudge comes together in minutes with no candy thermometer required.
ingredients
1cup creamy peanut butter (no-stir variety like Jif or Skippy (250g))
1cup unsalted butter (226g)
2tsp vanilla extract
3cups powdered sugar (sifted (360g))
Instructions
1
Lightly grease an 8-inch square baking dish with butter and line with parchment paper or aluminum foil, leaving overhang on the sides for easy removal.
2
In a medium saucepan, combine the peanut butter and unsalted butter. Place over medium heat and cook, stirring occasionally, until the mixture comes to a gentle boil and is smooth and fully melted.
3
Remove the pan from heat and stir in the sifted powdered sugar and vanilla extract until smooth and no lumps remain. (Optional: add ¼ teaspoon of salt for a salted peanut butter flavor.)
4
Pour the mixture into the prepared pan and spread evenly with a spatula.
5
Let cool at room temperature for about 3 hours, or refrigerate for 1 hour to speed up setting.
6
Once set, lift the fudge out using the parchment overhang. Cut into 1-inch squares using a hot knife for clean edges.
7
Store in an airtight container at room temperature for up to 1 week or in the refrigerator for up to 1 month.
Nutrition Facts
Servings 36
Amount Per Serving
Calories120kcal
% Daily Value *
Total Fat8gg13%
Saturated Fat3.5gg18%
Trans Fat0gg
Cholesterol15mgmg5%
Sodium85mgmg4%
Potassium60mgmg2%
Total Carbohydrate12gg4%
Dietary Fiber0gg0%
Sugars11gg
Protein2gg4%
Calcium 10 mg
* Percent Daily Values are based on a 2,000 calorie diet. Your daily value may be higher or lower depending on your calorie needs.
Note
Use a 9-inch pan if you don’t have an 8-inch—just cut slightly larger squares to compensate for thinner fudge.
Natural peanut butter is not recommended—it causes a dry, crumbly texture due to oil separation.
Get creative! Stir in mini chocolate chips, chopped nuts, or crushed pretzels—or dip squares in melted chocolate for a peanut butter cup effect.
For gifting: Wrap individual pieces in parchment paper for a sweet homemade present!
I’m a London-based food writer, recipe developer, and home cook who has been passionate about cooking for over 15 years. What started as a way to recreate my mother’s traditional dishes turned into a lifelong love for experimenting with flavors, writing about food, and helping others feel more confident in the kitchen.