
I don’t cook like a pro. I don’t have a 10-year-old knife collection or a marble countertop. But I do have a love for peaches. And when they’re in season? I go full chaos mode.
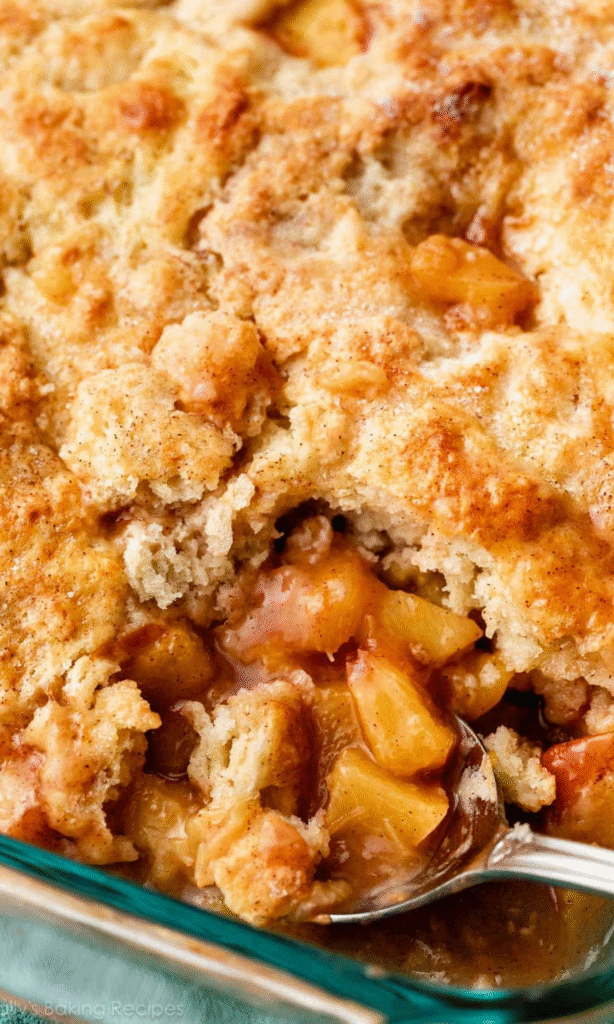
This cobbler? It’s not fancy. It’s not Instagrammable. But it’s warm. It’s sweet. It’s got that crackle sound when you cut into it. And it makes your kitchen smell like summer died and came back as dessert.
I’ve made this a dozen times. Some days it’s perfect. Some days the topping falls apart. But honestly? Even then, it still tastes good. Like, really good. So if you’re nervous — relax. You’ll be fine.
What You Need (And Why It Matters)
Let’s break it down. Not just “what” but why. Because I’m weird like that.
For the Peach Filling:
- 3.5–4 lbs fresh peaches – Seriously, don’t skip this. Frozen? Maybe. Canned? Nah. They’re too soft, like sad fruit. Fresh peaches = juicy, sweet, real.
- Brown sugar (1/4 cup) – Gives that deep, caramel-like flavor. Dark brown is better. Light is okay. Just don’t use white sugar. It won’t taste right.
- Cornstarch (1 Tbsp) – This is the glue. Without it, your cobbler turns into a soup. It thickens the juices so they stay put.
- Lemon juice (1 Tbsp) – A little zing. Keeps the peaches from turning gray. Also adds brightness. Trust me.
- Vanilla extract (1 tsp) – Simple. But magic. Makes everything taste richer.
- Cinnamon, nutmeg, ginger, salt – Tiny amounts. But they do the heavy lifting. Like, they make it feel cozy. Salt? Yes. It brings out the sweetness. Weird, right?
For the Biscuit Topping:
- All-purpose flour (2 cups) – Spoons and levels. Don’t pack it. Messy flour ruins things.
- Granulated sugar (1/2 cup) – Sweetness on top. Helps it brown.
- Baking powder & soda (1.5 tsp + 1/4 tsp) – These are the lifters. No lift = flat biscuit. No fun.
- Salt (1/2 tsp) – Again. Salt makes flavors pop. Don’t skip it.
- Cold butter (1/2 cup, cubed) – Cold. Always cold. Warm butter = greasy mess. Use a pastry cutter. Or forks. Or your fingers. Just don’t melt it.
- Buttermilk (1/2 cup, cold) – Key ingredient. Gives the topping that tangy, tender crumb. If you don’t have it? DIY it. Mix milk + vinegar. Let sit 5 mins. Done.
- Egg wash (1 egg + 1 Tbsp milk) – For shine. Golden crust. Looks fancy. But you can skip it. Brush with buttermilk instead. Still tasty.
- Optional cinnamon-sugar mix – Sprinkle on top. Gives that sweet crunch. Not needed. But nice.
How To Peel, Slice, And Pit Peaches (Without Losing Your Mind)
Okay, I know. Peeling peaches feels like a chore. But it’s not hard.
- Blanch them. Boil water. Drop peaches in for 30 seconds. Then ice bath. Boom. Skin slips off.
- Cut in half. Use a knife. Twist. Pop out the pit. Easy.
- Dice. Into 1-inch chunks. Not tiny. Not huge. Just… chunky. Like bite-sized joy.
Pro tip: Use a sharp knife. Dull blade = mush. And frustration.
How to Make This Peach Cobbler (Step-by-Step, With Feelings)
tep 1 – Prep the Pan & Preheat Oven
Grab a 9×13 pan. Grease it lightly. Doesn’t need much. Just enough so it doesn’t stick. Turn oven to 350°F (177°C). Let it heat up while you work. Patience is part of the recipe.
Step 2 – Mix the Peach Filling (It’s Almost Done)
In a big bowl, dump all the peach filling ingredients. Stir. Mix. Get messy. Spread it into the pan. Smooth it out. Don’t worry about perfection. Pop it in the oven for 10 minutes. That’s it. Just 10. Then take it out. Set aside. Oven stays on.
Why? Because the peaches need to start cooking before the biscuit goes on. Otherwise, the bottom gets soggy. Or worse — undercooked.
Step 3 – Make the Biscuit Dough (No Pressure Here)
Whisk flour, sugar, baking powder, baking soda, salt together. Dry mix. Done. Now add cold butter. Cut it in with a pastry cutter. Or two forks. Or rub it in with your fingers. Goal: Crumbs the size of peas. Not powdery. Not clumpy. Pea-sized. Then pour in cold buttermilk.
Gently stir. Just until it comes together. If it’s dry? Add one more tbsp buttermilk. But only one. Don’t drown it.
Dough should be slightly sticky. That’s fine. Don’t overwork it. Ever.
Step 4 – Assemble the Cobbler (Yes, It’s Okay If It’s Lopsided)
Take handfuls of dough. Flatten them with your hands. Make patties. Place them on top of the warm peach filling. Cover most of it. Leave a few spots open. You don’t need to cover every inch. In fact, leaving gaps lets steam escape. Prevents sogginess.
Brush with egg wash. Optional cinnamon-sugar sprinkle? Go for it. It looks pretty. And tastes amazing.
Step 5 – Bake It (The Wait Is Real)
Bake for 40–50 minutes. Until the top is golden brown. And the filling is bubbling around the edges. Stick a toothpick in the biscuit. If it comes out clean? Done.
If it’s wet? Bake 5 more minutes. Don’t rush it. Overbaked? Slightly dry. Underbaked? Soggy. Balance.
Don’t Overwork the Biscuit Topping (Seriously, Stop!)
I see it. People kneading the dough. Rolling it. Smoothing it.
No. Please. Stop.
The beauty of this cobbler is in the texture. Flaky. Crumbly. Rustic.
Overworking = tough biscuit. Like eating cardboard.
Just handle it once. Twice max. Then let it bake.
Tips That Actually Help (Not Just “Use Fresh Fruit”)
- Use ripe peaches. Not rock-hard. Not mushy. Ripe = sweet.
- Don’t peel if you’re lazy. I’ve done it. It’s fine. Just strain the filling after baking. But peeling is better.
- Add blueberries? Yes. Equal parts peaches and blueberries. Magic combo.
- Make individual ones? Sure. Use ramekins. But same steps. Just smaller.
- Serve warm. With vanilla ice cream. Or whipped cream. Or both.
- Leftovers? Cool. Cover. Refrigerate. Eat within 5 days. Reheat in oven. Not microwave. Microwaves ruin texture.
What to Do With Leftovers? (Because Yes, There Are Leftovers)
- First, accept it. You made too much. Good.
- Refrigerator is your friend. Keep it covered.
- Eat it cold? Possible. But not ideal.
- Warm it in the oven at 350°F for 15–20 minutes. Cover with foil. Keeps it from drying out.
- Or eat it straight from the fridge. Like a weird peach sandwich. No judgment.
Bonus: Freeze it. Yes, you can.
But don’t freeze the baked cobbler with the topping on. It gets soggy. Freeze the filling alone. Thaw. Add cornstarch. Then bake. Or freeze the whole thing. Thaw overnight. Warm. Done.


Peach Cobbler Recipe
Description
This Fresh Peach Cobbler is a warm, comforting bake that’s lightly spiced and perfectly sweet—best enjoyed with a scoop of vanilla ice cream. The real magic? That flaky, buttery biscuit crust kissed with a cinnamon-sugar crunch.
Ingredients
For the Peach Filling:
For the Biscuit Topping:
For Egg Wash + Topping (Optional):
Instructions
-
Preheat oven to 350°F (177°C) and lightly grease a 9×13-inch pan.
-
In a large bowl, toss peaches with brown sugar, cornstarch, lemon juice, vanilla, cinnamon, nutmeg, ginger, and salt.
-
Spread evenly into prepared baking dish.
-
Bake for 10 minutes, then remove and set aside (leave oven on).
-
In a bowl, whisk flour, sugar, baking powder, baking soda, and salt.
-
Cut in cold butter with a pastry cutter or forks until mixture resembles coarse crumbs.
-
Stir in buttermilk until dough comes together (add 1 Tbsp extra if dry).
-
Flatten dough with hands into patties. Place over peach filling to mostly cover.
-
Brush with egg wash and sprinkle cinnamon sugar (optional).
-
Bake 40–50 minutes until topping is golden brown and filling is bubbly.
-
Insert toothpick into biscuit topping to test for doneness—it should come out clean.
-
Let cool for 5–10 minutes before serving. Serve warm with vanilla ice cream or whipped cream.
Nutrition Facts
Servings 12
- Amount Per Serving
- Calories 310kcal
- % Daily Value *
- Total Fat 13g20%
- Cholesterol 40mg14%
- Sodium 160mg7%
- Total Carbohydrate 45g15%
- Dietary Fiber 2g8%
- Sugars 26g
- Protein 3g6%
* Percent Daily Values are based on a 2,000 calorie diet. Your daily value may be higher or lower depending on your calorie needs.
Note
- Filling only can be frozen for up to 3 months. Add 1 tsp cornstarch before baking.
- Fully baked cobbler can also be frozen up to 3 months and reheated.
- Avoid assembling the cobbler ahead of time, as the biscuit dough rises best when baked fresh.
- Make DIY buttermilk: Mix 1 tsp lemon juice or vinegar with cold milk to reach 1/2 cup. Let sit 5 mins.
- You can mix in or replace some peaches with blueberries, cherries, nectarines, or plums. Just keep total volume ~10 cups.
- You can brush with just buttermilk. It won’t brown quite as much but still bakes beautifully.
- Bake in small ramekins for mini cobblers. Reduce bake time slightly and place ramekins on a tray.