When time I tried it, I honestly didn’t get the hype. It just looked like a big baked potato situation. But then I had a really good one at a Seder, the kind with that deep golden crust and soft, almost fluffy center, and something clicked.
After that, I started making it myself every Passover. Not perfectly at first. I burned the bottom once. Another time it came out weirdly soggy. But now I’ve got a version I trust, and yeah, I kind of look forward to it more than I should.
What I love most is how simple it is. No fancy ingredients, no complicated steps. It’s just potatoes, eggs, onions, and a little technique that makes all the difference.
Ingredients I Used for the Recipe
- 5 pounds russet potatoes (about 10 medium) – these are the base, they give that classic hearty texture
- 2 large onions – for sweetness and depth, don’t skip these
- 6 eggs – helps bind everything together and gives structure
- 2 teaspoons salt – brings out all the flavor
- 1/2 teaspoon black pepper – just enough to balance the richness
- 6 tablespoons potato starch – this is what makes the inside light instead of dense
- 1/4 cup schmaltz or olive oil, divided – schmaltz adds incredible flavor, but olive oil works great too
How to make Passover Potato Kugel?
Step 1 – Heat the pan first
I used to skip this step and honestly, that was a mistake. I put my baking dish in the oven while it preheats to 400°F. A hot dish is what gives you that crispy crust right from the start.
Step 2 – Peel and grate the potatoes
I peel everything and then grate the potatoes into thick shreds. I’ve done it by hand and with a food processor. The processor wins every time unless I’m in a weird mood and want the extra work.
Step 3 – Soak the potato shreds
I dump the grated potatoes into a big bowl of cold water and let them sit for a few minutes. This pulls out some of the starch and keeps them from turning gray.
Step 4 – Grate the onions
While the potatoes are soaking, I grate the onions. This part always makes me tear up, even after all these years. I just accept it now.
Step 5 – Whisk the eggs
In another bowl, I whisk the eggs with salt and pepper until they look a little frothy. Nothing fancy, just enough to mix everything well.
Step 6 – Drain and squeeze the potatoes
This step matters more than it seems. I drain the potatoes and then press them hard to remove as much liquid as possible. If you leave too much water, the kugel turns heavy instead of fluffy.
Step 7 – Mix everything together
I combine the potatoes, onions, eggs, and potato starch in a big bowl. Then I just use my hands to mix it. It feels messy, but it works better than a spoon.
Step 8 – Prep the hot pan
I carefully take the hot dish out of the oven and add about 3 tablespoons of the fat. It should sizzle a little. Then I spread it around quickly so nothing sticks.
Step 9 – Add the mixture
I spread the potato mixture into the pan right away. That sizzling sound is exactly what I want. I smooth the top and drizzle the remaining fat over it.
Step 10 – Bake until golden
I bake it uncovered for about 60 to 70 minutes. I keep an eye on the top. If it browns too fast, I loosely cover it. If it’s not brown enough at the end, I give it a quick broil.
I let it sit for about 5 to 10 minutes before slicing. Cutting it too soon can make it fall apart, and I’ve learned that the hard way.
A few things I learned the hard way
I used to think kugel was forgiving, like you could just throw everything together and it would work. Not exactly. Small details really matter here.
The biggest one for me was moisture. The first time I didn’t squeeze the potatoes enough, it came out kind of wet and dense. Still edible, but not something I wanted to serve again.
Another thing is the fat. I tried making it with barely any oil once, thinking I’d make it lighter. It stuck to the pan and the crust just wasn’t there. That crisp layer is half the reason I make this dish.
Tips
Getting that crispy top just right
Don’t be afraid of high heat. That initial blast at 400°F really helps. And if needed, a quick broil at the end evens out the color.
Choosing between schmaltz and oil
If I’m going traditional, I go with schmaltz. It adds a rich flavor that’s hard to beat. But when I want something lighter or vegetarian, olive oil works perfectly fine.
Making it ahead
I’ve made this a few hours ahead and reheated it, and it holds up surprisingly well. Just don’t expect the crust to be quite as crisp as fresh out of the oven.
Serving it the way I like
I usually serve it hot, straight from the oven, alongside whatever else is on the table. But I’ll admit, I’ve eaten leftovers cold the next day and didn’t regret it at all.
What keeps me coming back to this every year
There’s something about this dish that feels steady. It doesn’t try to be fancy. It just shows up and does its job really well.
I like that it feeds a crowd without stress. I like that it smells amazing while it bakes. And I really like that moment when you cut into it and see that contrast between the crisp edges and the soft inside.
Every year I tweak something small, but the heart of it stays the same. Potatoes, onions, eggs, a hot pan, and a little patience. That’s really all it takes.

Passover Potato Kugel Recipe
Description
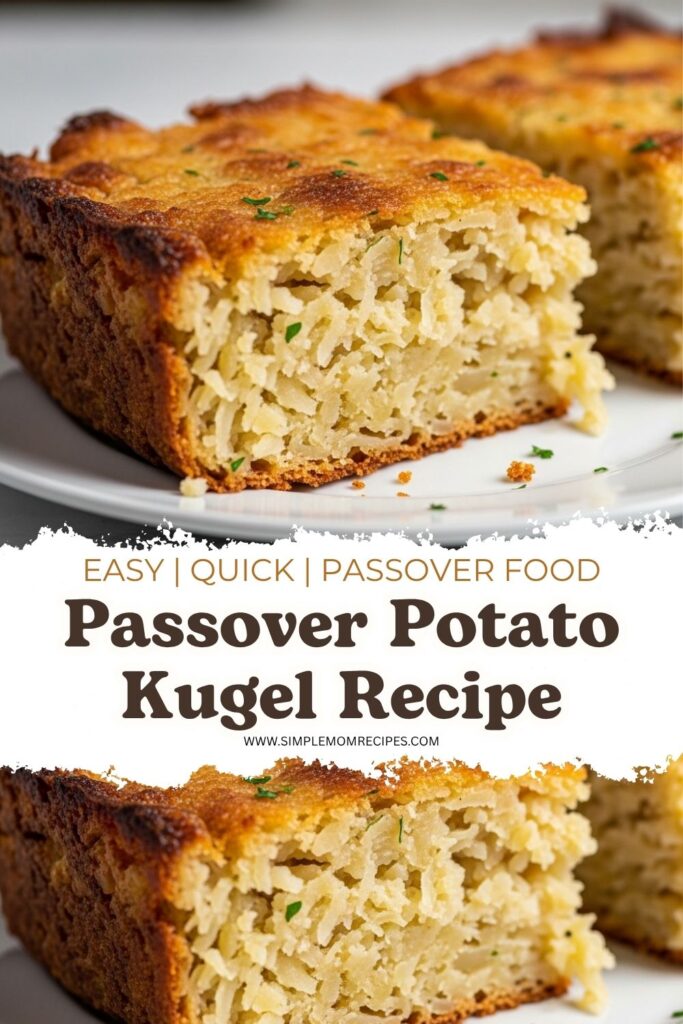
This Passover Potato Kugel is a traditional Jewish baked pudding that's crispy and golden on the outside while soft, fluffy, and tender inside. Made with simple ingredients—potatoes, eggs, onions, and potato starch—it's like one enormous latke perfect for your Seder table. Kosher for Passover and easily adaptable for vegetarian diets using olive oil instead of schmaltz.
ingredients
Instructions
- Place a 9x13 inch baking dish in the oven and preheat oven to 400°F (200°C), letting the dish heat up inside.
- Peel the potatoes, then use a food processor or hand grater to grate them into large shreds.
- Place the potato shreds in a large mixing bowl and cover with cold water. Let the shreds sit for a few minutes.
- Meanwhile, peel and shred the two large onions in the food processor or with a hand grater. Reserve.
- In a medium mixing bowl, whisk together the eggs, salt and pepper until fluffy.
- Drain the potato shreds in a colander, pushing down firmly on top of the shreds with your hands to push out the excess liquid.
- Place grated potatoes in a large bowl. Add the seasoned eggs, grated onions and potato starch to the bowl. Use your hands to mix all ingredients together until well combined.
- Take the preheated baking dish out of the oven. Quickly pour in 3 tablespoons schmaltz or olive oil, then use a pastry brush to carefully spread the fat around the bottom and sides of the hot dish. The hot dish helps form a beautiful brown and crisp crust.Be careful not to burn yourself!
- Carefully and quickly spread the potato mixture into an even layer in the baking dish (it should sizzle!), then drizzle remaining 1 tablespoon of melted schmaltz or olive oil across the top.
- Bake uncovered at 400°F (200°C) for 60-70 minutes until the top is nicely browned all across. If browning too fast before the center is cooked, cover loosely with foil. For extra browning, place 6 inches below the broiler for 1-2 minutes at the end.
- Let the kugel rest for 5-10 minutes before slicing and serving. Best served hot directly from the oven.
Nutrition Facts
Servings 8
- Amount Per Serving
- Calories 260kcal
- % Daily Value *
- Total Fat 10gg16%
- Saturated Fat 3gg15%
- Trans Fat 0gg
- Cholesterol 140mgmg47%
- Sodium 650mgmg28%
- Potassium 620mgmg18%
- Total Carbohydrate 35gg12%
- Dietary Fiber 4gg16%
- Sugars 3gg
- Protein 9gg18%
- Calcium 4% mg
- Iron 10% mg
* Percent Daily Values are based on a 2,000 calorie diet. Your daily value may be higher or lower depending on your calorie needs.
Note
- For extra crispiness: Preheating the baking dish and using schmaltz creates an irresistibly golden, crunchy crust.
- Vegetarian option: Substitute olive oil for schmaltz to keep this dish meat-free while still achieving great flavor.
- Make ahead tip: Assemble the kugel up to 4 hours ahead and refrigerate; bring to room temperature before baking.
- Leftovers: Store covered in refrigerator for up to 3 days; reheat slices in a 350°F oven to restore crispiness.
- Gluten-free: This recipe uses potato starch, making it naturally gluten-free and perfect for Passover.
