Let’s talk about the ultimate snack hack, the one that feels like a secret weapon against hangry afternoons. We’re making Easy No Bake Protein Balls, and they’re exactly as wonderful as they sound.
I’m Kelsey, and I whip these up nearly every Sunday. They transform my week from chaotic to calmly prepared, one delicious bite at a time.
Why This Recipe is a Game Changer
Now, you might have seen recipes that require a food processor or sticky dates. Not here, friend. This is a blissfully simple, mix-by-hand affair.
The best part? One master formula opens the door to four completely different flavors. It’s like getting a whole snack catalogue from a single bowl.
Ingredients Needed for the Recipe
Each flavor starts with a magical base. These ingredients work together to create a dough that’s sturdy, yet satisfyingly chewy.
- Old-Fashioned Rolled Oats: The hearty foundation that gives these bites a lovely, substantial texture you’ll love.
- Drippy Nut or Seed Butter: This is your glue and your richness; a runny, natural butter binds everything together beautifully.
- Honey or Maple Syrup: A touch of natural sweetness that balances the flavors and helps the mixture hold its shape.
- Protein Powder: The star of the show, boosting staying power and adding a subtle flavor backdrop, whether chocolate or vanilla.
- Flavorful Mix-Ins: This is where you get creative with chocolate chips, coconut, raisins, or spices for your personal twist.
How to make Easy No Bake Protein Balls?
The process is wonderfully straightforward, truly. Just grab a big bowl and a sturdy spoon, and let’s begin.
Step 1 – Combine Your Dry Ingredients
First, dump your rolled oats and protein powder right into the mixing bowl. Go ahead and add any dry spices here, too, like cinnamon.
Give these a quick stir with your spoon, just to get them acquainted before the wet ingredients arrive.
Step 2 – Add the Wet Ingredients
Now, spoon in that glorious nut butter and drizzle the honey over everything. This is where the magic starts to happen, visually.
Don’t be shy about scraping every last bit from the measuring cup. You want all that goodness in the mix.
Step 3 – The Big Mix
Start stirring. It will seem thick, maybe even a bit impossible at first. That’s perfectly normal, I promise.
Keep going, using a little arm muscle. When the spoon gets tough to use, just dive in with clean hands to knead it.
Step 4 – Incorporate Mix-Ins
Once your dough is mostly together, fold in your special add-ins like chocolate chips or raisins. Distribute them evenly for a treat in every bite.
This final stir is easy, a reward after the initial heavy mixing. The dough should be pliable and hold together when pinched.
Step 5 – Scoop and Roll
Use a small cookie scoop or a tablespoon to portion the dough. Roll each portion between your palms to form a smooth, compact ball.
Place each finished ball on a plate or baking sheet. You’ll be amazed at how quickly the whole batch comes together.
Step 6 – Chill and Set
Finally, transfer your protein balls to a sealed container. Pop them in the refrigerator for at least an hour to firm up.
This chilling time is crucial. It allows the oats to soften slightly and all the flavors to meld into perfect harmony.
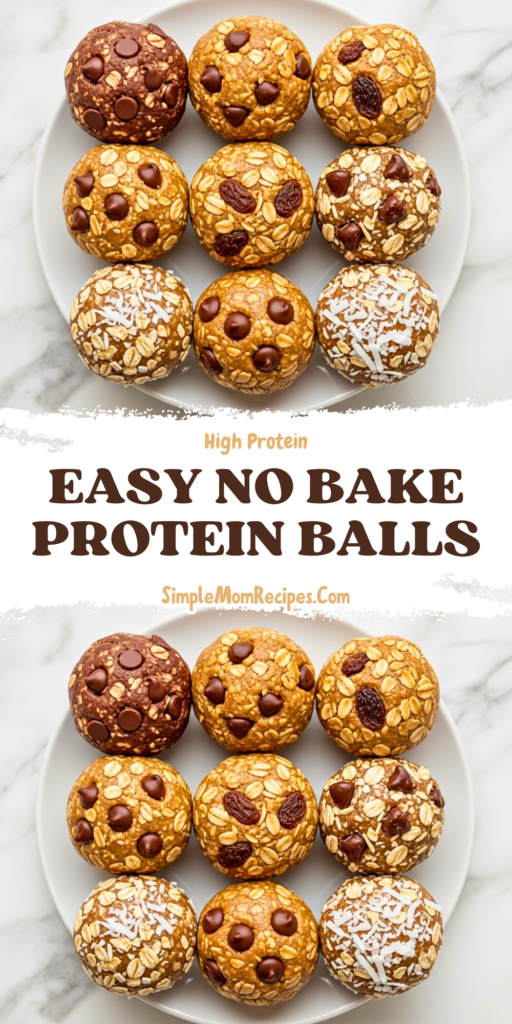
Flavor Variations to Try
The basic recipe is your playground. Simply switch the nut butter and mix-ins to create a whole new snack experience.
For a classic, use peanut butter with chocolate chips. Almond butter with shredded coconut feels like a tropical getaway.
Cashew butter with raisins and cinnamon tastes like a cookie. Tahini with mini chocolate chips is uniquely nutty and divine.
Tips
A few little insights from my kitchen can make your first batch, or your fiftieth, a total success.
- If your mixture feels dry or crumbly, add a teaspoon of water or milk. Mix, and repeat only if needed, until it comes together.
- For perfectly uniform balls, a small cookie scoop is a fantastic tool. It also keeps your hands much cleaner.
- Store them in the freezer for a cool, almost fudge-like treat that lasts for months. They thaw in minutes.
- Always use runny, natural nut butter. The oily kind from the top of the jar is ideal for easy mixing here.
Storing Your Protein Balls
Keeping them fresh is simple. I always use an airtight container, it’s the best way to lock in moisture and flavor.
They’ll stay perfect in the fridge for up to two weeks, if they even last that long. In the freezer, they’re your secret stash for months.
You can eat them straight from the freezer, honestly. They have a fantastic, dense texture when they’re still a little cold.
So there you have it, a snack solution that’s flexible, forgiving, and frankly, a lot of fun to make. I hope these little balls of joy make your days a bit easier and a whole lot tastier.


Easy No Bake Protein Balls Recipe
Description
The easiest no bake protein balls on the internet with four different flavors – chocolate peanut butter, tahini chocolate chip, cinnamon raisin, and almond joy. Take just 10 minutes to whip up a batch of these healthy, protein-packed snacks and enjoy them all week long!
ingredients
Chocolate Peanut Butter
Almond Joy
Cinnamon Raisin Cookie
Tahini Chocolate Chip
Instructions
General Instructions
-
Place oats, nut or seed butter, sweetener, protein powder, and any mix-ins (chocolate chips, coconut, raisins, etc.) in a large bowl and stir to combine.
-
Getting the mixture to combine takes a little arm muscle and it may seem too thick or crumbly at first, but it will come together as you keep mixing. Use your hands to knead the dough near the end—it helps bind everything.
-
Once combined, use a small cookie scoop to portion and roll the mixture into 24 even balls.
-
Store in an airtight container in the refrigerator for up to 2 weeks or freeze for up to 3 months.
Nutrition Facts
Servings 24
- Amount Per Serving
- Calories 98kcal
- % Daily Value *
- Total Fat 5g8%
- Saturated Fat 1g5%
- Sodium 45mg2%
- Potassium 120mg4%
- Total Carbohydrate 10g4%
- Dietary Fiber 2g8%
- Sugars 4g
- Protein 6g12%
- Calcium 30 mg
- Iron 1 mg
* Percent Daily Values are based on a 2,000 calorie diet. Your daily value may be higher or lower depending on your calorie needs.
Note
- Mixture too dry? Add water or almond milk, 1 teaspoon at a time, until the dough holds together.
- No food processor needed! These are mixed by hand in one bowl—easy cleanup and beginner-friendly.
- Make it your own: Swap nut butters, protein powders, or add-ins to create your favorite combo.
- Perfect for meal prep: Make a batch Sunday night and grab on-the-go all week.