Mini Easter Cakes that are soft, pastel, and perfectly portioned. A fun, easy dessert topped with candy eggs that looks fancy but comes together simply at home.
I don’t know when I got so attached to tiny desserts, but here I am, fully committed. There’s just something about handing someone their own little cake that feels extra special. No slicing, no awkward uneven pieces, just a cute little treat sitting there like it was made just for them.
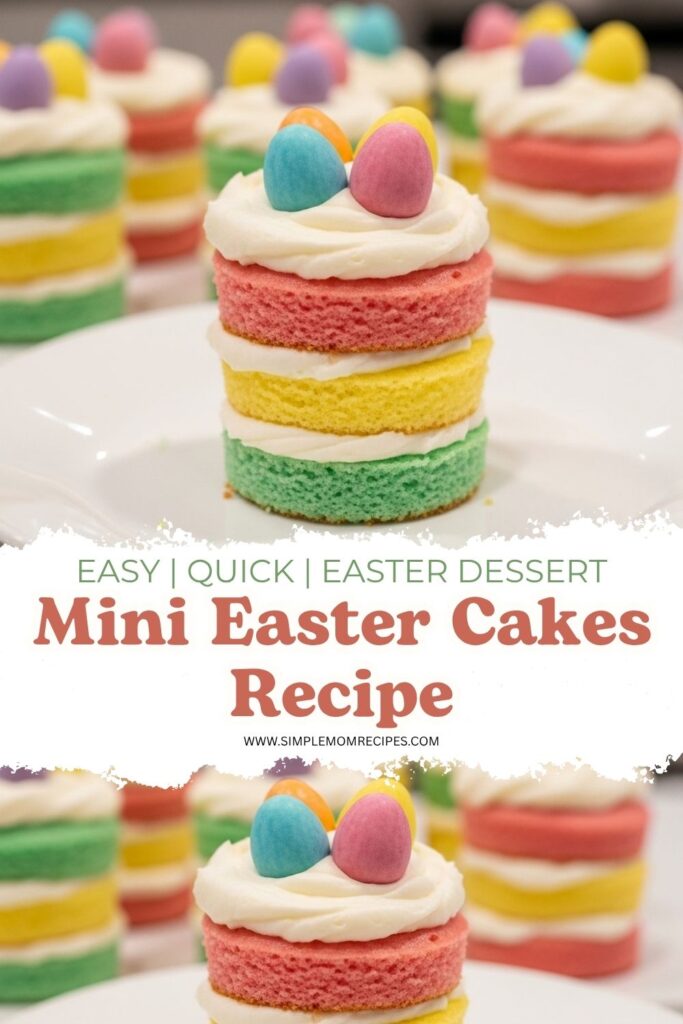
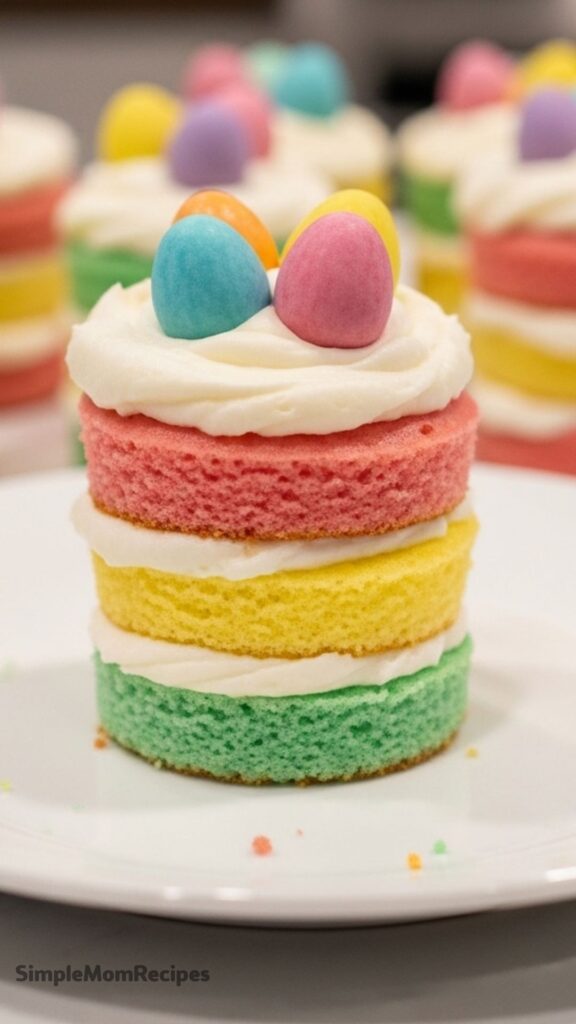
The first time I made these mini Easter cakes, I was mostly hoping they’d look decent. I wasn’t expecting them to turn out this charming. Soft pastel layers, a bit of messy frosting, and those candy eggs on top… I kind of stared at them longer than I should have before serving.
They look like they took a ton of effort. They didn’t. And that’s honestly my favorite kind of recipe.
Ingredients I Used for the Recipe
- 1 box white cake mix – this keeps things simple and gives a light base that takes color really well
- Eggs, oil, and water (as listed on the box) – these bring the batter together and keep it moist
- Gel food coloring (pink, yellow, green) – just a few drops to create those soft Easter shades
- 2 containers white frosting – for layering and holding everything together, plus a little extra on top
- Candy-coated chocolate eggs – these are the fun topping, about 5 to 7 per mini cake
- Nonstick spray or butter – so the cakes don’t stick, which matters more than I used to think
- A little flour – dusted over the pans to help release the layers cleanly
How to make Mini Easter Cakes?
Step 1 – Prep the pans first
I always used to skip this part or rush it, and then regret it later. I spray each pan well and dust with flour. It’s a small step, but it saves you from broken cake layers, which is not the vibe here.
Step 2 – Make the batter
I follow the cake mix directions and don’t overthink it. Once it’s smooth, I pause for a second because this is where things get a little more hands-on.
Step 3 – Divide evenly
I measure the batter and split it into three bowls. Not perfectly, but close enough. The first time I eyeballed it and ended up with one super thick layer and two sad thin ones. Lesson learned.
Step 4 – Add the colors
I add gel coloring slowly. It’s tempting to go big, but it gets intense fast. A little swirl, mix, check. I usually go for soft pastel shades because they feel more Easter-y to me.
Step 5 – Bake the layers
I pour each colored batter into its own pan and smooth the tops. These bake quicker than you’d expect, around 8 to 12 minutes. I check early because overbaked thin layers dry out fast.
Step 6 – Let them cool completely
This part takes patience. I’ve tried rushing it. Warm cake plus frosting equals a mess. Not cute. I let them sit until they’re totally cool to the touch.
Step 7 – Cut out the circles
I use a round cutter and press out little cake circles. It feels a bit like crafting at this point. You get several pieces from each layer, and I try to cut them close together so I don’t waste too much.
Step 8 – Stack and frost
I layer three different colors with frosting in between. I don’t stress about perfect edges. I actually like when a little frosting peeks out. It makes them look homemade in the best way.
Step 9 – Clean up the sides
I run a knife gently around each cake to smooth things out. It doesn’t need to be perfect. If anything, slightly uneven edges somehow make them look more real.
Step 10 – Add the candy eggs
This is the fun part. I press a few candy eggs on top. Sometimes I do a neat circle, sometimes I just drop them on and call it done. Both work.
A few things I figured out the hard way
Not all frosting behaves the same. I once used a super fluffy one, and the layers kept sliding around like they had somewhere better to be. Now I stick with something a little firmer.
If your cake layers come out uneven, don’t panic. Mine usually do. I just mix and match pieces so they balance out when stacked. It’s kind of like a puzzle, and frosting hides a lot anyway.
I used to aim for perfect color matching across layers. That lasted one attempt. Now I just go with whatever looks good in the moment. It’s way less stressful.
Ways I like to switch things up
Sometimes I stick with the classic pastel trio. Other times I just pick one color and go all in. A soft blue batch I made once actually turned out really pretty, even though it wasn’t very traditional.
I’ve also tried chocolate cake. You lose the color layering, but it has its own charm. Especially with green frosting on top to look like grass. It feels a little more playful.
On days when I feel like putting in extra effort, I add shredded coconut before the candy eggs. It gives that little nest look, which is kind of adorable.
And honestly, the topping can be whatever you want. I’ve used sprinkles, tiny candies, even leftover holiday chocolates. It always works out.
Tips
Don’t rush the cooling
Warm cake will ruin your frosting. I’ve tested this more than once.
Use a light hand with food coloring
You can always add more, but you can’t take it back. I’ve ended up with neon cake before. Not the goal.
Clean your knife while frosting
Crumbs build up fast. Wiping the knife every now and then makes a big difference.
Keep expectations realistic
They don’t need to look bakery-perfect. The charm is in the little imperfections.
Serve the same day if you can
They taste best fresh. I’ve stored leftovers before, and they’re still good, just not quite the same.
What I didn’t expect about these
I thought these would just be another cute holiday dessert. Something fun, nothing too memorable. But they stuck with me. Maybe it’s because they’re small and feel a bit personal, or maybe it’s just the colors and how cheerful they look sitting on a plate.
I’ve made them a few times now, and every batch turns out slightly different. Some taller, some a little messy, some with way too many candy eggs on top. I stopped trying to control every detail.
That’s probably my favorite part. They’re easy, a little imperfect, and still end up feeling special. And somehow, that’s exactly what I want from a dessert like this.
Mini Easter Cakes Recipe
Description
Adorable pastel-colored mini cakes topped with candy eggs—perfect for Easter celebrations. Easy to make, fun to decorate, and sure to impress your guests with minimal effort.
ingredients
Instructions
Prepare Cakes
- Preheat oven to 175°C (350°F). Spray three 9-inch cake pans with nonstick spray and lightly dust with flour.
- Prepare cake mix according to package directions.
- Measure total batter and divide evenly into three bowls.
- Add a different food coloring to each bowl and mix well until color is evenly distributed.
- Pour each colored batter into a prepared pan and spread evenly. Tap pans gently to remove air bubbles.
- Bake 8-12 minutes or until a toothpick inserted in center comes out mostly clean. Cool completely on wire rack.
Decorate Cakes
- Use a 2.5-inch round cutter to cut 7 circles from each cooled cake layer.
- Stack three circles (one of each color) with a generous layer of frosting between each. Frost the top.
- Use the flat side of a knife to smooth excess frosting from the sides of each mini cake.
- Top each cake with 7 candy eggs, pressing lightly into the frosting. Start with the center egg, then arrange around it.
- Serve immediately or store in an airtight container. Enjoy!
Nutrition Facts
Servings 7
- Amount Per Serving
- Calories 295kcal
- % Daily Value *
- Total Fat 12gg19%
- Saturated Fat 4gg20%
- Trans Fat 0gg
- Cholesterol 35mgmg12%
- Sodium 180mgmg8%
- Potassium 85mgmg3%
- Total Carbohydrate 45gg15%
- Dietary Fiber 0gg0%
- Sugars 32gg
- Protein 3gg6%
- Calcium 4% mg
- Iron 2% mg
* Percent Daily Values are based on a 2,000 calorie diet. Your daily value may be higher or lower depending on your calorie needs.
Note
- Color tips: Add gel coloring gradually for best control; pastel shades work beautifully for Easter.
- Frosting hack: For neater sides, chill assembled cakes 10 minutes before smoothing frosting.
- Make ahead: Bake and cut layers up to 1 day ahead; assemble and decorate the day of serving.
- Variation: Try chocolate cake with green coconut "grass" and mini eggs for a fun nest look.
