
There’s something about a dessert that comes in its own perfect little package. It just feels special, you know?
Mini cheesecakes are exactly that. All the creamy, dreamy indulgence of a classic cheesecake, but portioned into adorable, single-serving bites. They’re a total game-changer for entertaining.
No more wrestling with a springform pan or worrying about a crumbly first slice. These are simple, elegant, and honestly, a whole lot of fun to make.
Why You’ll Love This Recipe
Let’s be real, the holiday season, or any gathering, can get hectic. Your dessert plan needs to be reliable.
That’s where these mini cheesecakes shine. They are the ultimate make-ahead dessert. You can bake them days before, let them set in the fridge, and simply decorate an hour before your guests arrive.
They travel like a dream and serve with zero fuss. No plates or forks required, just happy hands reaching for a second one.
Ingredients Needed for the Recipe
Here’s everything you’ll need, broken down so you know just why each ingredient is there.
For the Base:
- Digestive Biscuits or Graham Crackers: These provide the classic, slightly sweet, crumbly foundation. Their texture is just right.
- Unsalted Butter (melted): This is the magic glue. It binds the crumbs together into a solid, flavorful base.
- Caster Sugar: Just a tablespoon for a hint of extra sweetness against the tangy filling.
- Cinnamon (optional): A warm, cozy note that makes the base taste a bit more special.
- Salt: A tiny pinch to make all the other flavors pop.
For the Filling:
- Full-Fat Cream Cheese (block style): The star of the show. It must be full-fat and at room temperature for a perfectly smooth, rich filling.
- Sour Cream: My little secret weapon. It lightens the filling, adding a lovely tang and preventing it from being too dense.
- Caster Sugar: Fine sugar dissolves easily, ensuring your filling isn’t grainy.
- All-Purpose Flour: Just a bit! This gives the filling structure so it sets firmly.
- Large Eggs (room temperature): They bind everything together. Room temp is key to avoid curdling.
- Vanilla Extract: For that warm, classic flavor. Pure extract makes a difference.
- Lemon Zest: Don’t skip this. It doesn’t make it taste like lemon, it just adds a bright sparkle that cuts the richness.
- Salt: Again, just a pinch to balance the sweetness.
For Decorating (optional):
- Heavy/Thickened Cream, Icing Sugar, & Vanilla: For making simple Chantilly cream.
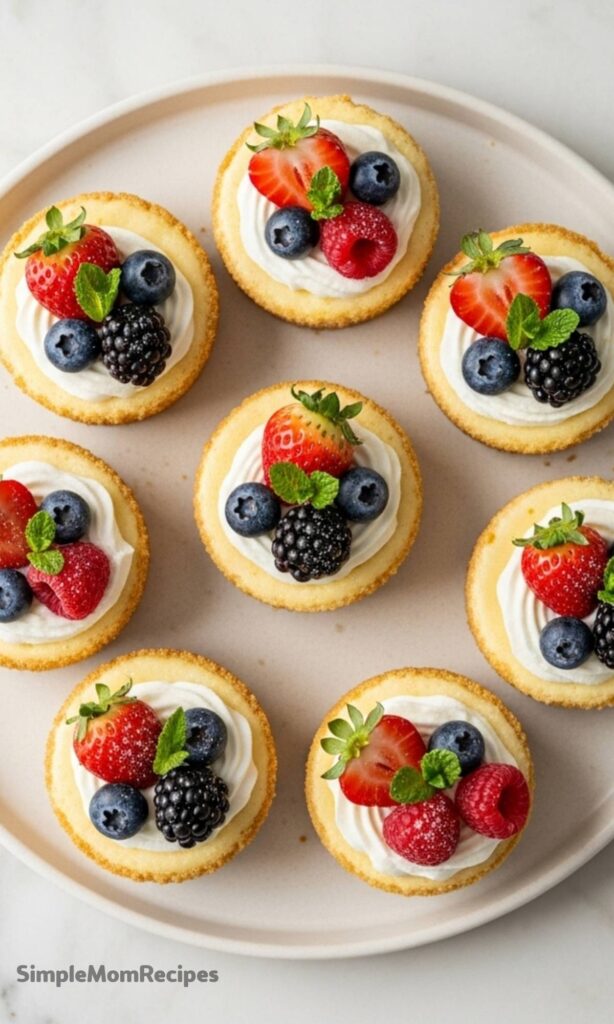
- Fresh Berries, Mint, Icing Sugar: For a beautiful, fresh finish.
How to make Mini Cheesecakes?
The process is wonderfully straightforward. Just follow these simple steps for perfect results every time.

Step 1- Prep & Make the Base
Preheat your oven to 160°C / 325°F (140°C fan). Line a 12-hole muffin tin with paper liners.
Now, crush your biscuits. A food processor is fastest, but a zip-top bag and a rolling pin work just as well—and it’s oddly satisfying. You want fine crumbs.
Mix the crumbs with the melted butter, sugar, cinnamon, and salt. It should look and feel like damp sand.
Step 2- Form the Crust
Divide this sandy mixture evenly between your muffin liners. Don’t just sprinkle it, press it down firmly.
Use something flat-bottomed, like a small measuring cup or a spice jar, to compact it into an even layer. This prevents a crumbly base.
Bake the empty bases for just 7 minutes. This sets them. Let them cool for 5 minutes before adding the filling.
Step 3- Create the Filling
In a large bowl, beat the room-temperature cream cheese until it’s completely smooth. This should only take seconds if it’s soft.
Add the sour cream, sugar, flour, vanilla, lemon zest, and salt. Beat again, just until everything is combined and smooth. Don’t overmix.
Now, beat in the eggs one at a time, mixing just until each disappears into the batter. The final mixture should be smooth and pourable, like a thick pancake batter.
Step 4- Bake & Cool
Divide the filling between the muffin cups, using it all. You can fill them nearly to the top, as they won’t rise much.
Bake for 20 minutes. The centers should still be slightly soft and supple, not liquidy, but not firm either.
Let the cheesecakes cool completely in the tin on the counter for about an hour. Then, cover them and refrigerate for at least 6 hours, preferably overnight. This setting time is non-negotiable for the perfect texture.
Step 5- Decorate & Serve
Once fully chilled and set, peel off the liners. If you have time, let them sit out for 20-30 minutes before serving to take the deep chill off.
Whip your cream with a bit of icing sugar and vanilla until it holds soft peaks. Pipe or dollop it on top.
Add your berries, a dusting of icing sugar, and maybe a tiny mint leaf. Then, prepare for the compliments.
Brilliant Flavor Variations
The basic recipe is a perfect canvas. Here are a few ways to mix it up.
For a Chocolate Base, swap half the digestives for chocolate wafer cookies. The contrast is divine.
Love a Citrus Burst? Add the zest of a whole lime or orange along with the lemon. Top with matching fruit.
For a Caramel Swirl, drop small spoonfuls of thick caramel sauce onto the filled cups before baking. Use a toothpick to gently swirl it through the batter.
Storage & Make-Ahead Secrets
These cheesecakes are a busy host’s best friend. Here’s how to manage them.
The undecorated cheesecakes (just the base and filling) keep beautifully in the fridge for up to 5 days. You can also freeze them for up to 3 months. Thaw overnight in the fridge.
The key to perfect make-ahead decorating is stabilized cream. For your whipped cream, replace about a quarter of the liquid cream with mascarpone cheese before whipping.
It whips up beautifully and holds its shape for days, not hours. A total game-changer for stress-free prep.
Tips
- Room Temperature is Crucial: Cold cream cheese or eggs will lead to a lumpy batter. Plan ahead and let them sit out for a few hours.
- Don’t Over-beat: Once you add the eggs, mix just until combined. Over-beating incorporates too much air, which can cause cracks.
- Press the Base Firmly: A well-packed base won’t crumble when you bite into it. Really use some muscle with that measuring cup.
- Trust the Chill Time: Patience! The long chill in the fridge is what gives the filling its classic, sliceable-yet-creamy texture.
- Easy Release: If a liner sticks a bit, gently warm the sides with your fingers for a few seconds. It should peel away cleanly.


Mini Cheesecakes Recipe
Description
These adorable mini cheesecakes are made in a muffin tin! Easier to make than one large cheesecake, they’re pretty as a picture and a lot less messy to serve. Perfect for gatherings, holidays, or anytime you want a sweet treat that’s both elegant and easy.
ingredients
Base
Filling
Chantilly Cream (Optional)
Decorating (Optional)
Instructions
Base
-
Preheat & Prep
Preheat oven to 160°C (325°F) with the rack positioned 1/3 from the bottom. Line a 12-hole standard muffin tin with paper liners. -
Blitz Base
Break biscuits into pieces and blitz in a food processor until fine crumbs form (~10 seconds). Add melted butter, sugar, cinnamon (if using), and salt. Pulse until mixture resembles wet sand. -
Press Base
Divide mixture evenly among muffin cups. Press down firmly with the base of a 1/4 or 1/3 cup measure to create a compact, flat layer. -
Bake Base
Bake for 7 minutes. Remove and let cool for 5 minutes before adding filling.
Filling
-
Make Filling
Beat cream cheese on medium speed until smooth (~10 sec). Add flour, vanilla, sour cream, sugar, lemon zest, and pinch of salt. Beat just until combined. Add eggs one at a time, mixing only until incorporated. Do not overmix. -
Fill & Bake
Divide filling evenly among muffin cups, filling to within 3mm of the top. Bake for 20 minutes, or until centers are set but still slightly soft. -
Cool & Chill
Cool in the tin on the counter for 1 hour. Cover with parchment paper and loosely with cling wrap. Refrigerate for at least 6 hours or preferably overnight.
Decorate and Serve
-
De-chill
Remove from fridge 30–60 minutes before serving for best flavor and texture. -
Whip Cream
Beat heavy cream, vanilla, and icing sugar until thick enough to pipe or dollop. -
Decorate
Peel off paper liners, place on a platter, and top with whipped cream, berries, mint, and a dusting of icing sugar. Serve proudly!
Nutrition Facts
Servings 12
- Amount Per Serving
- Calories 280kcal
- % Daily Value *
- Total Fat 18g28%
- Saturated Fat 11g56%
- Cholesterol 85mg29%
- Sodium 220mg10%
- Potassium 120mg4%
- Total Carbohydrate 22g8%
- Sugars 14g
- Protein 6g12%
- Calcium 60 mg
- Iron 1 mg
* Percent Daily Values are based on a 2,000 calorie diet. Your daily value may be higher or lower depending on your calorie needs.
Note
- Make ahead: Mini cheesecakes (without cream) can be made up to 2 days in advance and stored covered in the fridge.
- Freezing: Freeze undecorated cheesecakes for up to 3 months. Thaw in the fridge overnight before decorating.
- Stabilised cream: For longer-lasting whipped cream, replace 1/4 of the cream with mascarpone before whipping.
- Serving tip: Cheesecake tastes best slightly below room temperature—take out of the fridge 30–60 minutes before serving.