But I kept messing with it. Mostly because I hate wasting ingredients, and I had a box of matzo sitting around way longer than it should have. Turns out, if you treat it right, it actually gets really good. Not just “for what it is” good. Like, crave-it-again kind of good.
The trick is that you can’t treat it like normal pizza dough. I learned that the hard way the first time when everything went soggy in seconds and I ended up eating it folded over the sink. Not my finest moment.
Ingredients I Used for the Recipe
- 2 whole matzos (split into 4 pieces) – this is your base, thin and crisp, so you have to handle it gently
- 1 1/2 cups canned whole tomatoes (drained and broken into chunks) – gives that fresh, slightly chunky sauce feel without soaking everything
- 3 ounces mozzarella cheese (grated) – melts into that stretchy layer and also helps protect the matzo
- 1/2 ounce parmesan cheese (grated) – adds a salty, slightly sharp finish on top
- 4 teaspoons extra-virgin olive oil – used for crisping the bottom and adding flavor
- Fresh basil leaves – for a fresh, herby finish at the end
- Kosher salt – just a pinch to bring everything together
- Optional toppings (like olives, mushrooms, or peppers) – I keep it simple most of the time, but you can play around
How to make Matzo Pizza?
Step 1 – Prep the tomatoes
I start by dumping the canned tomatoes into a strainer and just breaking them apart with my hands. Nothing fancy. You want rough chunks, not a smooth sauce. The key here is draining them well. If they’re watery, your matzo is going to give up on you fast.
Step 2 – Preheat and set up
I heat the oven to 500°F and line a baking sheet with foil. I’ve skipped the foil before and regretted it while scrubbing melted cheese later, so now I don’t even think twice about it.
Step 3 – First layer of cheese
This is the step that changed everything for me. I sprinkle about half the mozzarella directly onto the matzo before anything else. It feels a little backward, but this layer melts into a barrier that keeps the matzo from getting soggy.
Step 4 – Quick bake
I slide the tray into the oven for about 3 minutes, just until the cheese melts. Don’t walk away here. It happens fast, and burnt cheese on matzo is not forgiving.
Step 5 – Add tomatoes and toppings
Once it’s out, I add the tomatoes in small dollops instead of spreading them. This part took me a couple tries to get right. Less is better. Then I add the rest of the mozzarella, a pinch of salt, and whatever toppings I feel like that day.
Step 6 – Bake until bubbly
Back into the oven it goes for around 10 minutes. I watch for the cheese to get bubbly and slightly golden. The edges of the matzo should still look crisp, not soaked.
Step 7 – Finish on the stovetop
This step is optional, but I almost always do it now. I heat a bit of olive oil in a pan and transfer the pizzas carefully. Then I let them cook for about 2 minutes, just rotating them a little. The bottom gets extra crispy, almost like a thin-crust takeout pizza.
Step 8 – Final touches and serve
I sprinkle parmesan on top, add fresh basil, and maybe a little drizzle of olive oil. Then I eat it immediately. Waiting is a mistake. These cool down way faster than regular pizza.
What I messed up at first (so you don’t have to)
The first time I made this, I treated it like regular pizza. Big mistake. I spread sauce edge to edge, piled on toppings, and thought more was better. It turned into a floppy mess that barely held together.
Another thing I did wrong was skipping that first cheese layer. I didn’t think it mattered. It does. Without it, the sauce just seeps right into the matzo and ruins the texture.
Also, I used to rush the draining step for the tomatoes. Now I let them sit for a minute or two. It makes a bigger difference than you’d expect.
Tips
Don’t overload it
I know it’s tempting to pile on toppings, but matzo can’t handle that kind of weight. Keep it light and balanced.
Use less sauce than you think
Every time I think “this needs more sauce,” I remind myself of that soggy first attempt. Small spoonfuls are enough.
Eat it right away
This isn’t the kind of pizza that sits well. It’s at its best straight out of the pan, still hot and crisp.
Try different cheeses
I’ve swapped mozzarella with whatever I had in the fridge before. It usually works, as long as it melts well. But I still come back to mozzarella for that classic feel.
The stovetop step is worth it
If you like a crispy bottom, don’t skip this. It adds that slightly greasy, crunchy texture that makes it feel more like real pizza.
Why I keep making this, even when I have other options
I make regular pizza too, from dough and all that. But this one has a place of its own. It’s quick, it’s low effort, and somehow it scratches the same itch when I don’t feel like committing to a full recipe.
There’s also something kind of fun about turning something so plain into something that feels indulgent. It reminds me that good food doesn’t always have to start fancy.
And honestly, I like that it’s a little imperfect. The edges crisp differently every time. Sometimes one piece is better than the others. It keeps things interesting.
Now I actually keep matzo around on purpose. Not something I thought I’d ever say, but here we are.
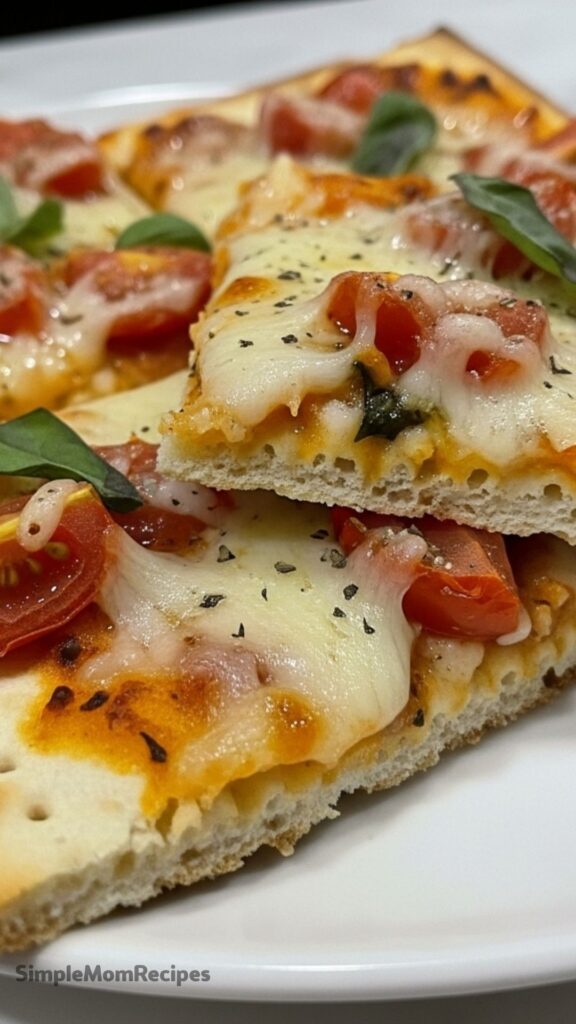
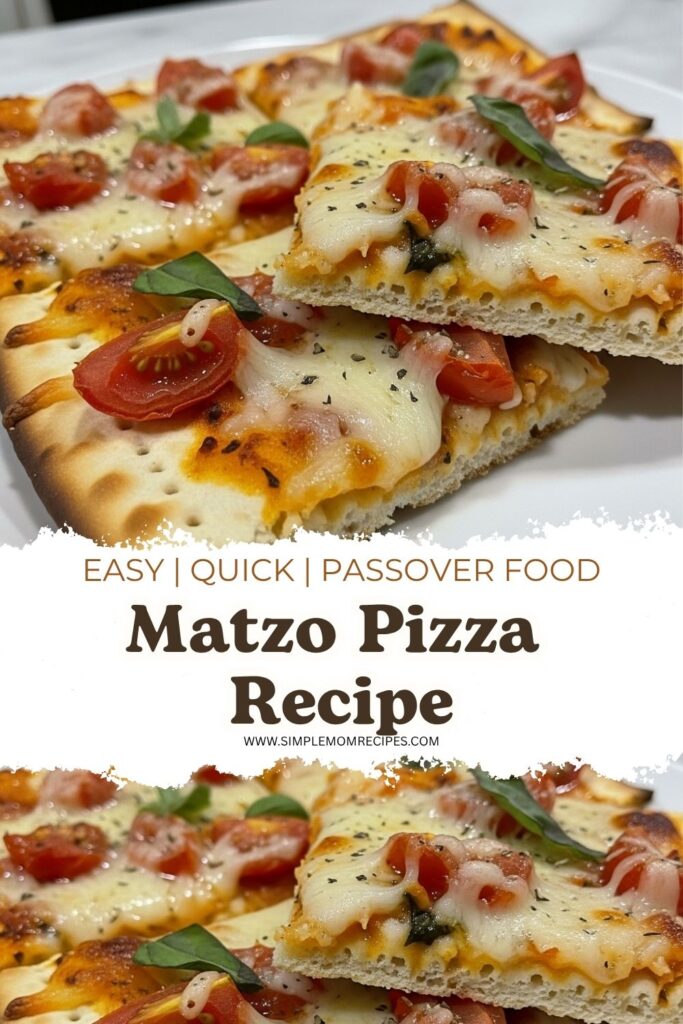
Matzo Pizza Recipe
Description
This matzo pizza recipe transforms the Passover staple into a quick, crispy, and delicious meal. By melting a layer of cheese first to create a moisture barrier and using sparing amounts of drained tomatoes, you get a pizza with structural integrity and that irresistible greasy-on-the-bottom appeal. Perfect for a fast weeknight dinner or Passover celebration.
ingredients
Instructions
Preheat and prep tomatoes
Adjust oven rack to center position and preheat oven to 500°F (260°C). Place tomatoes in a fine-mesh strainer and break apart with your fingers into rough 1/2-inch chunks. Toss in strainer over sink to drain all excess liquid.Draining tomatoes well prevents soggy matzoCreate cheese barrier
Place matzos on a foil-lined baking sheet. Spread half of mozzarella evenly over matzos, then transfer to oven. Bake until cheese is melted, about 3 minutes.This cheese layer protects the matzo from moistureAdd toppings
Remove from oven and add tomatoes to matzos, distributing in small dollops. Top with remaining mozzarella and other toppings as desired. Season with kosher salt.Use sauce sparingly to maintain crispnessBake until bubbly
Return to oven and bake until bubbly, about 10 minutes.Crisp on stovetop
Remove pizza from oven and sprinkle with parmesan cheese. Heat 2 teaspoons oil in a large nonstick or cast iron skillet over medium heat. Using a wide, stiff spatula, carefully remove 2 pizzas from baking sheet and add to skillet. Cook, swirling and rotating occasionally, until crisp and well-browned on the bottom, about 2 minutes. Transfer to cutting board. Repeat with remaining pizzas.Stovetop finishing adds extra crispness and flavorServe immediately
Serve immediately, drizzled with extra olive oil and sprinkled with fresh basil if desired.Matzo pizzas cool quickly, so enjoy right away
Nutrition Facts
Servings 4
- Amount Per Serving
- Calories 189kcal
- % Daily Value *
- Total Fat 11g17%
- Saturated Fat 4g20%
- Cholesterol 20mg7%
- Sodium 279mg12%
- Potassium 186mg6%
- Total Carbohydrate 16g6%
- Dietary Fiber 1g4%
- Sugars 2g
- Protein 8g16%
- Calcium 146 mg
- Iron 1 mg
* Percent Daily Values are based on a 2,000 calorie diet. Your daily value may be higher or lower depending on your calorie needs.
Note
- Prevent sogginess: Always drain tomatoes well and use sauce sparingly on matzo.
- Cheese barrier trick: Melting cheese first creates a moisture-proof layer that keeps matzo crisp.
- Stovetop finish: A quick sear in olive oil adds that irresistible crispy, golden bottom.
- Customize toppings: Add pepperoni, mushrooms, onions, or fresh herbs after the initial bake.
- Serve fast: These thin pizzas cool quickly, so have plates ready and enjoy immediately.
