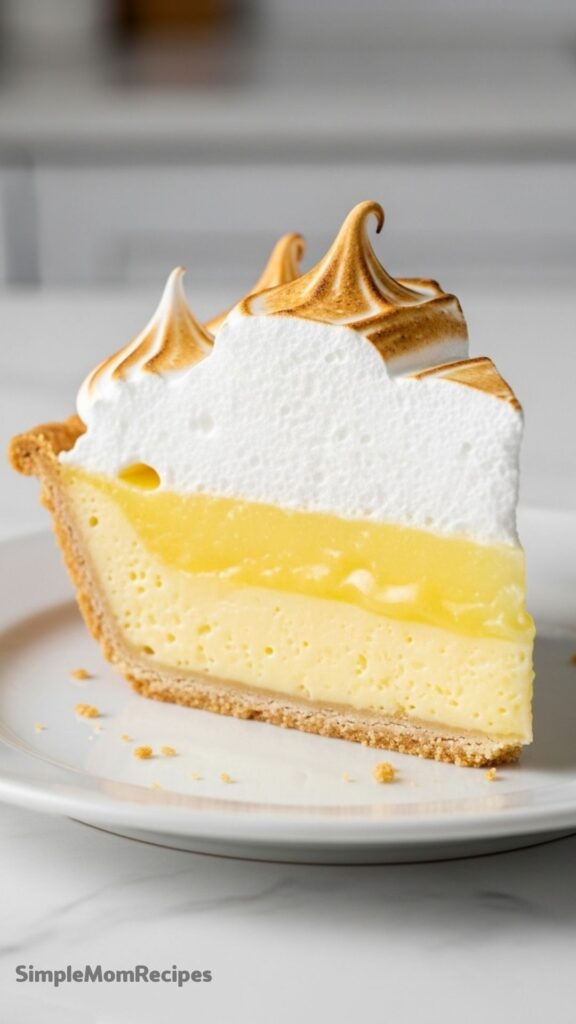
I don’t bake pies every week, but this one keeps showing up when I want something that feels a little dramatic without being complicated. The contrast is what gets me. That sharp lemon layer sitting under a soft cloud of meringue, and then the crust holding it all together like it knows it’s doing important work.
I used to rush this pie. Big mistake. The filling would look fine, then turn loose and messy the second I sliced it. Took me a few tries to realize patience matters more than anything here. Heat, timing, letting things cool fully. Once I slowed down, everything started working the way it should.
This version is the one I keep going back to. It’s not fussy, but it does ask for attention in the right spots. And when it comes out with that lightly browned top and clean slices, yeah, it feels worth it.
Ingredients I Used for the Recipe
1 pre-baked 9-inch pie crust - gives structure and that buttery base, store-bought works just fine or homemade if I feel like it
5 large egg yolks - these make the lemon filling rich and smooth
5 large egg whites - used for the meringue topping, helps create that fluffy texture
6 tablespoons cornstarch - thickens the lemon filling so it actually holds when sliced
1 tablespoon cornstarch - added to the meringue mixture to keep it stable
1 1/3 cup sugar - sweetens the filling without overpowering the lemon
1/2 cup plus 2 tablespoons sugar - helps build the meringue and gives it structure
1/4 teaspoon salt - balances the sweetness in the filling
1 1/2 cups water - forms the base of the filling mixture
1/3 cup water - used for the meringue stabilizer
1/2 cup fresh lemon juice - the main flavor, bright and sharp
2 teaspoons lemon zest - adds deeper citrus flavor without extra liquid
2 tablespoons unsalted butter - smooths out the filling and adds richness
1/4 teaspoon cream of tartar - helps the egg whites hold their shape
1/2 teaspoon vanilla extract - softens the flavor of the meringue just a bit
How to make Lemon Meringue Pie?
Step 1 - Bake the crust until it actually looks done
I start with a pre-baked crust because soggy bottoms are not something I want to deal with again. I line it with foil, fill it with beans, bake it, then finish it uncovered until it turns lightly golden. If it still looks pale, I leave it a few more minutes. That color matters later.
Step 2 - Build the lemon filling slowly
I whisk together cornstarch, sugar, salt, and water in a saucepan and bring it to a boil. This part needs constant stirring or it clumps fast. Once it thickens, I don’t rush. I let it bubble a bit so the starch fully activates.
Then I temper the egg yolks. Just a little hot mixture at a time while whisking. I used to dump it all in at once and ended up with scrambled eggs. Not great. Once combined, everything goes back into the pot and cooks again until thick and glossy.
Step 3 - Finish the filling with lemon and butter
Off the heat, I stir in lemon juice, zest, and butter. This is where it starts smelling like something worth waiting for. I taste it here sometimes. It should feel sharp but balanced. If it makes me pause for a second, I know it’s right.
Step 4 - Make the meringue with a little extra support
I heat the small cornstarch and water mixture until it turns gel-like. It looks odd, but it helps the meringue stay firm later.
Then I beat the egg whites with vanilla until foamy. Slowly add sugar and cream of tartar. I don’t rush this part. If I go too fast, the texture turns grainy. Once soft peaks form, I add the cornstarch gel bit by bit and keep beating until stiff peaks show up.
Step 5 - Assemble while everything is still hot
This part matters more than I expected. I reheat the lemon filling until it’s hot and pour it straight into the crust. Then I spread the meringue over it right away. The heat helps the layers stick together.
I make sure the meringue touches the crust edges all around. If there are gaps, it shrinks later and pulls away. Learned that the hard way after one sad-looking pie.
Step 6 - Bake until the top turns golden
I bake it at a lower temperature until the meringue gets those golden tips. Not too dark, just enough color to make it look finished. It usually takes around 20 minutes, but I keep an eye on it instead of trusting the clock.
Step 7 - Let it cool completely before slicing
This is the step I used to ignore. Big regret every time. If I cut it warm, the filling slides everywhere. Now I let it sit until fully cooled. Sometimes I even chill it a bit. The slices come out clean, and the texture holds.
Where things can go wrong and how I deal with it
The filling not setting used to frustrate me the most. It usually came down to not cooking it long enough. That boil step isn’t optional. It needs that heat to thicken properly, otherwise it stays loose.
Meringue can be tricky too. Any bit of yolk in the whites ruins it. I crack eggs into a separate bowl first now, just in case. Also, bowls need to be clean. Even a little grease messes things up.
Another thing I noticed is how sensitive the meringue is to time. If I leave it sitting too long before baking, it starts breaking down. So I try to move quickly once it’s ready.
Tips that actually made a difference for me
Let egg whites come to room temperature before whipping, they build volume better
Cook the filling until it’s clearly thick, not just slightly
Spread meringue while the filling is hot so it sticks properly
Seal the meringue to the crust edges to prevent shrinking
Don’t rush the cooling step, it affects the final texture more than anything
Use fresh lemon juice, bottled just doesn’t hit the same
How I store it and what I’ve noticed over time
I try to serve this the same day. That’s when it looks and tastes the best. The meringue stays fluffy, and the layers hold nicely. If I have leftovers, I keep them in the fridge, loosely covered.
By the next day, the meringue starts to change. It can get a little watery or shrink slightly. Still edible, just not as pretty. So now I plan around that and make it when I know it’ll be eaten quickly.
It’s one of those desserts that rewards timing more than effort. Once I understood that, it stopped feeling unpredictable and started feeling reliable. And honestly, that’s what made me stick with it.
Tart homemade lemon custard is the star of this classic, impressive pie. This lemon meringue pie features a perfectly balanced sweet-tart filling, a tender all-butter crust, and a mile-high meringue topping that's lightly browned to golden perfection. With tips to prevent weeping and ensure a set filling, this recipe delivers bakery-quality results at home.
ingredients
For the crust
19-inch frozen pie crust or homemade all-butter crust (deep-dish recommended)
For the lemon filling
5large egg yolks (at room temperature)
6tablespoons cornstarch
1 1/3cup sugar (266g)
1/4teaspoon kosher salt
1 1/2cups water
1/2cup fresh lemon juice (about 3-4 lemons)
2teaspoons lemon zest (finely grated)
2tablespoons unsalted butter (cut into pieces)
For the meringue
1tablespoon cornstarch
1/3cup cold water
1/4teaspoon cream of tartar (or 1 tsp white vinegar)
1/2 cup plus 2tablespoons sugar (128g)
5large egg whites (at room temperature)
1/2teaspoon vanilla extract
Instructions
Pre-bake the crust
1
Preheat oven to 375°F (190°C).
2
Line frozen pie shell with aluminum foil extending over edges. Fill two-thirds with pie weights or dry beans.
3
Bake for 20 minutes. Remove foil and weights, poke bottom with fork tines to prevent bubbling.
4
Return crust to oven and bake 15 minutes more until lightly browned. Remove and set aside.
Make the lemon filling
5
Whisk egg yolks in a medium bowl and set aside.
6
In a medium saucepan, whisk together cornstarch, sugar, salt, and water. Bring to a boil over medium heat, whisking constantly. Simmer 1-2 minutes until thickened.
7
Temper egg yolks by whisking in a spoonful of hot cornstarch mixture, then gradually add half the cornstarch mixture to the yolks while whisking.
8
Return yolk mixture to saucepan. Bring back to a boil over medium-high heat, stirring constantly. Cook 3-4 minutes to deactivate enzymes that cause runny filling.
9
Remove from heat. Stir in lemon juice, lemon zest, and butter until smooth.
Prepare the meringue
10
Reduce oven temperature to 325°F (163°C).
11
In a small saucepan, whisk cornstarch and cold water until dissolved. Heat over medium, whisking until mixture bubbles and thickens to a gel. Remove from heat and set aside.
12
Whisk together sugar and cream of tartar; set aside.
13
In a clean mixer bowl, beat egg whites and vanilla on low speed, gradually increasing to medium. Once frothy, slowly add sugar mixture a spoonful at a time.
Ensure bowl and whisk are completely clean and free of fat for best results.
14
Beat until soft peaks form. Add cornstarch gel mixture a spoonful at a time while beating. Increase speed to high and beat until stiff peaks form. Do not over-beat.
Assemble and bake
15
Reheat lemon filling until bubbling hot. Pour into pre-baked pie shell, spreading evenly.
Hot filling helps meringue adhere properly.
16
Working quickly, spread meringue over hot filling, sealing edges to the crust to prevent shrinking. Use the back of a spoon to create decorative peaks.
17
Bake at 325°F (163°C) for 20 minutes until meringue is golden brown.
18
Transfer to a wire rack and cool completely to room temperature before slicing, about 1 hour.
Cutting while warm may cause filling to be runny.
Nutrition Facts
Servings 8
Amount Per Serving
Calories362kcal
% Daily Value *
Total Fat16.38g26%
Saturated Fat4.05g21%
Cholesterol67mg23%
Sodium307mg13%
Potassium83mg3%
Total Carbohydrate49.66g17%
Dietary Fiber1.7g7%
Sugars40g
Protein4.83g10%
Calcium 15 mg
Iron 1.27 mg
* Percent Daily Values are based on a 2,000 calorie diet. Your daily value may be higher or lower depending on your calorie needs.
Note
Prevent runny filling: Bring the cornstarch-thickened filling to a full boil for 3-4 minutes to deactivate enzymes in egg yolks that can thin the starch.
Sturdy meringue tip: Adding a gelled cornstarch-water mixture to the meringue helps it hold its shape and prevents weeping or shrinking during baking.
Egg white success: Use room temperature egg whites and ensure your mixer bowl and whisk are completely clean and free of any fat for best whipping results.
Seal the edges: When adding meringue, make sure it touches the crust all around to anchor it and prevent shrinking.
Cool completely: Let the pie cool fully on a wire rack before slicing. For extra firmness, place cooled pie on a cooling pack covered with a tea towel.
Make ahead: You can prepare the crust a day in advance. However, assemble and bake the pie the day you plan to serve it for best texture.
I’m a London-based food writer, recipe developer, and home cook who has been passionate about cooking for over 15 years. What started as a way to recreate my mother’s traditional dishes turned into a lifelong love for experimenting with flavors, writing about food, and helping others feel more confident in the kitchen.