I have made a lot of cheesecakes in my life. Some turned out great, some cracked like the desert floor, and a few were honestly just too heavy to enjoy more than a bite of.
This one changed everything for me. It’s creamy without feeling dense, bright without being sour, and it actually tastes like real lemon instead of that fake candy flavor.
The first time I made it, I remember standing in my kitchen thinking I probably messed something up because the batter smelled so fresh and light. Turns out, that’s exactly how it’s supposed to be.
Now I make this whenever I want a dessert that feels a little special but still comforting. It’s the kind of cheesecake people talk about after they leave.
What Makes This Lemon Cheesecake Different From Others I’ve Tried
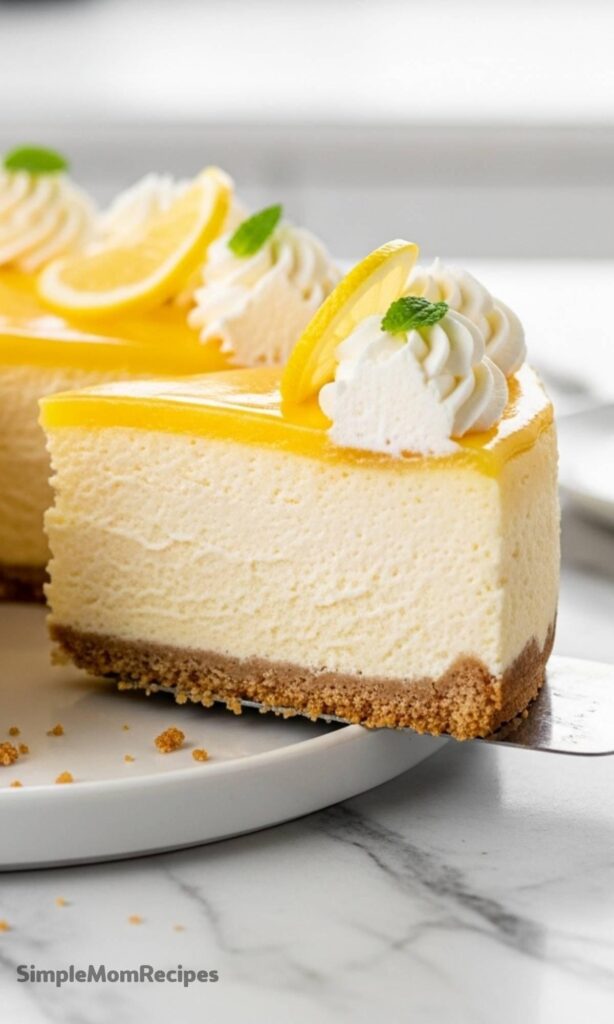
The lemon flavor doesn’t just sit on top. It’s layered into every part. There’s lemon zest rubbed into the sugar, fresh lemon juice in the filling, and then that glossy lemon curd on top.
That combination gives it depth. Not sharp. Not overly sweet. Just balanced in a way that keeps you going back for another forkful even when you said you were done.
I also love the graham cracker crust here. It’s baked first, which sounds small, but it gives you that crunch that holds up against the creamy filling.
And yes, the whipped cream on top is technically optional. I’ve made it without. But when I add it, suddenly it looks like something from a bakery case and I feel way more impressive than I actually am.
Ingredients I Used for the Recipe
2 cups graham cracker crumbs - These make the base and give that classic sweet crunch.
1/3 cup granulated sugar - Mixed into the crust for a little sweetness.
1/4 teaspoon salt - Just enough to balance flavors so it doesn’t taste flat.
7 tablespoons unsalted butter, melted - Holds the crust together and adds richness.
1 1/2 cups granulated sugar - Sweetens the cheesecake filling.
1 tablespoon lemon zest - This is where the real lemon aroma starts.
5 bricks (8 ounces each) full-fat cream cheese, room temperature - The heart of the cheesecake. Must be soft for smooth mixing.
1 1/2 teaspoons pure vanilla extract - Rounds out the flavor and softens the lemon edge.
4 large eggs, room temperature - Give structure and that creamy texture.
3 egg yolks, room temperature - Extra richness that makes the filling silky.
2/3 cup freshly squeezed lemon juice - The main source of that bright citrus flavor.
1/4 cup heavy cream, room temperature - Helps create a smooth, luscious consistency.
3/4 cup lemon curd - Spread on top for an extra punch of lemon.
Whipped cream (optional) - For decorating and adding lightness.
Lemon slices (optional) - Make it look fresh and pretty.
Mint sprigs (optional) - A simple garnish if you want to dress it up.
How to make Lemon Cheesecake Recipe?
Step 1 - Prepare the Pan and Oven
I start by preheating the oven to 350°F and wrapping my springform pan in foil. I used to skip the foil step and regret it every single time when water sneaked in.
Now I overdo it with the wrapping. No leaks, no stress.
Step 2 - Make the Graham Cracker Crust
I mix the graham cracker crumbs, sugar, salt, and melted butter until it looks like wet sand. Then I press it firmly into the pan and slightly up the sides.
Press harder than you think you need to. A loose crust falls apart later, and that’s heartbreaking.
Step 3 - Pre-Bake the Crust
The crust bakes for about 10 minutes. This is what gives it that toasty flavor and keeps it from getting soggy once the filling goes in.
After baking, I let it cool and lower the oven temperature to 300°F.
Step 4 - Start the Filling by Mixing Sugar and Lemon Zest
I blend the sugar and lemon zest together first. This step smells incredible and helps release the oils from the zest.
It’s a small thing, but it makes the lemon flavor deeper instead of just acidic.
Step 5 - Beat in the Cream Cheese
I add the softened cream cheese and mix until completely smooth. No lumps allowed here.
If the cream cheese is too cold, this step becomes a nightmare. I learned that the hard way.
Step 6 - Add Vanilla and Eggs Slowly
Vanilla goes in first, then the eggs one at a time on low speed. I don’t rush this.
Overmixing adds too much air, which can cause cracks later. Slow and steady really does matter.
Step 7 - Blend in Lemon Juice and Heavy Cream
I pour in the fresh lemon juice and mix just until combined, then add the heavy cream.
The batter turns smooth, pale, and silky. At this point I always sneak a tiny taste.
Step 8 - Pour and Prepare the Water Bath
I pour the filling into the crust and smooth the top. Then the pan goes into a larger roasting pan filled with hot water.
This water bath helps the cheesecake bake gently and stay creamy instead of drying out.
Step 9 - Bake Low and Slow
The cheesecake bakes for about 1 hour and 30 minutes. It still jiggles slightly in the center when done.
I turn the oven off, crack the door open, and let it cool inside. This gradual cooling helps prevent cracks.
Step 10 - Chill Completely
Once it reaches room temperature, I refrigerate it for at least 6 hours. Overnight is even better.
This is the hardest part because it smells amazing and I want to cut into it immediately.
Step 11 - Add the Lemon Curd Topping
I spread lemon curd across the top with a small spatula. Not too thick, just enough to cover.
The glossy finish makes it look fancy with almost no effort.
Step 12 - Decorate Right Before Serving
If I’m using whipped cream, I add it right before serving so it stays fluffy. Sometimes I add lemon slices and mint if I’m feeling extra.
Other times I skip decoration entirely. It still tastes incredible.
Tips From My Kitchen After Making This Many Times
Room temperature ingredients matter more than you think. Cold cream cheese leads to lumps, and lumps don’t magically disappear.
Don’t rush the cooling process. I used to. The texture wasn’t the same and sometimes it cracked.
Use fresh lemons. Bottled juice just doesn’t give the same brightness.
If you’re nervous about the water bath, place the wrapped pan in the roasting pan before adding water. Moving a full water bath is awkward. Learned that after one small kitchen disaster.
Chill the cheesecake long enough. This is not a dessert you can hurry. The flavor actually improves as it rests.
For storage, I keep it covered in the fridge for a few days. It also freezes well without the toppings, which is great when I want to plan ahead.
And one last thing. Slice with a warm knife. It sounds fussy, but it gives you those clean, bakery-style cuts that make you feel like you really nailed it.
This cheesecake feels like sunshine in dessert form. It’s creamy, bright, and just indulgent enough without being overwhelming. Every time I make it, it reminds me why simple ingredients done right always win.
This Lemon Cheesecake Recipe is smooth, creamy, and loaded with lemon flavor! Lemon juice and lemon zest go in the cheesecake batter and homemade lemon curd on top. A crunchy graham cracker crust and freshly whipped cream make it an all-around winning recipe.
3/4cup lemon curd (171g, homemade or store-bought)
whipped cream (optional)
lemon slices (optional)
mint sprigs (optional)
Instructions
For the Graham Cracker Crust
1
Preheat the oven to 350°F (175°C). Lightly spray a 9-inch springform pan with non-stick baking spray. Wrap the bottom and sides of the pan with heavy duty extra wide aluminum foil in several diligent layers to ensure no water creeps through during the water bath.
2
In a large bowl, combine the graham cracker crumbs, sugar, salt, and melted butter. Mix well until the mixture resembles wet sand.
3
Press the crust firmly into the prepared pan, pressing down evenly and slightly up the sides. Bake for 10 minutes. Place the partially baked crust on a cooling rack and set aside while preparing the filling. Reduce oven temperature to 300°F (150°C).
For the Lemon Cheesecake
4
In the bowl of a large food processor, beat the sugar and lemon zest together until well combined and fragrant.
5
Add the cream cheese and beat until smooth and creamy, scraping down the sides and bottom of the bowl as needed. Beat in the vanilla extract.
6
On the lowest speed, beat in the eggs one at a time, mixing until just combined after each addition. Scrape down the sides and bottom of the bowl as needed to ensure even mixing.
7
Beat in the lemon juice, mixing until just combined. Then beat in the heavy cream, mixing just until incorporated. Using a rubber spatula, scrape the sides and bottom of the bowl to ensure the batter is completely smooth.
8
Pour the filling into the prepared crust and smooth the top with a silicone spatula. Place the cheesecake pan into a large, deep roasting pan. Fill the roasting pan with 3 inches of hot water to create a water bath.
9
Carefully place the pan in the oven and bake for 1 hour and 30 minutes. Turn the oven off and crack the door open slightly. Let the cheesecake sit undisturbed in the oven with the water bath for 45 minutes to cool gradually.
10
Remove the cheesecake from the oven and lift it out of the water bath. Place on a cooling rack and cool completely at room temperature, then chill uncovered for at least 6 hours or overnight. Do not remove the pan until completely chilled.
For the Topping
11
Using a small offset spatula, spread the lemon curd evenly over the top of the cooled cheesecake, stopping just before the edge to prevent spilling.
12
If desired, top with swirls of whipped cream, fresh lemon slices, and mint sprigs for an elegant presentation. Slice with a warm, clean knife and serve immediately.
Nutrition Facts
Servings 12
Amount Per Serving
Calories917kcal
% Daily Value *
Total Fat54gg84%
Saturated Fat33gg165%
Trans Fat1gg
Cholesterol150mgmg50%
Sodium250mgmg11%
Potassium150mgmg5%
Total Carbohydrate62gg21%
Dietary Fiber1gg4%
Sugars46gg
Protein13gg26%
Calcium 8% DV mg
Iron 4% DV mg
* Percent Daily Values are based on a 2,000 calorie diet. Your daily value may be higher or lower depending on your calorie needs.
Note
Room temperature ingredients: Ensure cream cheese, eggs, and heavy cream are at room temperature for a smooth, lump-free batter.
Water bath is essential: The water bath prevents cracks and ensures even, gentle baking for that signature creamy texture.
Don't overmix: Once eggs are added, mix on low speed and just until combined to avoid incorporating too much air.
Patience with chilling: Allow the full 6+ hours of chilling time for clean slices and optimal flavor development.
Make ahead friendly: This cheesecake can be made up to 2 days in advance; add toppings just before serving for best presentation.
Keywords:
lemon cheesecake, lemon dessert, creamy cheesecake, graham cracker crust, lemon curd topping, spring dessert, citrus cheesecake
Kelsey Perez
Food & Lifestyle Blogger
I’m a London-based food writer, recipe developer, and home cook who has been passionate about cooking for over 15 years. What started as a way to recreate my mother’s traditional dishes turned into a lifelong love for experimenting with flavors, writing about food, and helping others feel more confident in the kitchen.