Cheesy ham and rice casserole made with simple ingredients, creamy cheese, and tender rice. A quick, budget-friendly dinner perfect for busy nights
It’s not fancy. It’s not trying to impress anyone. But it’s creamy, a little salty from the ham, and somehow feels like a full meal without much effort. I’ve made it on rushed weeknights, lazy Sundays, and even once at 9 pm because I forgot dinner was my responsibility.
The thing I like most is how forgiving it is. I’ve messed up the rice before. I’ve added too much cheese once, which honestly wasn’t even a real problem. It still turned out good enough that everyone ate it without complaining.
That alone makes it worth keeping in rotation.
Ingredients I Used for the Recipe
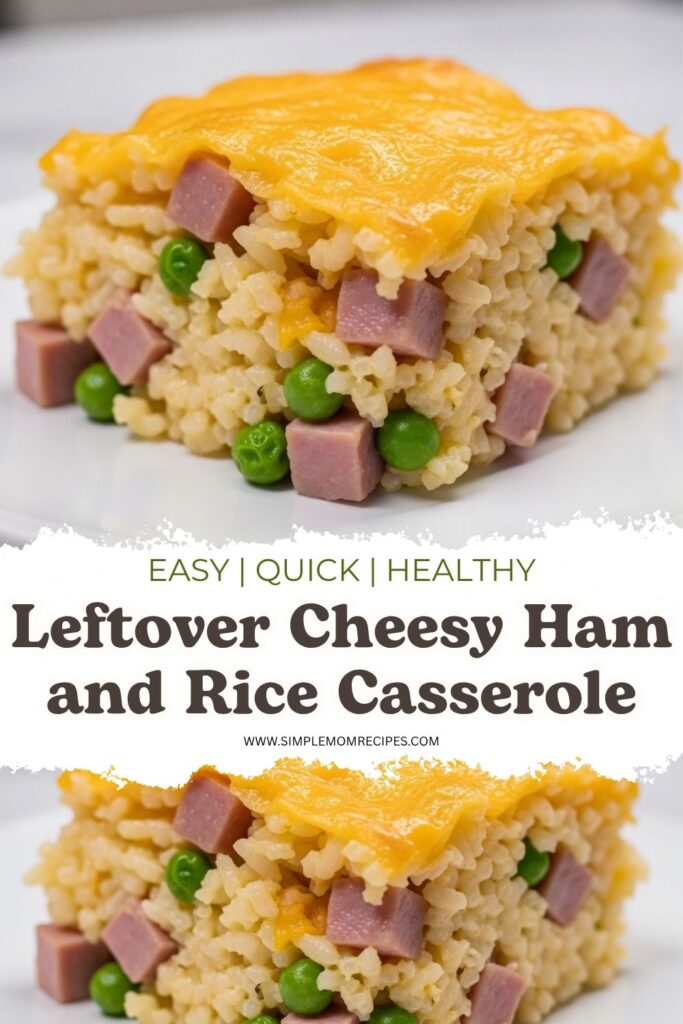
- 2 cups cooked rice – this is the base, and I usually use whatever leftover rice I have sitting in the fridge
- 2 cups cooked ham, cubed – adds that salty, hearty bite and makes it filling
- 2 cups frozen green peas – for a bit of color and something green so I feel better about the meal
- 1 (10.5 oz) can cream of chicken soup – brings everything together and makes it creamy without extra work
- 1/2 cup sour cream – adds a slight tang and smooth texture
- 3 cups shredded cheddar cheese – the main flavor, melty and rich, I always go a little heavy here
- Salt and pepper to taste – just enough to balance everything
- Onion powder and garlic powder – small amounts, but they make a difference
- A dash of hot sauce – optional, but I use it for a tiny kick that doesn’t overpower
How to make Cheesy Ham and Rice Casserole?
Step 1 – Preheat and get everything ready
I start by preheating the oven to 350°F and greasing a 9×13 baking dish. I’ve skipped greasing before and regretted it later while scrubbing, so I don’t skip it anymore.
Step 2 – Mix it all together
In a big bowl, I throw in the cooked rice, ham, peas, cream of chicken soup, sour cream, and about two cups of the cheese. I keep one cup aside for later. Then I add the seasonings and mix everything until it looks evenly coated.
This part always looks a little messy, but that’s normal. If it feels too thick, I sometimes add a splash of milk just to loosen it up.
Step 3 – Transfer to the baking dish
I pour the mixture into the prepared dish and spread it out evenly. It doesn’t have to be perfect. Then I sprinkle the reserved cheese over the top, making sure it covers most of the surface.
I’ve tried adding breadcrumbs once on top for crunch, and it actually worked pretty well.
Step 4 – Bake until bubbly
I bake it uncovered for about 30 minutes. You’ll know it’s ready when the edges start bubbling and the cheese on top melts into that golden layer.
There was a time I pulled it out too early because I was hungry. It was still good, just not as creamy as it should’ve been. Now I wait it out.
Step 5 – Let it sit for a bit
This part is hard, but I let it cool for about 5 minutes before digging in. It thickens slightly and becomes easier to serve.
Also, I’ve burned my mouth enough times to learn this the hard way.
Little things I’ve learned after making this way too many times
One thing I didn’t expect was how much the type of rice matters. Fresh rice works, but day-old rice from the fridge actually holds up better. It doesn’t get mushy, which I appreciate.
I’ve also swapped the peas before. Corn works. Mixed veggies work. Once I used broccoli, chopped small, and it turned out surprisingly good. So if someone asks if they can skip peas, yeah, you definitely can.
And about the ham. This recipe is perfect for leftovers. After holidays, I always end up with too much ham sitting around, and this is usually the first thing I make with it. It stretches the leftovers into something new.
There was a time I didn’t have enough ham, so I mixed in a bit of cooked chicken. Not traditional, but it worked. This recipe doesn’t really complain.
Tips
Use what you already have
I rarely follow this exactly anymore. If I’m short on something, I swap it. It still turns out fine.
Don’t skip the cheese on top
It might seem like a small step, but that golden layer on top makes a big difference. It’s the part everyone goes for first.
Add a tiny bit of heat
The hot sauce doesn’t make it spicy. It just wakes up the flavors a little. I used to skip it, now I don’t.
Make extra if you can
This reheats really well. I actually think it tastes better the next day once everything settles together.
Freeze it for later
I’ve made double batches and frozen one. On days when I don’t feel like cooking at all, pulling this out feels like a small win.
Don’t overthink it
This isn’t a delicate recipe. It’s meant to be easy. If it looks a little messy before baking, that’s normal.
How it usually ends up on my table
Most times, I serve this straight from the dish with a spoon and call it dinner. No sides, no extras. Maybe a simple salad if I’m trying to feel balanced, but honestly, it holds its own.
It’s one of those meals where people go quiet while eating. Not because it’s fancy, just because it hits that comfort spot. Warm, cheesy, filling. That kind of food.
I’ve made this when I didn’t feel like cooking, when I had leftovers to use up, and even when I just wanted something easy that I knew wouldn’t fail me. It’s not perfect, but it works. And sometimes that’s exactly what I need.

Leftover Cheesy Ham and Rice Casserole Recipe
Description
A quick, creamy family casserole loaded with ham, peas, and cheddar cheese. Ready in under 30 minutes with simple pantry ingredients—perfect for busy weeknights and picky eaters.
ingredients
Instructions
- Preheat oven to 350°F (175°C) and lightly grease a 9x13 inch baking dish.
- In a large bowl, combine cooked rice, cubed ham, frozen peas, cream of chicken soup, sour cream, 2 cups of shredded cheese, hot sauce (if using), and seasonings. Stir until well mixed.Reserve 1 cup of cheese for topping.
- Transfer the mixture to the prepared baking dish and spread evenly.
- Sprinkle the reserved 1 cup of cheddar cheese evenly over the top.
- Bake uncovered for 25–30 minutes, or until the casserole is bubbly around the edges and the cheese is melted and lightly golden.
- Remove from oven and let rest for 5 minutes before serving.
Nutrition Facts
Servings 6
- Amount Per Serving
- Calories 450kcal
- % Daily Value *
- Total Fat 28gg44%
- Saturated Fat 16gg80%
- Trans Fat 0gg
- Cholesterol 75mgmg25%
- Sodium 890mgmg38%
- Potassium 320mgmg10%
- Total Carbohydrate 24gg8%
- Dietary Fiber 3gg12%
- Sugars 4gg
- Protein 26gg52%
- Calcium 35% mg
- Iron 10% mg
* Percent Daily Values are based on a 2,000 calorie diet. Your daily value may be higher or lower depending on your calorie needs.
Note
- Make it ahead: Assemble the casserole, cover, and refrigerate up to 24 hours before baking. Add 5–10 minutes to bake time if starting cold.
- Freezer friendly: Freeze unbaked casserole for up to 1 month. Thaw overnight in fridge before baking.
- Veggie swaps: Try corn, green beans, or broccoli instead of peas.
- Extra crunch: Sprinkle buttered breadcrumbs or crushed crackers on top before baking.
