Some weeks just call for easy food that still feels fun, and this kids charcuterie board checks every box. It’s colorful, flexible, and somehow makes plain old snacks feel like a treat.
I love it for after school, playdates, or those weekends when kids are coming and going nonstop. You set it out once, and suddenly everyone’s happily grazing without asking for five different snacks.
This board is not about perfection or fancy ingredients. It’s about using what you already have, leaning into kid-friendly flavors, and making snack time feel relaxed instead of rushed.
When I make one, I think in simple categories first, then layer in extras if I have them. Cheese, crackers, meat, and fruit are the backbone, and everything else is just bonus fun.
It also grows with your kids. Younger kids love the finger foods and bright colors, while older kids appreciate heartier add-ons that actually fill them up.
Ingredients Needed for the Recipe
Cheese – Mild, kid-friendly cheeses like cheddar or string cheese give the board its savory base.
Crackers – A mix of shapes and textures keeps things interesting and pairs with everything else.
Deli meat or cured meat – Turkey, ham, pepperoni, or salami add protein and make the board more filling.
Fresh or dried fruit – Grapes, berries, oranges, or raisins bring sweetness and balance.
These ingredients are flexible, not fixed rules. If one category is missing, the board still works, and that’s part of the charm.
How to make Kids Charcuterie Board?
Make this recipe yours—just save it to your Pinterest board!"
Step 1 – Choose your board or platter
Start with a large platter, cutting board, or even two smaller plates if that’s easier. The goal is enough space to spread things out without crowding.
I usually go bigger than I think I need, because snacks disappear fast once kids start picking. Extra space also makes arranging everything much simpler.
Step 2 – Place the main items first
Lay down the cheese, crackers, meat, and fruit before anything else. I like to scatter each item in a few spots instead of keeping it all in one pile.
This makes the board feel full and lets multiple kids grab at once without hovering over the same section.
Step 3 – Add fun extras and add-ons
Once the basics are down, start filling in gaps with extras. Bowls of Goldfish, animal crackers, popcorn, or trail mix work great here.
If you’re adding sweets, keep them small and light so they don’t overpower the rest of the board.
Step 4 – Adjust for age and group size
Think about who you’re feeding before finalizing the board. Younger kids may prefer softer textures and familiar foods.
For older kids or teens, adding something hearty like pretzel bites or pizza snacks makes the board feel more satisfying.
Step 5 – Serve and keep it casual
Set the board out and let kids help themselves. That hands-off approach is part of what makes this so appealing.
If you’re worried about sharing, individual plates or toothpicks are easy swaps that still keep the fun intact.
Why this works so well for kids
Kids love choice, and a charcuterie board quietly gives them control. They pick what they want, skip what they don’t, and feel good about it.
It also removes pressure from the table. There’s no big “meal moment,” just easy snacking that fits around play and conversation.
I’ve noticed kids often try more foods this way, too. Something about seeing everything laid out makes even fruit feel exciting.
Ideas for customizing the board
This is where you can really make the board your own. No two boards ever look the same in my kitchen.
You can theme it loosely around what you have, what the kids love, or even what needs to be used up in the fridge.
Adding bowls helps when you want to include small snacks without cluttering the main board. It also keeps messes contained.
Tips
Wash fruit ahead of time so the board comes together quickly.
Cut cheese into different shapes to keep things visually interesting.
Use small bowls for nuts or candy to control portions.
Ask about allergies before adding nuts or shared snacks.
Have kids wash their hands before serving.
Use toothpicks to reduce hands touching shared food.
Make individual plates if you prefer less sharing.
Serving ideas for different occasions
This kids charcuterie board works just as well for everyday snacks as it does for gatherings. That flexibility is what keeps me coming back to it.
For after-school, I keep it simple and light. For weekends or parties, I bulk it up with more protein and warm snacks.
It’s also a great option for outdoor playdates. Set it on a picnic table, and suddenly snack time feels like an event.
Making it ahead and storing leftovers
You can prep many of the ingredients ahead of time, which makes assembly fast later. I often wash fruit and cut cheese earlier in the day.
Leftovers store well if you keep things separate. Crackers stay crisp, fruit stays fresh, and nothing feels wasted.
That flexibility means this board never feels like extra work. It fits into real life, which is exactly why it works.
At the end of the day, this kids charcuterie board is about ease and enjoyment. It turns everyday snacks into something kids actually get excited about.
And honestly, that little bit of joy at snack time goes a long way. ::contentReference[oaicite:0]{index=0}
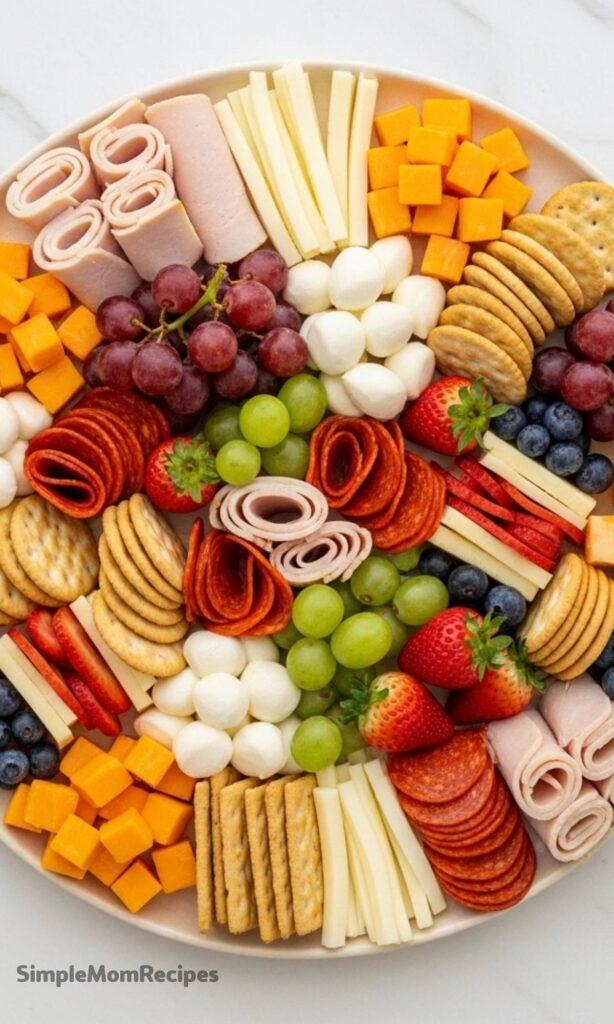
A fun, colorful, and customizable snack board featuring cheese, crackers, deli meats, fresh fruits, and more—perfect for after-school snacks, playdates, or parties. This kid-friendly charcuterie board is easy to assemble and encourages healthy (and not-so-healthy!) snacking in a hands-on, engaging way.
ingredients
Core Ingredients
1cup cheddar cheese cubes (or mild white cheddar)
1cup mozzarella string cheese (halved or whole)
1cup assorted crackers (whole grain, butter, or cheese-flavored)
1cup turkey slices (rolled or cubed)
1/2cup pepperoni slices
1cup grapes (halved if serving young kids)
1cup strawberries (sliced)
1cup blueberries
Optional Add-Ons
1/2cup dried apricots or raisins
1/2cup unsalted peanuts or cashews (omit if allergies are a concern)
1/2cup Goldfish crackers
1/4cup animal crackers
1/4cup mini marshmallows or M&Ms (for a sweet treat)
Instructions
1
Wash and prepare all fruits. Slice strawberries and halve grapes if needed.
2
Cut cheese into bite-sized cubes or use pre-cut options. Leave string cheese whole or halve lengthwise.
3
Roll or cube deli turkey and pepperoni for easy grabbing.
4
Arrange ingredients on a large platter or board. Group similar items together but scatter them in 3–4 spots for visual appeal and easy access.
5
Place crackers, Goldfish, nuts, and sweets in small bowls or directly on the board.
6
For germ-conscious settings, provide toothpicks or serve individual plates with pre-portioned snacks.
Nutrition Facts
Servings 6
Amount Per Serving
Calories320kcal
% Daily Value *
Total Fat16gg25%
Saturated Fat7gg35%
Trans Fat0gg
Cholesterol45mgmg15%
Sodium620mgmg26%
Potassium280mgmg8%
Total Carbohydrate30gg10%
Dietary Fiber3gg12%
Sugars12gg
Protein14gg29%
Calcium 20 mg
Iron 8 mg
* Percent Daily Values are based on a 2,000 calorie diet. Your daily value may be higher or lower depending on your calorie needs.
Note
Make it vegetarian: Skip the deli meats and add hummus, roasted chickpeas, or veggie sticks.
Allergy-friendly: Always check for nut, dairy, or gluten allergies. Use seed butter cups or gluten-free crackers as needed.
Prep ahead: Wash fruit and cut cheese/meats up to a day in advance. Assemble just before serving to keep crackers crisp.
Portion control: For parties, consider individual mini boards using muffin tins or small plates.
Keywords:
kids charcuterie board, snack board for kids, easy kids snacks, party snacks for children, healthy kids snacks
Kelsey Perez
Food & Lifestyle Blogger
I’m a London-based food writer, recipe developer, and home cook who has been passionate about cooking for over 15 years. What started as a way to recreate my mother’s traditional dishes turned into a lifelong love for experimenting with flavors, writing about food, and helping others feel more confident in the kitchen.