Let’s be honest, store-bought protein bars can be, well, a little boring after a while. They’re also a mystery wrapped in shiny packaging. I got tired of that mystery, and you might be too. We started making everything from scratch in our kitchen, and these bars were a natural, delicious next step.
They’re the perfect afternoon rescue, the kind you can feel genuinely good about grabbing. They also have this fantastic sweet and salty thing happening, with a rich peanut butter base and just a whisper of dark chocolate on top. Honestly, they disappear faster than I’d care to admit.
The Simple Joy of Knowing What’s Inside
There’s a quiet confidence that comes from making your own snacks. You control the sweetness, you pick the peanut butter, you choose the chocolate. No unpronounceable ingredients hiding in the small print. It’s just straightforward, real food.
That’s the real magic here. You’re creating something nourishing and delicious with your own hands, and it takes barely fifteen minutes of active time. The rest is just waiting, which is always the hardest part.
Ingredients Needed for the Recipe
Here’s your simple shopping list. Every item has a little job to do, working together to create that perfect chewy-yet-soft bar.
- Natural Creamy Peanut Butter: This is the star, providing rich flavor and helping bind everything together. Go for one with just peanuts and maybe a touch of salt.
- Pure Maple Syrup: It sweetens things naturally and adds a lovely depth you just don’t get from other sweeteners.
- Almond Flour: This little helper rounds out the texture, making the bars tender instead of chalky.
- Melted Coconut Oil: A secret weapon for texture! It keeps the final bar satisfyingly soft and helps the chocolate topping set beautifully.
- Vanilla Extract: A dash of vanilla smooths everything out, adding a warm background note that makes the flavors sing.
- Plain Protein Powder: The main event. A plain or vanilla plant-based powder blends in seamlessly without overpowering.
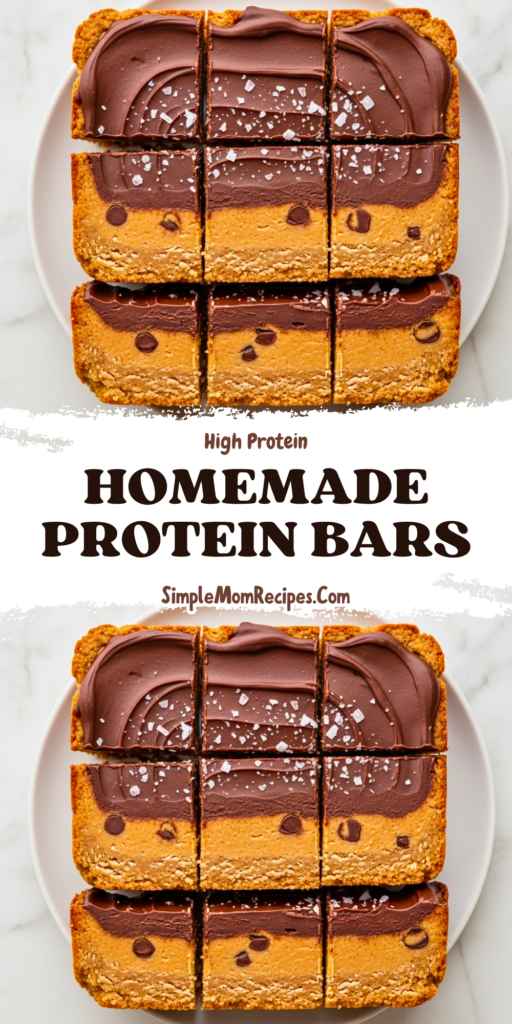
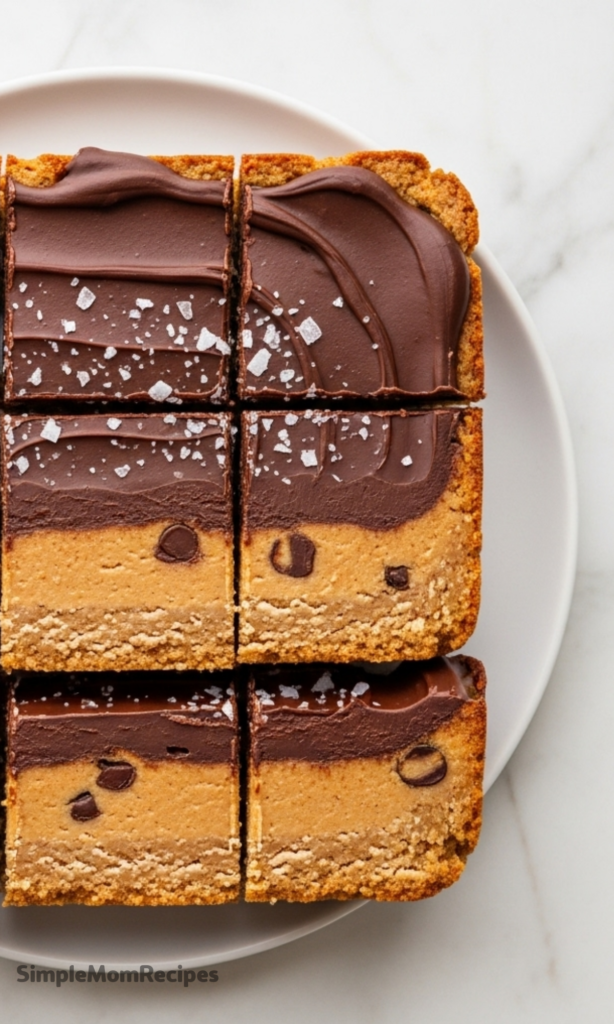
- Dark Chocolate Chips: They melt into a thin, elegant topping that cracks delightfully when you take a bite. A little goes a long way.
- Sea Salt: Just a flaky sprinkle on top before the chocolate sets. It’s optional, but it truly elevates every single flavor.
How to make Homemade Protein Bars?
The process is wonderfully hands-on. You’ll get that playdough-like dough ready, press it into a pan, and finish it with a shiny chocolate coat. It’s almost therapeutic.
Step 1: Mix the Base Dough
Grab a medium bowl and add your peanut butter, maple syrup, almond flour, the 1 ½ tablespoons of melted coconut oil, vanilla, and protein powder. Stir it all together with a sturdy spoon. It might seem crumbly at first, but keep going.
The mixture will suddenly come together into a single, soft ball of dough. It should hold its shape when you pinch it, just like classic playdough. If it seems too dry, a tiny splash of water can help it along.
Step 2: Press and Shape
Line a 9×5 inch loaf pan with a sheet of parchment paper, letting some hang over the sides. This creates handy little handles for lifting the whole block out later. Transfer your dough into the prepared pan.
Now, press it down firmly into one even, compact layer. I like to use the bottom of a small glass or a flat measuring cup to roll over the top, it gets it perfectly smooth and even. This step ensures your bars won’t fall apart later.
Step 3: Create the Chocolate Topping
Place your dark chocolate chips and that remaining half teaspoon of coconut oil into a microwave-safe cup. Heat it in short, 10-second bursts, stirring well after each one. Be patient, chocolate burns easily.
Once it’s fully melted and glossy, drizzle it all over the peanut butter base. Use a spoon or a small spatula to gently spread it into a thin, even layer that covers every bit. Now’s the time for that flaky sea salt sprinkle, if you’re using it.
Step 4: Chill, Slice, and Enjoy
Slide the whole pan into the refrigerator. Let it chill undisturbed for about 30 minutes, or until the chocolate topping is completely set and firm to the touch. You’ll know it’s ready.
Use the parchment paper to lift the whole slab out onto a cutting board. Cut it into 8 substantial squares, or 16 smaller, snack-sized rectangles. A pro tip? Cut them before you store them, otherwise the chocolate can be tricky to slice cleanly.
Smart Swaps and Variations
Don’t have almond flour? Oat flour is a good stand-in, though it will make the texture a bit more dense and hearty. It still works wonderfully. If you need a nut-free option, sunflower seed butter is a fantastic swap for the peanut butter.
And about that chocolate. The recipe as written gives you a lovely, modest coating. But if you’re in the mood for a true dessert bar, double the chocolate. One of our testers did this in an 8×8 pan and said it tasted like a grown-up, protein-packed Reese’s cup. You have options.
Tips
- Use plain or vanilla protein powder for the best, cleanest flavor. Some chocolate or heavily flavored powders can taste a bit artificial here.
- That darker, “robust” grade of maple syrup really makes a difference. It lends a caramel-like note that’s just divine with the peanut butter.
- When melting chocolate, short bursts in the microwave are key. Stirring well between heats prevents seizing and ensures a silky-smooth topping.
- Don’t skip lining the pan with parchment. It’s the easiest way to get a clean lift-out, with no sticking or scraping involved.
Storing Your Homemade Creations
These bars are happiest living in a sealed container in the fridge. They’ll stay perfect and fresh-tasting for up to two weeks there, making them a fantastic make-ahead snack. They’re also quite portable.
They hold up just fine at room temperature for a few hours, so they’re safe for lunchboxes or a morning hike. I pack them for my son all the time, and they arrive in one delicious piece. If you have incredible willpower, they can even be frozen for longer storage.

Homemade Protein Bars Recipe
Description
These homemade protein bars are a family and fan favorite! They’re full of big peanut butter and chocolate flavor, using your favorite protein powder and a few extra ingredients. It’s a plant-based treat you can feel good about! Whip them up in just 15 minutes for a wholesome, customizable snack that’s vegan, gluten-free, and packed with protein.
ingredients
Instructions
-
In a large bowl, mix the peanut butter, maple syrup, almond flour, 1½ tablespoons melted coconut oil, vanilla extract, and protein powder until a playdough-like dough forms.
-
Line a 9" x 5" loaf pan (or similar small pan) with parchment paper, leaving overhang on two sides for easy removal.
-
Press the dough into the pan evenly. Use a small glass or flat-bottomed cup to smooth the surface if needed.
-
In a microwave-safe measuring cup, combine chocolate chips and ½ tsp coconut oil. Microwave in 10-second bursts, stirring between each, until fully melted.
-
Drizzle the melted chocolate evenly over the peanut butter layer, then use a spatula to spread into a thin, uniform coating. Sprinkle lightly with flaky sea salt if desired.
-
Refrigerate for at least 30 minutes, or until the chocolate is firm. Remove using the parchment overhang and cut immediately into 8 large or 16 small bars.
-
Store bars in an airtight container in the refrigerator for up to 2 weeks. They hold up well at room temperature for a few hours—perfect for packed lunches!
Nutrition Facts
Servings 16
- Amount Per Serving
- Calories 180kcal
- % Daily Value *
- Total Fat 10gg16%
- Saturated Fat 4gg20%
- Trans Fat 0gg
- Cholesterol 0mgmg0%
- Sodium 120mgmg5%
- Potassium 180mgmg6%
- Total Carbohydrate 15gg5%
- Dietary Fiber 3gg12%
- Sugars 8gg
- Protein 10gg20%
- Calcium 40 mg
- Iron 1.8 mg
* Percent Daily Values are based on a 2,000 calorie diet. Your daily value may be higher or lower depending on your calorie needs.
Note
- Protein powder tip: Plain works best for neutral flavor, but vanilla is a great alternative.
- Want more chocolate? Double the chocolate chips for a Reese’s-like treat and use an 8×8 pan.
- Make it nut-free: Use sunflower seed butter instead of peanut butter.
- Storage: Keep refrigerated; bars can also be frozen for up to 3 months (texture may become slightly drier).