There are two kinds of people in this world. Those who adore coconut, and those who, well, don’t. Considering my deep love for coconut cake, you can probably guess which camp I’m in. And if you’re reading this, I have a feeling you’re right there with me, ready to dive into something truly special.
Honestly, even if you think you’re on the fence about coconut, this pie might just change your mind. It’s not just about the coconut flavor. It’s about the whole experience.
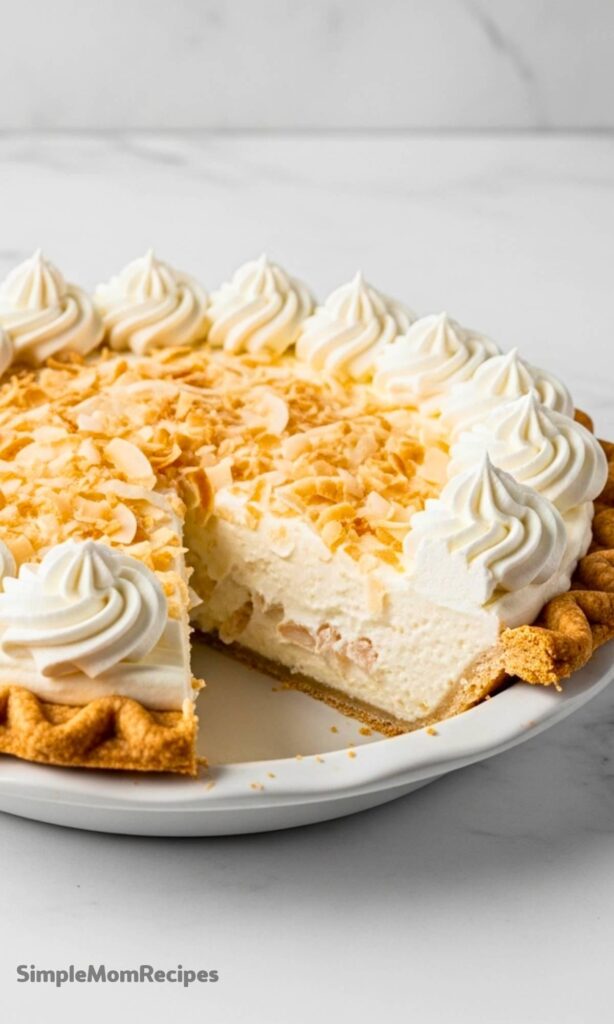
That perfectly flaky, golden-brown crust you made yourself. A filling that’s so thick, creamy, and lush it’s almost like a luxurious pudding. And then you pile on a mountain of fresh, barely-sweet whipped cream. Every single forkful is a combination of textures and flavors that just works.
I worked really hard to get this recipe just right. I took everything I loved about making classic puddings and banana cream pie and channeled it all into a coconut version that I genuinely think is the best. It took a few tries in the kitchen, but the result? A pie that’s completely from scratch and absolutely worth every bit of effort. Let’s get started, because this is one dessert you’re going to want to make ASAP.
The Three Essential Parts of This Pie
Before we even think about turning on the oven, let’s break down what we’re building. A great coconut cream pie isn’t complicated, but it does have a few key components, and understanding them makes the whole process smoother and way more fun.
First, the Crust. This needs to be a fully blind-baked pie crust shell. That just means we bake the crust all by itself until it’s golden brown and crisp, with no filling in it. Since the coconut filling doesn’t go into the oven, this step is non-negotiable. It’s what gives us that sturdy, flaky base that shatters a little when you cut into it.
Second, the Star of the Show: The Creamy Coconut Filling. This is a stovetop situation. We’re going to make a real pudding from scratch using egg yolks, a whole can of creamy coconut milk, and plenty of shredded coconut. It’s rich, it’s luscious, and it’s got that deep, authentic coconut flavor you just can’t get from a box.
And finally, the Crowning Glory: The Whipped Cream. Please, please don’t even think about using the store-bought stuff here. Homemade whipped cream is incredibly simple to make, and its light, airy sweetness is the perfect partner for the thick, rich filling underneath. We’ll pile it high, maybe add some toasted coconut on top, and that’s the picture of perfection.
Ingredients Needed for the Recipe
Let’s gather everything we need. I’ve tested this recipe over and over, and each ingredient has a specific job to do. Using the right things will set you up for success from the very beginning.
- 1 unbaked Pie Crust: This is your foundation. You can use my recipe for a flaky butter crust or an all-butter version. Make sure it’s unbaked and well-chilled before we start the blind baking process. You only need one crust for this pie.
- 4 large egg yolks: These are our primary thickeners. They give the filling its rich, velvety texture and beautiful pale yellow color. Save the whites for another use, like an omelet or meringue cookies!
- 1/4 cup (30g) cornstarch: This works alongside the egg yolks to ensure the filling sets up firmly enough to slice beautifully, without being rubbery.
- 1 (14 ounce) can full-fat coconut milk: This is non-negotiable. You need the full-fat canned coconut milk, the kind you find in the international aisle, not the stuff in a carton next to the almond milk. It’s thick, rich, and provides the base for all that coconut flavor.
- 1 cup (240ml) half-and-half: I tested this with heavy cream (too heavy) and whole milk (too thin), and half-and-half is the Goldilocks here. It creates a filling that’s rich but not overly so, with a perfect mouthfeel.
- 2/3 cup (130g) granulated sugar: Just the right amount to sweeten the filling. The sweetened shredded coconut adds a bit more sweetness too.
- 1/4 teaspoon salt: Just a pinch to balance all the sweetness and enhance the other flavors. It makes a surprising difference.
- 1 cup (80g) sweetened shredded coconut: This gets stirred right into the filling, giving you those lovely, soft, sweet shreds in every single bite. No dry, chewy chunks here.
- 2 Tablespoons (28g) unsalted butter, softened: A little butter stirred in at the end adds a final touch of richness and a beautiful, satiny sheen to the pudding.
- 1 teaspoon pure vanilla extract & optional 1/2 teaspoon coconut extract: Vanilla is a must. The coconut extract is optional, but if you want to dial the coconut flavor up to an 11, go for it. It’s a lovely boost.
- For the Whipped Cream: You’ll need 1 and 1/2 cups (360ml) of cold heavy cream, 3 Tablespoons of confectioners’ or granulated sugar, and 3/4 teaspoon of vanilla extract. Keep that cream as cold as possible for the best volume.
- Optional for garnish: Some unsweetened coconut flakes, coconut chips, or even more sweetened shredded coconut, lightly toasted for that beautiful finish.
How to make Homemade Coconut Cream Pie?
Alright, let’s get to the fun part. We’ll take it step by step, and I’ll walk you through each part. It’s a process, but it’s a rewarding one.

Step 1 – Prepare and Blind Bake Your Pie Crust
First things first, your pie crust needs to be ready to go. I love making my pie dough the night before so it has plenty of time to chill in the fridge for at least 2 hours. When you’re ready, roll it out on a lightly floured surface, fit it into your 9-inch pie dish, and crimp or flute those edges however you like.
Pop that shaped crust back into the refrigerator for at least 30 minutes. This is so important to prevent shrinking. Once it’s nice and cold, preheat your oven to 375°F (190°C). Line the chilled crust with parchment paper and fill it with pie weights or dried beans. Bake for about 15 minutes, just until the edges are lightly golden.
Carefully remove the weights and parchment, prick the bottom of the crust all over with a fork, and return it to the oven. Bake for another 12-15 minutes, or until the entire bottom and crust are a beautiful golden brown. Set it on a wire rack to cool completely. You can even do this up to 3 days ahead and keep it covered in the fridge.
Step 2 – Make the Coconut Filling on the Stove
Now for the magic. In a small bowl, whisk those 4 egg yolks and the cornstarch together until it’s smooth and pale. Set that bowl aside for now. Grab your medium saucepan and whisk together the can of coconut milk, the half-and-half, the granulated sugar, and the salt. Place it over medium heat, whisking occasionally, and bring it to a boil. Let it boil for a full 2 minutes.
This next part is called tempering, and it’s easier than it sounds. Carefully remove about 1/2 cup of that hot milk mixture from the saucepan. In a slow, steady stream, whisk it into the bowl with the egg yolks and cornstarch. You have to whisk constantly so the heat from the milk warms the eggs gradually without scrambling them. Once that’s combined, pour the egg yolk mixture back into the saucepan in a slow, steady stream, whisking like crazy the whole time.
Step 3 – Thicken, Finish, and Fill the Crust
Keep that saucepan over medium-low heat. The pudding will immediately start to bubble and get very thick. Stand back a little because those bubbles can pop! Whisk and cook for another 90 seconds to ensure the cornstarch is fully cooked and the pudding is nice and thick. Then, remove the pan from the heat.
Right away, stir in the 1 cup of sweetened shredded coconut, the 2 Tablespoons of softened butter, the teaspoon of vanilla, and that optional 1/2 teaspoon of coconut extract. Stir until the butter is melted and everything is beautifully combined. Now, immediately pour this warm, luscious pudding into your completely cooled pie crust. It’s going to look gloriously creamy.
Step 4 – Chill the Pie Until Firm
This is the hardest part, the waiting. You have to cover the pie tightly with plastic wrap, but make sure the wrap is pressed directly onto the surface of the pudding. This prevents that dreaded skin from forming. Pop the whole thing into the refrigerator for at least 3 hours, but overnight is even better. It needs that time to fully set and chill so you get clean, beautiful slices.
Step 5 – Whip the Cream and Decorate
Once the pie is completely chilled and firm, it’s time for the final touch. In a large bowl using a hand mixer or a stand mixer with the whisk attachment, combine the cold heavy cream, your sugar of choice, and the vanilla. Start on medium-low and gradually increase the speed to medium-high. Whip until you get medium peaks. That means when you lift the whisk, the cream holds a soft, slightly droopy peak. It’s perfect for spreading or piping.
You can simply spread the whipped cream over the filling with a spatula, or get fancy with a piping bag. I love using a large star tip to pipe big, generous swirls. Sprinkle your toasted coconut or coconut flakes all over the top. You can serve it right away, or chill it for another hour or two to let it firm up slightly. Then, slice and enjoy every single bite.
My Favorite Ways to Switch It Up
One of the best things about this pie is how easy it is to make it your own. I’ve played around with a few variations over the years, and these are the ones I keep coming back to.
If you’re not a fan of whipped cream, or you just have a bunch of egg whites to use up, a meringue topping is a fantastic alternative. I’ve used the meringue recipe from my s’mores cupcakes before, and it’s perfect. It has that slightly marshmallowy flavor and texture. Just pile it on top of the filling and use a kitchen torch to toast it to a beautiful golden brown. It’s a stunning look and a delicious change of pace.
For an extra layer of texture, consider adding a thin layer of something crunchy in the bottom of the baked pie crust before you pour in the filling. A sprinkle of toasted coconut, some crushed shortbread cookies, or even a very thin smear of good quality dark chocolate would be incredible. It adds a little surprise when you get to the bottom.
Tips
Over the many times I’ve made this pie, I’ve learned a few things that can really make a difference. Keep these in mind and you’ll be golden.
- Patience with the crust is key. Don’t skip the chilling time before blind baking. A cold crust is a crust that won’t shrink. It’s that simple.
- When tempering the eggs, go slow. A fast, steady stream of the hot liquid while whisking constantly is your goal. If you dump it all in at once, you might end up with scrambled eggs in your pudding.
- Let the pie chill for the full time. I know it’s tempting to dig in early, but a warm or even slightly soft filling will fall apart when you try to slice it. That 3-hour minimum is there for a reason. Overnight is best for a perfect, clean slice.
- Keep your cream cold for whipping. For the best volume, put your bowl and whisk attachment in the freezer for about 10-15 minutes before you start whipping the cream. It makes a huge difference.
- Press that plastic wrap directly onto the filling. Don’t just drape it over the top of the pie dish. It needs to be touching the surface of the pudding to prevent a skin from forming while it chills.
Storing Your Pie and Making It Ahead
This pie is a dream for anyone who loves to get ahead of the game. There are so many points where you can pause and pick it up later. The baked pie crust can be made and stored at room temperature for a day or in the fridge for up to 3 days. The filled, unbaked pie can chill in the fridge for a full day before you add the whipped cream.
You can even freeze the whole pie after the filling has set. Just make sure it’s completely cool, cover it tightly with an extra layer or two of plastic wrap, and then foil. It will be happy in the freezer for up to 3 months. When you’re ready to serve it, thaw it overnight in the refrigerator, then make your fresh whipped cream and top it. I don’t recommend freezing it with the whipped cream already on top, as the texture of the cream will change when it thaws.
Once the whipped cream is on, any leftovers should be covered loosely and stored in the refrigerator. It will stay perfect for about 5 days, though honestly, in my house, it’s lucky to last two.
Homemade Coconut Cream Pie Recipe
Description
This coconut cream pie features a thick and creamy coconut filling, a crispy homemade pie crust, fluffy sweetened whipped cream, and toasted coconut on top. It’s a dreamy make-ahead dessert that’s perfect for coconut lovers and anyone who enjoys rich, creamy pies with a flaky crust.
ingredients
Pie Crust
Coconut Filling
Whipped Cream Topping
Instructions
Prepare the Pie Crust
Make pie dough ahead of time and chill for at least 2 hours. Preheat oven to 375°F (190°C). Roll out dough into a 9-inch pie dish, crimp or flute edges, then chill for 30 minutes. Line with parchment paper, fill with pie weights, and bake for 15 minutes. Remove weights, prick bottom with fork, and bake another 14–15 minutes until golden brown. Cool completely.Make the Coconut Filling
Whisk egg yolks and cornstarch together in a bowl. In a saucepan, combine coconut milk, half-and-half, sugar, and salt. Bring to a boil over medium heat, whisking occasionally. Boil for 2 minutes. Slowly temper egg mixture by adding ½ cup of hot liquid while whisking constantly. Pour tempered yolks back into saucepan and cook for 1 minute 30 seconds, whisking continuously until thickened.Finish and Chill Filling
Remove from heat. Stir in shredded coconut, butter, vanilla extract, and coconut extract (if using). Pour warm filling into cooled pie crust. Cover surface directly with plastic wrap to prevent skin. Refrigerate at least 3 hours or overnight.Top with Whipped Cream
Using a mixer, whip cold heavy cream, sugar, and vanilla on medium-high speed until medium peaks form (3–4 minutes). Pipe or spread over chilled pie. Garnish with toasted coconut if desired. Serve immediately or chill up to a few hours before serving.
Nutrition Facts
Servings 8
- Amount Per Serving
- Calories 420kcal
- % Daily Value *
- Total Fat 28g44%
- Saturated Fat 18g90%
- Cholesterol 135mg45%
- Sodium 280mg12%
- Potassium 220mg7%
- Total Carbohydrate 36g12%
- Dietary Fiber 2g8%
- Sugars 24g
- Protein 6g12%
- Calcium 80 mg
- Iron 2 mg
* Percent Daily Values are based on a 2,000 calorie diet. Your daily value may be higher or lower depending on your calorie needs.
Note
- Make-Ahead Friendly: Assemble pie (without whipped cream) up to 1 day ahead. Add topping just before serving.
- Toasting Coconut: Spread coconut on a baking sheet and bake at 300°F (149°C) for 6–8 minutes until golden.
- No Coconut Extract? The sweetened shredded coconut provides plenty of flavor—omit if unavailable.
- Dairy-Free Option: Not tested, but full-fat canned coconut milk may replace half-and-half; results may vary.
