There’s a certain magic in the air when October rolls around, a crisp feeling that just begs for spooky fun and impossibly cute treats. And honestly, what captures that spirit better than a classic s’more, all dressed up for a Halloween party?
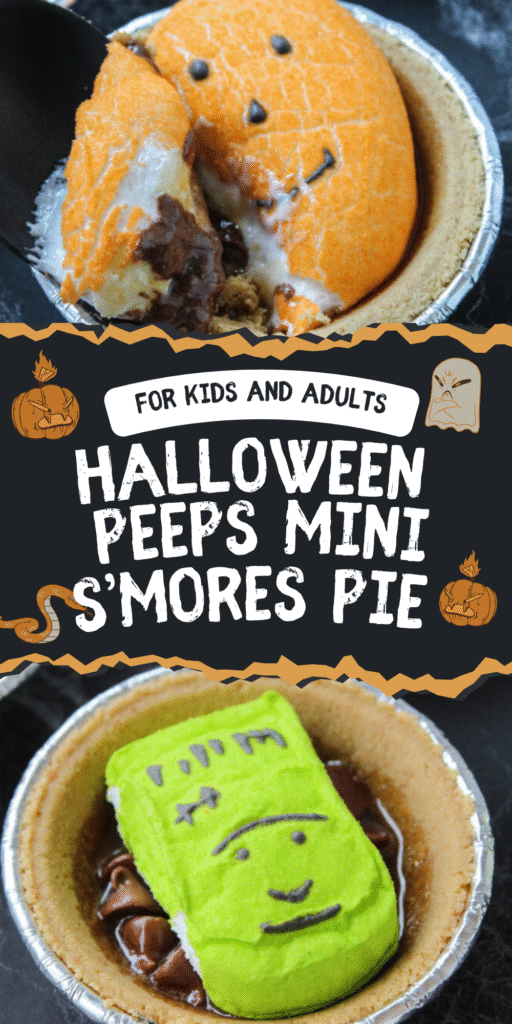
These Halloween PEEPS Mini S’mores Pies are the answer, a dessert so simple it feels like a little bit of wizardry. They combine the nostalgic comfort of graham crackers, chocolate, and marshmallow with a festive twist that’s downright adorable.
Best of all, they come together with just three ingredients and almost no effort, leaving you plenty of time to focus on costumes, decorations, or just enjoying the season.
Why This Recipe is a Halloween Game-Changer?
Let’s be real, Halloween can be hectic enough without spending hours in the kitchen on elaborate desserts. That’s the true horror we want to avoid. This recipe is the perfect antidote to any pre-party stress.
It uses store-bought mini pie crusts, which are a total lifesaver and create such a professional, individual-serving look. You get all the fun of baking and that incredible warm, melty s’mores experience without any of the complicated steps.
It’s the kind of recipe that makes you look like a superstar host, even when your secret is how frighteningly easy it all was.
Ingredients Needed for the Recipe
Gathering your ingredients is a breeze, and you might not even need to make a special trip to the store. Here’s the simple list that makes the magic happen:
- Mini Graham Cracker Pie Crusts: You’ll typically find these sold in a pack of six in the baking aisle. They’re the perfect little edible bowls for our s’mores creation.
- Hershey’s Milk Chocolate Bars: The classic choice for any s’mores purist. You’ll need about 12 squares, or two to three per pie, to get that rich, melty chocolate layer.
- Halloween PEEPS: This is where the festive fun comes in! Choose your favorite Halloween characters—whether it’s pumpkins, ghosts, or bats—to sit proudly on top.
The Secret to the Perfect PEEP
Not all PEEPS are created equal, especially when they hit the heat of the oven. Through a bit of, ahem, delicious experimentation, a pattern emerged that can help you get the best result.
The jack-o-lantern PEEPs, for whatever wonderful reason, tend to puff up and hold their cute shape the most reliably after baking. Their structure seems to withstand the warmth a bit better than some of the more delicate shapes.
This isn’t a hard and fast rule, of course—ghosts and bats will still taste amazing. But if presentation is your top priority, the pumpkins are a fantastic bet.
How to make Halloween PEEPS Mini S’mores Pies?
The process is so straightforward it’s almost silly. Just follow these simple steps, and in less than 15 minutes, you’ll have a tray of warm, gooey, and utterly delightful Halloween treats.
Preparing Your Pies
Start by preheating your oven to 350°F (175°C). This gives it plenty of time to reach the perfect temperature while you assemble the pies.
Open the package of mini pie crusts and carefully separate them. Place them evenly spaced on a standard baking sheet; no need for any fancy parchment paper or grease.
This setup makes it easy to slide them in and out of the oven safely, and it contains any potential bubbling-over marshmallow, though that’s part of the charm.
Adding the Chocolate
Unwrap your Hershey’s bars and break them into the individual squares. The familiar sound of snapping chocolate is a nice little preview of the goodness to come.
Place 2 to 3 squares of chocolate into the bottom of each mini crust. You want a solid layer that will melt into a pool of chocolatey goodness, so don’t be shy.
If you’re feeling adventurous, a small handful of chocolate chips works here too, but there’s something wonderfully authentic about using the classic bars.
Topping with PEEPS
Now for the main event! Unwrap your Halloween PEEPS and place one squarely on top of the chocolate in each crust.
Gently press down just enough so the PEEP settles into the crust. They might look a little tall and precarious now, but trust the process—the heat will work its magic.
This is where your personal style shines. You can create a monochromatic theme with all orange pumpkins or a spooky mix of colors and characters.
The Baking Process
Carefully slide the baking sheet into your preheated oven. Set a timer for exactly 8 minutes—this is crucial.
You’re not looking for a golden-brown crust here; you’re just warming everything through until the chocolate is glossy and melted and the PEEPS have puffed up beautifully.
Keep an eye on them through the oven window; it’s a mesmerizing sight watching those marshmallow ghosts and pumpkins transform.
Cooling and Serving
Once the timer goes off, put on your oven mitts and pull the tray out. The pies will be extremely hot, so resist the urge to touch them right away.
Let the pies cool on the baking sheet for a solid 2 to 3 minutes. This allows the molten chocolate to set just slightly, making them the perfect temperature for eating.
Serve them warm, maybe with a small fork, and watch as everyone’s face lights up with that first delicious, gooey bite.
Tips
While the recipe is simple, a few small tips can make your experience even smoother and more fun. Think of these as little secrets from a fellow Halloween baker.
First, remember that these are best enjoyed immediately. The texture is at its peak when they’re fresh from the oven, with that wonderful contrast between the warm, soft filling and the crisp crust.
If you’re serving a smaller group, you can absolutely bake just two or three pies and save the remaining ingredients for another night. The components store perfectly well on their own.
Don’t limit yourself to graham cracker crusts! A chocolate or even an Oreo crumb crust would be a decadent and delicious alternative that plays wonderfully with the other flavors.
And finally, the most important tip: let them cool. That two-minute wait feels like an eternity, but it’s the difference between a delightful treat and a burnt tongue. Patience is a virtue, especially when melted sugar is involved.
How Can I Make These for Other Holidays?
The beautiful thing about this concept is that it’s a year-round celebration waiting to happen. The basic formula is endlessly adaptable to any holiday or occasion you can imagine.
For Christmas, use green and red tree or snowman PEEPS atop the pies for a festive winter twist. Valentine’s Day calls for pink and red heart PEEPS, creating a sweet treat for your sweetheart.
Imagine a platter of these for Easter, crowned with yellow chick or bunny PEEPS—it’s an instant hit for a spring brunch or dinner. The possibilities are truly endless, making this a go-to recipe in your arsenal.
What’s the Best Way to Serve These at a Party?
Presentation is key when you want to impress your guests, even with a simple dessert. Since these mini pies are individual servings, they naturally look great arranged on a platter or a rustic wooden board.
For a real wow factor, consider setting up a “s’mores pie bar” where guests can customize their own. Have the unbaked crusts set out with bowls of chocolate squares and an assortment of PEEPS.
Everyone can build their own, and you can pop a whole batch into the oven at once. It’s an interactive, fun activity that makes the dessert course an event in itself.
Can I Get the Kids Involved in Making Them?
Absolutely! This is one of the best recipes for little helpers. The steps are safe, simple, and incredibly satisfying for children who love to be in the kitchen.
They can be in charge of placing the chocolate squares into the crusts, which is great for counting practice. The best job, of course, is carefully selecting and placing the PEEPS on top.
It gives them a sense of ownership and pride, and they’ll be so excited to eat something they helped create. Just make sure an adult handles the hot oven tray and the final serving.


Halloween PEEPS Mini S’mores Pie Recipe
Description
Halloween PEEPS mini s’mores pies are a spooktacular dessert for any festive party or Trick-or-Treat night! With only 3 ingredients and 8 minutes in the oven, these s’mores pies are frighteningly easy to make—and delightfully gooey, chocolatey, and fun!
ingredients
Instructions
-
Preheat oven to 350°F (177°C). Line a baking sheet with parchment paper or foil (optional, for easy cleanup).
-
Place the 6 mini graham cracker pie crusts on the baking sheet.
-
Divide the chocolate squares evenly among the crusts—place 2–3 squares in each crust.
-
Top each chocolate-filled crust with one Halloween PEEP.
-
Bake for 8 minutes, or until the marshmallows puff slightly and the chocolate begins to melt.
-
Carefully remove from the oven and let cool for 2–3 minutes before serving. The filling will be very hot!
-
Serve warm and enjoy your spooky, gooey mini s’mores pies!
Nutrition Facts
Servings 6
- Amount Per Serving
- Calories 210kcal
- % Daily Value *
- Total Fat 9g14%
- Saturated Fat 5g25%
- Cholesterol 10mg4%
- Sodium 180mg8%
- Potassium 120mg4%
- Total Carbohydrate 32g11%
- Dietary Fiber 1g4%
- Sugars 22g
- Protein 3g6%
- Calcium 60 mg
- Iron 1 mg
* Percent Daily Values are based on a 2,000 calorie diet. Your daily value may be higher or lower depending on your calorie needs.
Note
- Best PEEPS: Jack-o'-lantern shapes hold their form best when baked.
- Crust swaps: Try chocolate or Oreo mini crusts for a twist.
- Holiday versions: Use Christmas, Easter, or Valentine’s PEEPS for year-round fun!
- Serve fresh: These don’t store well—best enjoyed warm from the oven.