I didn’t grow up eating anything called “green velvet,” so the first time I made these it felt a little ridiculous. Cookies aren’t supposed to be green. But that’s exactly why I love them. They’re unexpected, a little playful, and somehow people get extra excited when they see them on the table.
I started making these when I wanted something festive without relying on a boxed mix. I wanted real ingredients, real flavor, and honestly, I just wanted to see if I could pull it off from scratch. The first batch wasn’t perfect. I rushed the chilling step and ended up with cookies that spread like pancakes. Lesson learned the hard way.
Now this recipe has become one of those things I make when I want to bake but don’t want to overthink it. It’s simple, but it feels special. The cocoa gives that soft velvet vibe, the white chocolate adds sweetness, and the color makes people smile before they even take a bite.
Ingredients I Used for the Recipe
- 1/2 cup unsalted butter, room temperature – This gives the cookies richness and that soft, tender texture. I always let it sit out so it creams properly.
- 1/4 cup white granulated sugar – Adds sweetness and helps create slightly crisp edges.
- 3/4 cup light brown sugar, packed – Brings moisture and that subtle caramel flavor that makes these taste deeper.
- 1 egg, room temperature – Helps bind everything together so the cookies stay soft instead of crumbly.
- 1 tablespoon milk – I used unsweetened vanilla almond milk, but any milk works. It loosens the dough just enough.
- 2 teaspoons chocolate extract (or vanilla extract) – Boosts the chocolate flavor without making the cookies too heavy.
- 3 to 4 teaspoons green gel food dye – The gel kind is important because it colors the dough without watering it down.
- 1 1/2 cups plus 1 tablespoon all-purpose flour – The structure of the cookie. I measure carefully so they don’t get dense.
- 1/4 cup cocoa powder – Just enough chocolate to create that velvet taste without turning them into full-on chocolate cookies.
- 1 teaspoon baking soda – Gives the cookies their lift and keeps them from feeling too compact.
- 1 1/2 teaspoons cornstarch – My favorite little trick for making cookies extra soft.
- 1/4 teaspoon salt – Balances the sweetness so the flavor doesn’t fall flat.
- 1 cup white chocolate chips – Adds creamy pockets of sweetness throughout.
How to Make These Cookies Without Stressing Yourself Out?

Step 1 – Cream the Butter and Sugars
I start by beating the butter, granulated sugar, and brown sugar together until it looks fluffy and lighter in color. This step matters more than people think. If I rush it, the cookies turn out dense. When I take my time, they bake up soft and thick.
I scrape the sides of the bowl at least once because there’s always that stubborn butter hiding there.
Step 2 – Add the Wet Ingredients and Color
Next goes the egg, milk, and chocolate extract. Once that’s mixed in, I add the green gel dye a little at a time. I don’t dump it all in. I learned that mistake once and ended up with dough that looked like neon playdough.
I mix until the color looks even. It should be bold but not shocking.
Step 3 – Mix the Dry Ingredients Separately
In another bowl, I whisk together the flour, cocoa powder, baking soda, cornstarch, and salt. This helps everything distribute evenly so you don’t get random bites that taste like straight baking soda.
Then I slowly add this to the mixer on low speed. I stop mixing as soon as the dough comes together. Overmixing makes tough cookies, and nobody wants that.
Step 4 – Fold in the White Chocolate Chips
I take the bowl off the mixer and stir in the chips by hand. It feels old school, but it keeps the dough from getting overworked. Plus I can make sure the chips are spread out instead of clumped together.
This is usually when I sneak a taste. Yes, I know it has raw egg. I still do it.
Step 5 – Chill the Dough (Don’t Skip This)
The dough has to chill for at least an hour. Overnight is even better if you have the patience. This step keeps the cookies from spreading too much and deepens the flavor.
When I skipped chilling once, they turned into flat green puddles. Still tasty. Just not pretty.
Step 6 – Scoop and Shape
After chilling, I preheat the oven to 350°F and line my baking sheets with parchment paper. I scoop the dough into balls and space them a few inches apart.
Sometimes I roll the dough balls in sugar for a crackly finish. Sometimes I don’t. It depends on my mood more than anything.
Step 7 – Bake Just Until Set
They bake for about 10 to 11 minutes. The centers should still look slightly soft when I pull them out. If I wait until they look fully done, they end up overbaked after cooling.
I let them sit on the baking sheet for a few minutes before moving them. They firm up as they rest.
What I Noticed After Making These Again and Again
The texture is what makes these cookies stand out. They’re soft in the middle, slightly chewy at the edges, and the white chocolate melts into little creamy bites. The cocoa isn’t overpowering. It’s more like a background note that keeps the sweetness balanced.
I also realized these cookies get better the next day. The flavor settles, the texture relaxes, and somehow they taste richer. I used to think fresh-from-the-oven was always best. Not with these.
They also hold up really well at room temperature. I store them in an airtight container, and they stay soft for days. That makes them perfect for making ahead when life gets busy.
Tips I Learned the Hard Way
I’ve messed this recipe up enough times to know what actually matters.
- Use gel food coloring, not liquid. Liquid changes the dough texture and the color turns dull.
- Make sure your butter isn’t melted. Soft is good. Melty is not.
- Don’t skip chilling. I know it’s annoying, but it changes everything.
- Measure flour carefully. Too much makes the cookies dry instead of velvety.
- Pull them out when they look slightly underbaked. They finish cooking while resting.
- If you want a brighter green, skip rolling them in sugar. Sugar gives a more matte look.
- If your kitchen is warm, chill the scooped dough for 10 minutes before baking to keep the shape.
One more thing I learned. These cookies are supposed to look a little imperfect. Some crack, some stay smooth, some spread differently. That’s part of the charm.
Why These Cookies Always Get People Talking
Every time I bring these somewhere, someone asks what they are before they even try one. The color throws people off, and then the flavor surprises them. They expect mint or something artificial, but instead they get this soft chocolate cookie with creamy sweetness.
I like recipes that feel fun without being complicated. These check that box. They don’t require fancy tools, they don’t take all day, and they still feel like you made something unique.
Baking can feel intimidating sometimes, like everything has to look perfect to count. These cookies remind me that it doesn’t. They’re a little messy, a little bold, and honestly just enjoyable to make.
That’s why I keep the recipe around. Not because it’s trendy or impressive, but because it works, it makes people happy, and it’s one of those things I can bake without second guessing myself the whole time.
And if a cookie can do that, it’s earned a permanent spot in my kitchen.
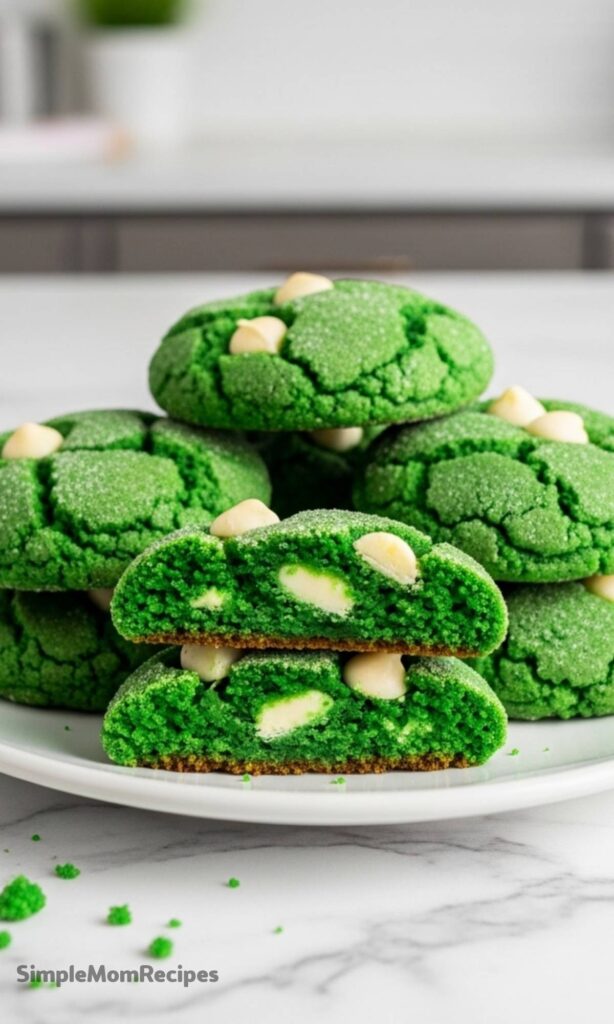
Green Velvet Cookies Recipe
Description
These Green Velvet Cookies are made completely from scratch—no cake mix needed! Featuring rich cocoa powder and chocolate extract for the perfect chocolate flavor, dyed with green gel food coloring, and studded with white chocolate chips. They're a fun, festive twist on red velvet cookies, ideal for St. Patrick's Day or any celebration. With a soft, velvety interior and optional sugary crunch on the outside, these cookies are sure to surprise and delight.
ingredients
Instructions
Important Prep Note
Dough requires at least one hour of chilling before baking. Plan accordingly.Cream Wet Ingredients
In the bowl of your stand mixer fitted with the paddle attachment, cream together the butter, white sugar, and brown sugar until light and fluffy.Add Flavor and Color
Mix in the egg, milk, chocolate extract, and green gel food dye. Add dye drop by drop until your desired green shade is reached. Scrape down the bowl and mix on medium-high until thoroughly combined.Gel dye is recommended over liquid for vibrant color without altering dough consistency.Incorporate Dry Ingredients
Switch mixer to low speed. Add flour, cocoa powder, baking soda, cornstarch, and salt. Mix until just combined. Remove bowl and fold in white chocolate chips by hand.Chill the Dough
Cover and refrigerate dough for at least 1 hour (or overnight for deeper flavor and easier handling).Chilling prevents spreading and improves texture.Preheat and Prepare
Preheat oven to 350°F (175°C). Line two baking sheets with parchment paper.Shape and Optional Sugar Roll
Use a standard cookie scoop to portion dough into balls. For a crackly, sugary top, roll each ball in granulated sugar before placing on the sheet, 2-3 inches apart.Skip sugar roll for a glossy, vibrant green finish.Bake
Bake for 10-11 minutes, until edges are set but centers still look soft.Do not overbake for best soft, velvety texture.Cool Properly
Let cookies rest on the baking sheet for 5-10 minutes to set, then transfer to a wire rack to cool completely.
Nutrition Facts
Servings 24
- Amount Per Serving
- Calories 145kcal
- % Daily Value *
- Total Fat 7gg11%
- Saturated Fat 4.5gg23%
- Trans Fat 0gg
- Cholesterol 18mgmg6%
- Sodium 45mgmg2%
- Potassium 65mgmg2%
- Total Carbohydrate 19gg7%
- Dietary Fiber 1gg4%
- Sugars 13gg
- Protein 2gg4%
- Calcium 2% mg
- Iron 5% mg
* Percent Daily Values are based on a 2,000 calorie diet. Your daily value may be higher or lower depending on your calorie needs.
Note
- For brighter green: Use gel food dye and skip rolling in sugar for a glossy finish.
- Make ahead: Dough can be chilled overnight for deeper flavor and easier scooping.
- Storage tip: Keep cookies in an airtight container at room temperature for up to 1 week.
- Freezer friendly: Freeze baked cookies for up to 1 month, or freeze dough balls and bake from frozen (add 1-2 minutes to bake time).
