You know the ones. The sad, cakey squares that taste like a science experiment gone wrong. Like someone tried to make chocolate magic but forgot the soul.
Not these.
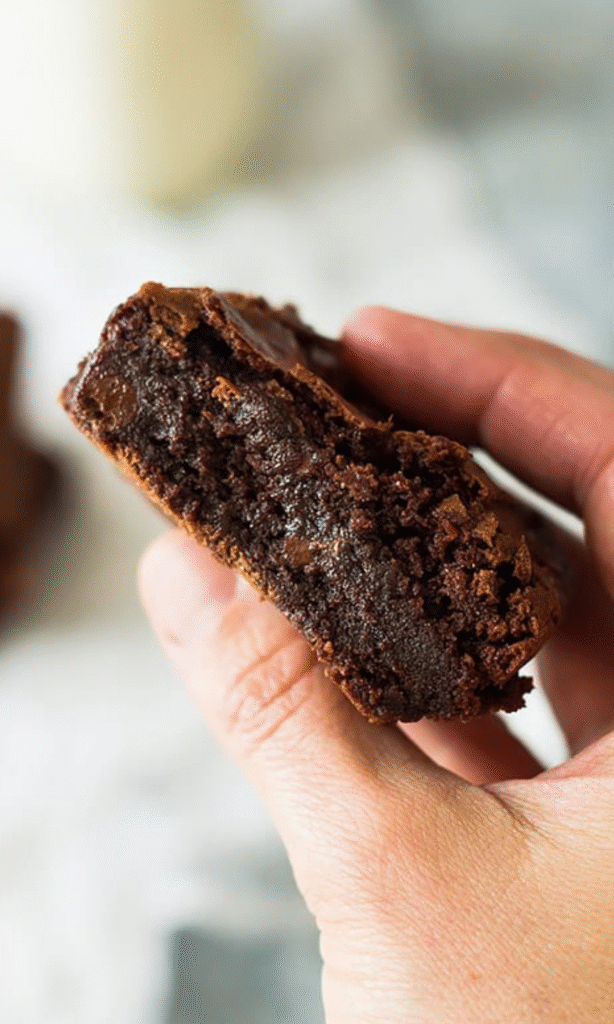
These brownies? They’re the kind that make you close your eyes after the first bite. The kind that crackle on top, then give way to something so dense, so rich, so fudgy, you almost feel bad for how good they are. And then—oh right—the frosting. A thick, silky chocolate blanket that doesn’t just sit on top. It belongs there.
I didn’t invent this recipe. But I’ve baked it, tweaked it, burned it (RIP batch of 2021), and finally—finally—got it right. And now? I’m handing it to you. No fluff. No weird jargon. Just how to make brownies that feel illegal in how good they are.
5 Key Ingredients in These Chewy Brownies
Yeah, yeah. Flour, sugar, eggs. Basic. But here’s the thing—some ingredients in this recipe aren’t just in it. They are it.
Let’s talk about the real players.
1. Melted Butter + Real Chocolate (Not Chips)
Butter melts easy. Chocolate melts like a mood. Together? They’re the foundation. This isn’t a “dump in chocolate chips and call it a day” situation. Nope. We’re using chopped chocolate bars. Why? Because chips have stabilizers. They don’t melt smooth. They fight you. Real chocolate? It melts into a glossy, velvety pool. That’s what gives the brownies that deep, fudgy heart. And butter? It adds richness. Moisture. That little crackle on top? That’s butter and chocolate saying, “We did this.”
2. Two Sugars: White and Brown
Granulated sugar? Lifts the batter just enough. Gives that shiny crust. But brown sugar? That’s the secret weapon. It’s got molasses. Which means moisture. Which means chew. Without it, you get fudge. With it? You get chewy fudge. Like, the kind that pulls apart slowly. The kind that makes you eat one square… then “accidentally” go back for half another.
3. Eggs (and Yes, Size Matters)
Large eggs. Not medium. Not extra-large unless you like playing roulette with texture. Eggs bind. They add structure. But too many? Cakey. Too few? Dense like a brick. Three is the sweet spot. They whip into the sugar and chocolate, making the batter glossy. That shine? That’s promise. Promise of fudginess.
4. Cocoa Powder (Dutch-Process If You Got It)
Flour is just flour. But cocoa? That’s flavor depth. We’re using a bit extra here—not just in the batter, but in the frosting too. Dutch-process is smoother, less acidic. Natural cocoa works, but Dutch? It’s like the brownie version of turning the lights down low and putting on slow jams. Rich. Deep. Unhurried.
5. Chocolate Chips (Yes, Now We Add Chips)
Wait. Didn’t we just say not to use chips for melting? Yep. But inside the batter? Different story. Chips hold their shape. They burst in pockets of melty joy. Like little chocolate landmines. You bite in—boom—warm goo. Use semi-sweet. Or dark. Or a mix. Just don’t skip them. They’re the surprise in the story.
How to Make Chewy Fudgy Brownies Recipe?
Alright. Let’s do this.
No rush. No stress. Just follow the steps. And for the love of chocolate, don’t overbake.
Step 1: Melt the Chocolate and Butter
Grab a heatproof bowl. Or a saucepan. Toss in the butter (cut it up—melts faster) and the chopped chocolate bars. Melt them together.
Microwave? 20 seconds at a time. Stir. Repeat. Don’t walk away. Burnt chocolate smells like regret.
Stovetop? Low heat. Gentle. Stir often. You want smooth. You want glossy. You want “I can’t believe I made this.”
Once melted, let it sit. Just 5 minutes. Cool it down so the eggs don’t scramble when they hit it. That’d be tragic.
Step 2: Preheat and Prep
Oven to 350°F. Now.
Line a 9-inch square pan with parchment paper. Leave some overhang on the sides. That’s your future self’s best friend. Makes lifting the brownies out so much easier. No one wants to dig brownies out of a pan like it’s archaeology.
Step 3: Mix the Wet Stuff
Sugar goes in. Both kinds. Whisk them into the chocolate mixture. Then—eggs. One at a time. Whisk each in fully. Then vanilla. Keep whisking. Batter should look shiny. Happy.
Step 4: Dry Ingredients
Flour. Cocoa powder. Salt. Whisk together first—no lumps. Then add to the wet mix. Stir until just combined. Don’t overmix. You’re not building muscle. You’re making brownies.
Now—chocolate chips. Fold them in. Batter gets thick. Gooey. Looks like dessert heaven.
Step 5: Bake (But Not Too Long)
Pour into the pan. Smooth the top. Pop it in the oven.
32 to 35 minutes. Maybe less. Maybe more. Ovens are moody.
Check at 30. Look for that top to look set. Cracked. Shiny. Stick a toothpick in the center. You want crumbs. Not wet batter. Not clean. Crumb-y. That’s the golden rule.
Underbaked is better. They firm up as they cool. Overbaked? You’ve entered cake territory. And we didn’t come here for cake.
Let them cool. 1 to 2 hours. On a wire rack. Be patient. I know. It’s hard. But warm brownies + frosting = melty mess. And while melty is great in your mouth, it’s not great on your counter.
Chocolate Brownie Frosting
This isn’t an afterthought.
This is the exclamation point.
Butter. Softened. Not melted. Not cold. Soft. Beat it for 2 minutes. Get it creamy. Like, “I could write a love song about this texture” creamy.
Then—powdered sugar. Cocoa powder. Warm milk or cream (warm helps it blend smooth). Vanilla. A pinch of salt. Beat it. Low first. Then high. One full minute.
Taste it.
Needs more salt? Add a pinch. Sounds weird, but salt makes chocolate sing.
Now—spread it. Use an offset spatula if you’ve got one. If not, a butter knife works. Just go slow. Smooth it like you’re frosting a tiny chocolate dream.
Can I Use a Different Type of Chocolate for the Frosting?
Short answer: Yes.
Long answer: It’s not about the chocolate. It’s about the form.
The frosting uses cocoa powder, not melted chocolate. So you can’t just swap in a dark chocolate bar and expect magic.
But—within reason—you can tweak.
Want darker frosting? Use dark cocoa powder. Or swap some of the powdered sugar for extra cocoa.
Want it sweeter? Add a splash more vanilla. Or a bit more sugar (but go easy—too much and it’ll be stiff).
Milk chocolate frosting? That’s harder here, since we’re not melting bars. But you could use milk chocolate cocoa powder if you find it. Or—just eat a milk chocolate bar while frosting. Balance.
Point is: the base works. Tweak if you want. But don’t overthink it.
How Do I Avoid Overbaking These Brownies and Ensure the Perfect Fudgy Center?
Ah. The million-dollar question.
Because fudgy is not the same as undercooked. And cakey is not the same as done.
Here’s the trick: take them out when you think they’re almost done.
Seriously.
At 30 minutes, check. 32? Probably ready. Toothpick with moist crumbs? Pull them out.
They’ll keep cooking as they cool. The residual heat firms up the center. But gently. Like a slow hug.
Also—don’t open the oven too much. Heat escapes. Temperature drops. Then you’re baking longer. Which leads to dry.
And one more thing: thickness matters. We’re using a 9-inch pan. Not 9×13. That keeps them thick. Fudgy. Decadent.
If you use a bigger pan, they’ll bake faster. And thinner. And you’ll lose that chew.
So—stick to the size. Trust the toothpick. And when in doubt? Underbake.
You can always eat a slightly soft brownie.
You can’t un-bake a dry one.

Fudgy Chewy Brownies Recipe
Description
Ultra-fudgy, deeply chocolatey brownies with a chewy texture and a glossy top. Made with real melted chocolate and brown sugar for maximum richness. Simple ingredients, zero fuss, and a result that tastes like it came from a bakery that charges $7 per square.
Ingredients
Instructions
-
Preheat oven to 350°F (177°C).
-
Line a 9-inch square baking pan with parchment paper, leaving overhang on two sides for easy removal. Lightly grease if needed.
-
Chop the butter into small pieces and place in a heatproof bowl with the chopped chocolate.
-
Melt together using a microwave (20-second bursts, stirring between) or a double boiler on the stove. Stir until smooth. Let cool 5 minutes.
-
In a bowl, whisk granulated sugar and brown sugar into the chocolate mixture.
-
Add eggs one at a time, whisking well after each. Mix in vanilla.
-
In a separate bowl, sift together flour, cocoa powder, and salt.
-
Gently fold dry ingredients into wet mixture until just combined. Don’t overmix.
-
Fold in chocolate chips. Batter will be thick and glossy.
-
Pour into prepared pan. Spread evenly with a spatula.
-
Bake 32–35 minutes, or until top is cracked and shiny, and a toothpick inserted in the center comes out with a few moist crumbs (not wet batter).
-
Cool in pan on a wire rack for 1–2 hours. Don’t rush it. Warm brownies = messy cuts.
-
Once cooled, lift out using parchment paper. Place on a cutting board.
-
Slice with a sharp knife (wipe blade clean between cuts for clean edges).
-
Serve as-is or top with chocolate frosting, powdered sugar, or a scoop of vanilla ice cream.
Nutrition Facts
Servings 16
- Amount Per Serving
- Calories 210kcal
- % Daily Value *
- Total Fat 13.8g22%
- Sodium 55mg3%
- Total Carbohydrate 24g8%
- Dietary Fiber 1.5g6%
- Protein 2.5g5%
* Percent Daily Values are based on a 2,000 calorie diet. Your daily value may be higher or lower depending on your calorie needs.
Note
- Don’t skip the brown sugar. It adds moisture and chew. That’s what makes these chewy, not just fudgy.
- Use real chocolate bars for melting—chocolate chips have stabilizers and won’t melt as smoothly. Save the chips for mixing in.
- Underbake slightly. They firm up as they cool. Overbaking = cakey = sad.
- Store unfrosted brownies at room temp in an airtight container for up to 1 week. Frosted? 2 days at room temp, or up to 1 week in the fridge.
- They freeze great! Wrap tightly or store in a freezer-safe container for up to 3 months. Thaw at room temp.
- Gluten-free? Swap flour for a 1:1 gluten-free blend. Many have tested it—works well.
- Want frosting? Whip up butter, powdered sugar, cocoa, a splash of warm milk, vanilla, and a pinch of salt. Boom. Done.