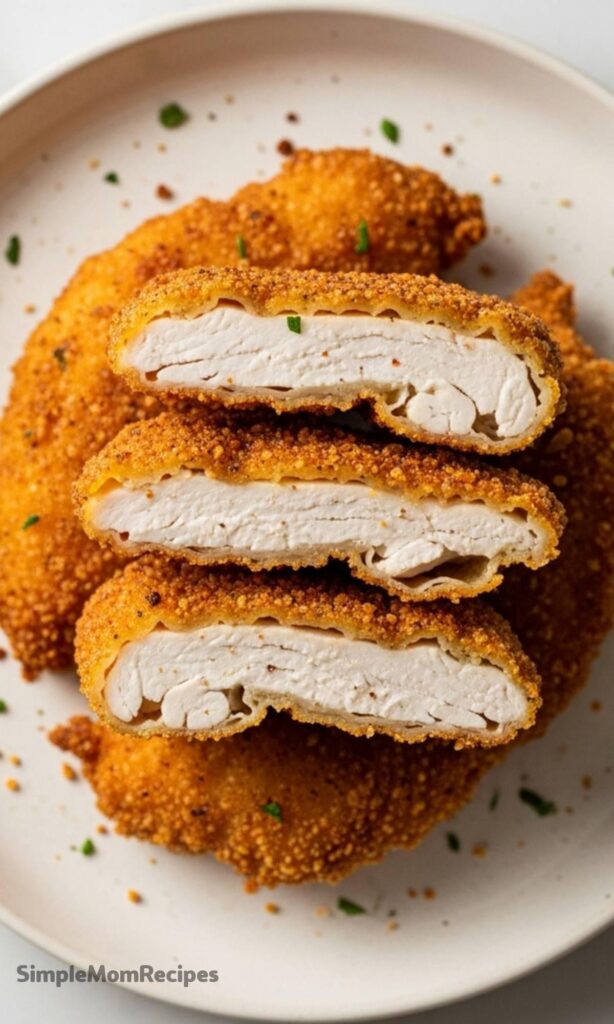
There’s something about truly great fried chicken that feels like a magic trick. You take a simple piece of chicken, give it a humble coating, and with a little heat, it transforms into something spectacular.
The promise is a shatteringly crisp, golden crust giving way to tender, juicy meat. But with chicken breast, that promise can sometimes feel like a tall order, can’t it?
We’ve all been there—the breading slides right off, or the outside is burnt before the inside is done, or the worst sin of all: dry, chalky meat. It’s enough to make you stick to thighs forever.
But what if I told you the perfect, crispy, juicy fried chicken breast is not only possible, it’s downright simple? This recipe is my absolute go-to, the one I make when I want that iconic crunch without any fuss.
It doesn’t require buttermilk or a long brine, just common pantry staples and a reliable pan. The secret is all in the batter method, a double-dredge that builds an unshakeable, craggy coating guaranteed to stay put.
If you’ve tried my other fried chicken recipes, you know I’m serious about that audible crunch. This version delivers that same satisfying texture, but tailored perfectly for the leaner, quicker-cooking breast.
It’s the kind of recipe that turns a regular Tuesday into a small celebration. The chicken comes out so impressive looking, with a deep golden color and a crust you can hear from across the room.
And the best part? Your family will absolutely demolish it. In my house, the plate is usually half-empty before I even get a chance to sit down at the table.
Ingredients Needed for the Recipe
One of the joys of this recipe is its simplicity. You likely have most of these items sitting in your fridge and pantry right now, which means you’re only ever about 30 minutes away from incredible fried chicken.
Each component plays a specific role in building flavor, texture, and that signature crunch. Here’s what you’ll need:
Boneless, Skinless Chicken Breasts (3): We’ll slice them in half lengthwise to create thinner cutlets. This ensures they cook quickly and evenly, so the crust doesn’t over-brown waiting for the center to cook through.
All-Purpose Flour (2 cups): This is the foundation of our crispy coating. It creates the structure that, when fried, turns into that perfect golden shell.
Garlic Powder, Chili Powder, Paprika (1 Tbsp each for the first two, 1 tsp for paprika): This trio is the soul of the seasoning. Garlic powder adds depth, chili powder gives a warm, rounded heat, and paprika contributes a sweet smokiness and gorgeous color.
Salt and Pepper: The essential flavor enhancers. Season generously—this seasoning has to flavor both the coating and the chicken itself.
Milk (1 cup) & Large Eggs (2): Combined, they create the wet batter that binds the flour to the chicken. The milk adds a slight tenderness, while the eggs provide proteins that set and brown beautifully.
Soy Sauce & Worcestershire Sauce (1 Tbsp each): These are our secret flavor agents. They add a savory, umami-rich complexity to the batter that takes it far beyond basic fried chicken. You won’t taste them distinctly, but you’ll miss them if they’re gone.
Neutral Oil for Frying: Use an oil with a high smoke point like vegetable, canola, or peanut oil. You’ll need enough to come about an inch up the side of your pan for proper pan-frying.
How to make Fried Chicken Breast (Crispy and Easy Pan-Fried Recipe)?
The process here is straightforward, but a few key techniques make all the difference. The main goal is creating layers that stick together through the frying process, resulting in that ideal, craggy crust.
Just follow these steps, and you’ll have flawless fried chicken every single time. Let’s get started.
Step 1 – Prep the Chicken and Seasoned Flour
Begin by preparing your chicken breasts. Place one on your cutting board and carefully slice it horizontally through the middle, as if you were opening a book.
This creates two thinner cutlets from one breast. Repeat with the remaining breasts—you’ll end up with six pieces total. Pat them dry with a paper towel; this helps the initial flour coating adhere.
Now, for the seasoned flour. I love using a large, resealable plastic bag for this—it’s less messy and coats everything evenly. Add the flour, garlic powder, chili powder, paprika, salt, and pepper to the bag.
Seal it well and give it a really good shake until all the spices are completely distributed throughout the flour. Take a quick pinch and taste it; it should be well-seasoned and flavorful.
Step 2 – Create the Flavorful Wet Batter
In a shallow bowl or dish wide enough to fit a chicken cutlet, whisk together the milk and eggs until they’re fully combined and smooth.
Then, whisk in the soy sauce and Worcestershire sauce. You’ll see the mixture take on a light brown color from the sauces—that’s all that wonderful, savory flavor integrating into our binder.
This wet mixture is what will glue our double layer of seasoned flour to the chicken, and those sauces are working hard to build a deep, rich taste right into the crust.
Step 3 – The Double-Dredge Method
Here’s where the magic happens for a super-crispy, stay-put coating. Take your dried chicken cutlets and place them all into the bag with the seasoned flour.
Seal it and shake gently until each piece is thoroughly coated in the dry mixture. This first layer dries the surface further and gives the wet batter something to grip.
Now, remove one piece of chicken from the flour bag, shaking off any loose excess. Fully submerge it into the wet batter mixture, letting any extra drip back into the bowl.
Immediately return the wet chicken piece back to the bag of seasoned flour. Seal and shake again to apply a second, final layer of flour. This double layer is what creates those fantastic nooks and crannies that get so incredibly crisp.
Step 4 – Fry to Golden Perfection
Heat about an inch of oil in a heavy-bottomed skillet, like cast iron or a sturdy stainless steel pan, over medium-high heat. You want the oil to reach about 350°F.
If you don’t have a thermometer, test it by dropping a small pinch of flour into the oil—if it sizzles vigorously right away, it’s ready. Carefully place the breaded chicken cutlets into the hot oil, but don’t crowd the pan.
Fry them in batches if needed. Cook for about 4-5 minutes per side, until the coating is a deep, golden brown and crisp. The key here is to let them fry undisturbed until it’s time to flip, so a good crust can form.
The most reliable way to check for doneness is with an instant-read thermometer. Insert it into the thickest part of a cutlet—it should read at least 165°F.
Step 5 – Drain and Serve Immediately
Once perfectly fried and cooked through, use tongs to transfer the chicken to a waiting plate or tray. Now, here’s a small but crucial tip: line the plate with a paper towel to catch initial grease, but for the crispiest result, consider using a wire rack set over a baking sheet.
This allows air to circulate all around the chicken, preventing the bottom from getting steamy and soft. Let them rest for just a minute or two—this allows the juices to settle—then serve right away while the crust is at its peak crunch.
Tips
Over the years, I’ve picked up a few tricks that consistently lead to the best possible outcome. These aren’t complicated, but they truly elevate the final dish from good to unforgettable.
Mind the Oil Temp: Keeping your oil between 325°F and 350°F is non-negotiable for crisp, non-greasy chicken. If it’s too cool, the coating absorbs oil. Too hot, and the outside burns. A simple kitchen thermometer is your best friend here.
Fry in Batches: It’s tempting to cook it all at once, but overcrowding the pan causes the oil temperature to plummet. Give each piece some space, and let the oil reheat fully between batches for consistent color and crunch.
Let the Coating Rest: After you’ve double-dredged the chicken, let the breaded cutlets sit on a rack for 5-10 minutes before frying. This helps the coating “set” and adhere much better during cooking.
Use the Right Oil: Stick with neutral, high-heat oils like vegetable, canola, or peanut oil. Their high smoke point means they can handle the frying temperature without breaking down or imparting off-flavors.
Season with Confidence: Don’t be shy with the salt and pepper in your flour mixture. That seasoned crust is a major source of the chicken’s flavor, so taste a pinch of the dry mix—it should be tasty on its own.
Serving Suggestions & Pairings
This crispy fried chicken breast is glorious all on its own, maybe with just a simple wedge of lemon for squeezing. But it also plays wonderfully with a host of classic and not-so-classic sides.
For a traditional Southern-style spread, you can’t go wrong with creamy mashed potatoes, collard greens simmered with a bit of smoked turkey, or classic mac and cheese.
A bright, tangy coleslaw is the perfect textural and flavor contrast to the rich, crunchy chicken. It cuts through the richness beautifully.
If you’re leaning towards something lighter, a simple arugula salad with a lemon vinaigrette or some quick-pickled cucumber slices work wonderfully. And let’s not forget the bread—a fluffy buttermilk biscuit or a slice of cornbread is ideal for sopping up any delicious crumbs.
For sauces, I’m a purist and often just use hot sauce. But a honey-mustard, a spicy mayo, or even a sweet and tangy barbecue sauce can be fantastic for dipping.
Storing and Reheating for Best Results
Let’s be honest, leftovers are rare with this recipe. But if you do find yourself with extra, proper storage and reheating will save that hard-earned crispness.
Allow any leftover chicken to cool completely to room temperature first. Then, store it in an airtight container in the refrigerator for up to 3 days. Avoid wrapping it tightly in foil or plastic, as that traps moisture and immediately softens the crust.
To reheat, the oven is your only good option if you want to recapture the crunch. Preheat your oven to 400°F and place the chicken on a wire rack set over a baking sheet.
This keeps it elevated. Heat for about 10-15 minutes, until it’s hot all the way through. The air circulation will help re-crisp the coating. The microwave, unfortunately, will only turn it rubbery and sad.
You can also freeze the fried chicken after it’s cooled. Wrap each piece individually, place them in a freezer bag, and they’ll keep for about a month. Thaw in the fridge overnight before reheating in the oven as described above.
This fried chicken batter is the secret to making the crispiest, crunchiest fried chicken breast you’ll ever eat. With simple pantry ingredients and almost no prep, you get fried chicken that’s tender and juicy on the inside with a golden, shatteringly crisp coating on the outside. It truly doesn’t get better than this.
ingredients
3 boneless skinless chicken breasts (cut in half lengthwise)
2cups all-purpose flour
1Tbsp garlic powder
1Tbsp chili powder
1tsp paprika
salt and pepper (to taste)
1cup milk
2 large eggs
1Tbsp soy sauce
1Tbsp Worcestershire sauce
oil for frying (peanut, canola, or vegetable oil recommended)
Instructions
1
Step 1. Combine the SeasoningsIn a Ziplock bag, add the flour, garlic powder, chili powder, paprika, and salt and pepper. Close the bag and shake to combine.
2
Step 2. Make the Wet BatterIn a bowl, whisk together the milk, eggs, soy sauce, and Worcestershire sauce until fully combined.
3
Step 3. Double-dredge the chickenPlace the chicken pieces into the seasoned flour and shake to coat. Remove and dip into the wet batter, then return to the flour mixture for a second coating. Shake off excess.
4
Step 4. Fry the ChickenHeat oil (2–3 inches deep) in a heavy skillet over medium-high heat to 350°F. Fry chicken in batches for 6–8 minutes per side, or until golden brown and internal temperature reaches 165°F. Drain on a wire rack (not paper towels) for best crispiness.
Nutrition Facts
Servings 4
Amount Per Serving
Calories380kcal
% Daily Value *
Total Fat20gg31%
Saturated Fat5gg25%
Trans Fat0gg
Cholesterol135mgmg45%
Sodium620mgmg26%
Potassium380mgmg11%
Total Carbohydrate22gg8%
Dietary Fiber1gg4%
Sugars2gg
Protein28gg57%
Calcium 4% mg
Iron 10% mg
* Percent Daily Values are based on a 2,000 calorie diet. Your daily value may be higher or lower depending on your calorie needs.
Note
Oil tip: Use a high smoke point oil like peanut, canola, or vegetable oil for best results.
Keep it crispy: Rest fried chicken on a wire rack instead of paper towels to prevent sogginess.
Make ahead: Bread the chicken up to 4 hours in advance and refrigerate before frying.
Thinner cuts: Slice thick breasts horizontally for faster, even cooking and extra crunch.
I’m a London-based food writer, recipe developer, and home cook who has been passionate about cooking for over 15 years. What started as a way to recreate my mother’s traditional dishes turned into a lifelong love for experimenting with flavors, writing about food, and helping others feel more confident in the kitchen.