I started making these because I wanted something easy. No oven, no worrying about timing, no stressing over whether something would rise or collapse. Just mix, roll, dip, done. That alone was enough to keep me making them again.
They also disappear faster than anything else I put on the table. I’ve learned to set a few aside early or I won’t even get one later. That has happened more than once, and it’s honestly a little annoying.
Ingredients I Used for the Recipe
- ½ cup unsalted butter, softened – this gives the dough that rich, creamy base and helps everything blend smoothly
- ¾ cup brown sugar – adds sweetness and a deeper flavor that makes it taste like real cookie dough
- 2 tablespoons milk – loosens the dough just enough so it’s soft but still rollable
- 1 teaspoon vanilla extract – brings that classic cookie dough flavor together
- 1½ cups heat-treated all-purpose flour – makes the dough safe to eat and gives it structure
- ½ teaspoon salt – balances the sweetness so it doesn’t feel too heavy
- 1 cup pastel candy pieces – I usually go for colorful ones because they make everything feel more like Easter
- 12 ounces chocolate or almond bark – for coating, this is what gives that smooth outer shell
- Easter sprinkles (optional) – just for a little extra color and texture on top
How to make Easter Cookie Dough Truffles?

Step 1 – Cream the base
I start by mixing the butter and brown sugar until it looks smooth and a little fluffy. If the butter is too cold, it turns into a mess. I’ve rushed that step before and ended up with lumpy dough, so now I just wait until it’s soft.
Step 2 – Add the flavor
Next goes in the milk and vanilla. It doesn’t look like much at this point, kind of glossy and slightly loose, but that’s normal. I always give it a quick taste here. Not necessary, but I still do it.
Step 3 – Build the dough
I stir in the flour and salt slowly. The dough thickens pretty quickly, and I usually switch from a whisk to a spoon halfway through because it just gets too heavy.
If it feels too dry, I add a tiny splash of milk. If it’s too sticky, a little extra flour fixes it. I don’t measure that part too strictly anymore.
Step 4 – Fold in the candy
This is where it starts to look fun. I mix in the pastel candy pieces and try not to crush them too much. Some break anyway, and honestly, I don’t mind. It adds little streaks of color through the dough.
Step 5 – Shape into balls
I scoop out small portions and roll them into balls. Sometimes I go for egg shapes instead, especially if I’m feeling patient. Other times, I just keep them round because it’s faster.
I line them up on parchment paper and try to keep them about the same size, but they’re never perfectly even. That’s fine.
Step 6 – Chill until firm
I pop them in the freezer for about 30 to 60 minutes. This step matters more than I thought at first. If they’re not cold enough, they fall apart when dipping, and that gets frustrating fast.
Step 7 – Melt the chocolate
I melt the chocolate in short bursts, stirring in between. I’ve burned it before by trying to rush, and it turns thick and unusable. Now I just go slow and keep stirring.
I usually go with almond bark because it melts smoother. Chocolate chips can work, but they sometimes need a little oil to loosen up.
Step 8 – Dip and coat
I drop each chilled dough ball into the melted chocolate and use a fork to roll it around. Then I lift it out and tap off the extra. This part gets messy, and I’ve accepted that.
Sometimes I double dip a few because I like a thicker shell. Not necessary, just a personal thing.
Step 9 – Decorate and set
While the coating is still soft, I add sprinkles. You have to move quick here because the chocolate sets faster than expected.
Then I let them sit until fully firm. I usually leave them at room temperature unless it’s really warm, then I move them to the fridge.
Little Things I Learned Along the Way
The first time I made these, I didn’t chill them enough. They slid right off the fork into the chocolate and kind of melted apart. It was still edible, just not pretty.
Now I make sure they’re really cold. Not frozen solid, but firm enough to hold shape.
I also tried using regular white chocolate chips once. That did not go well. It turned thick and clumpy, and dipping became way harder than it should be. Since then, I stick with almond bark or candy melts.
Another thing, I used to make them too big. They looked nice but were kind of heavy to eat. Smaller bites just work better. Easier to serve too.
Ways I Switch Them Up Sometimes
I don’t always make them the exact same way. Once I got comfortable with the basic version, I started changing little things.
- I swap the candy pieces for mini chocolate chips when I want something less colorful
- I use white coating instead of regular chocolate for a softer look
- I mix in a bit of peanut butter to the dough for a different flavor
- I drizzle extra chocolate on top instead of using sprinkles
- I make tiny versions for parties so people can grab one without thinking
None of these are complicated changes, but they keep it from feeling repetitive.
Tips
Keep the dough cold while dipping
I take a few out of the freezer at a time instead of all at once. The rest stay cold so they don’t soften too much.
Use a fork, not your hands
I tried using my fingers early on. Bad idea. The chocolate gets everywhere and doesn’t coat evenly.
Work in small batches
If I rush and try to dip everything at once, it gets messy and uneven. Slowing down actually makes it faster in the end.
Add toppings right away
Once the chocolate starts to set, nothing sticks. I’ve missed that window before and had to redo a few.
Store them the right way
I keep them in the fridge if they’re sticking around longer than a day. The butter in the dough softens if they sit out too long.
They freeze well
I’ve made a big batch and frozen half. They hold up really well, and I just let them sit out for a few minutes before eating.
These ended up being one of those recipes I don’t have to think about anymore. I know how the dough should feel, how the chocolate should look, and when they’re ready.
They’re simple, a little messy, and honestly kind of fun to make. And every time I put them out, they’re the first thing gone. That’s pretty much all I need to keep making them again.
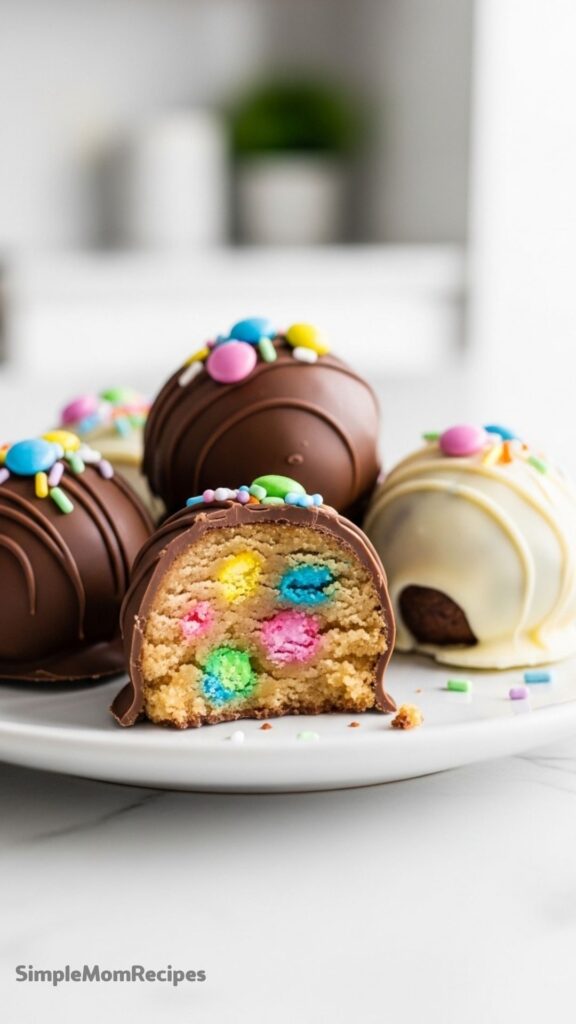

Easter Cookie Dough Truffles Recipe
Description
These Easter Cookie Dough Truffles are sweet, creamy, and coated in chocolate—an easy no-bake treat packed with pastel candy that's perfect for spring celebrations. With a soft cookie dough center studded with colorful candies and a smooth chocolate shell, these bite-sized delights are festive, fun, and always disappear fast at Easter gatherings.
ingredients
Instructions
-
Heat-treat the flour by spreading it on a baking sheet and baking at 350 F for 5 minutes, or microwave in 30-second intervals for 2 minutes total, stirring between intervals. Let cool completely.This step ensures the flour is safe to eat raw.
-
In a large bowl, beat the softened butter and brown sugar together until smooth and creamy.
-
Mix in the milk and vanilla extract until well combined.
-
Stir in the heat-treated flour and salt until a soft dough forms.
-
Gently fold in the pastel M and Ms or Easter candy pieces.
-
Roll the dough into 1 to 1 1/2-inch balls and place on a parchment-lined baking sheet.
-
Freeze the dough balls for 30 to 60 minutes until firm.This makes dipping easier and prevents the chocolate from melting the dough.
-
Melt the chocolate chips or almond bark in 30-second intervals in the microwave, stirring between each, until smooth.If using almond bark, no additional oil is needed. For chocolate chips, add 1 teaspoon coconut oil if needed for smooth dipping consistency.
-
Using two forks or a dipping tool, dip each chilled dough ball into the melted chocolate, tapping off excess.
-
Place dipped truffles back on parchment paper and immediately add Easter sprinkles if desired.Add sprinkles before the chocolate sets for best adhesion.
-
Allow truffles to set completely at room temperature or refrigerate for 15 minutes until the chocolate is firm.
Nutrition Facts
Servings 24
- Amount Per Serving
- Calories 197kcal
- % Daily Value *
- Total Fat 9.5gg15%
- Saturated Fat 5.8gg29%
- Trans Fat 0gg
- Cholesterol 15mgmg5%
- Sodium 25mgmg2%
- Potassium 45mgmg2%
- Total Carbohydrate 27gg9%
- Dietary Fiber 0.5gg2%
- Sugars 19.5gg
- Protein 2.2gg5%
- Calcium 2% mg
- Iron 3% mg
* Percent Daily Values are based on a 2,000 calorie diet. Your daily value may be higher or lower depending on your calorie needs.
Note
- Heat-treat your flour: Always heat-treat flour for edible cookie dough recipes to eliminate any risk of foodborne illness.
- Keep it cold: Chill dough balls thoroughly before dipping to prevent the chocolate from melting the dough and to make handling easier.
- Smooth coating tip: If chocolate is too thick for dipping, add a teaspoon of coconut oil or shortening to thin it slightly.
- Customize colors: Use white chocolate tinted with pastel food coloring for a custom spring palette.
- Make ahead: These truffles can be made up to 3 days in advance and stored in the refrigerator.
