I’ve made a lot of bread over the years, and most of it is just about getting the texture right. Soft inside, slightly crisp outside. That’s it. But these rolls aren’t just about texture.
They’re playful. And that changes how I approach them.
I don’t rush the shaping anymore. I don’t stress if one bunny looks slightly lopsided. In fact, the uneven ones usually end up being my favorite. They feel more real, less like something that came out of a perfect bakery display.
Also, I always eat one while it’s still warm. That part is non-negotiable.
Ingredients I Used for the Recipe
3 1/2 cups all-purpose flour - this forms the base of the dough and gives structure
1 cup warm milk - helps activate the yeast and keeps the rolls soft
2 1/4 teaspoons instant yeast - makes the dough rise and become fluffy
1/4 cup sugar - adds a light sweetness, not overpowering
1/4 cup butter, melted - gives richness and that soft, tender texture
1 large egg - helps bind everything together
1 egg yolk - adds extra softness and color to the dough
1/2 teaspoon salt - balances the sweetness and enhances flavor
1 egg + 1 tablespoon milk (for egg wash) - brushed on top for that golden finish
I’ve swapped things before when I ran out. Once I used just two whole eggs instead of egg plus yolk, and it still worked fine. Slightly different texture, but nothing dramatic.
How to make Easter bunny rolls?
Step 1 - Mix the dough
I start by combining the warm milk, yeast, and sugar in a bowl. I let it sit for a few minutes. Not too long, just enough to wake the yeast up.
Then I add the melted butter, egg, egg yolk, and salt. After that, flour goes in gradually. I don’t dump it all at once anymore. Learned that the hard way when my dough turned into a stiff mess.
Step 2 - Knead until soft
Once everything comes together, I knead the dough until it’s smooth. It should feel soft, slightly tacky, but not sticky enough to cling to your fingers.
There were times I added too much flour here because I panicked about stickiness. That made the rolls dense. Now I just trust the process a bit more.
Step 3 - Let it rise
I place the dough in a bowl, cover it, and leave it somewhere warm. Usually near a window or just inside the oven with the light on.
It needs to double in size. Sometimes it takes an hour, sometimes longer. I stopped watching the clock so closely.
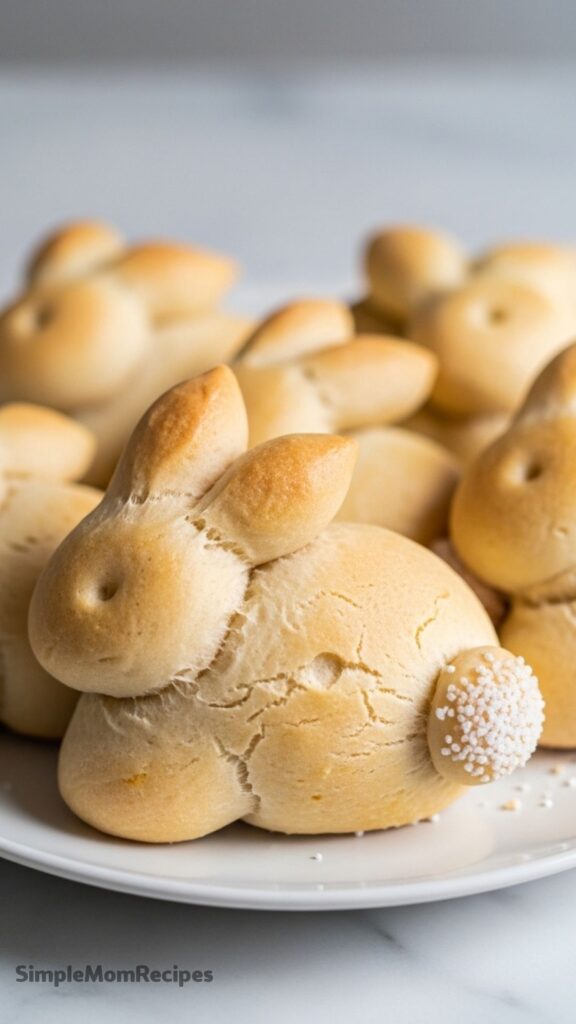
Step 4 - Shape the bunnies
This is the part that tests my patience every single time.
I divide the dough into small portions, then roll each into ropes. One part becomes the body, another forms the ears. I twist and shape until it looks somewhat like a bunny.
Some turn out great. Some don’t. I keep going anyway.
Step 5 - Second rise
Once shaped, I place them on a baking tray and let them rest again. They puff up slightly, which helps them look softer and fuller.
I used to skip this step once because I was in a hurry. Big mistake. They baked up tight and not nearly as fluffy.
Step 6 - Brush and bake
I brush each bunny with egg wash. This gives them that golden, shiny finish that makes them look better than they actually are.
Then into the oven they go until they’re lightly browned. The smell at this point is honestly the best part.
How I usually serve them
I keep it simple. Warm rolls, butter, and jam. That’s it.
Sometimes I split one open right away, even though I know I should wait. The butter melts instantly, and the inside is soft enough to tear with just my fingers.
If I’m feeling a bit extra, I’ll add a little honey or even cream cheese. But most of the time, I stick with butter and something fruity.
They’re best the day they’re made. I’ve stored leftovers, and they’re still good the next day, just not as soft. I usually warm them slightly before eating.
Tips
Seriously. The first few might look awkward. Mine always do. But once they bake, they somehow look cuter.
If the dough feels too firm, the rolls won’t be as fluffy. I remind myself not to overdo the flour.
Not hot. Just warm. I once used milk that was too hot and it basically ruined the yeast. Nothing rose, and I had to start over.
I’ve made the dough at night and left it in the fridge before. It actually makes the morning easier. Just let it come back to room temperature a bit before shaping.
I’ve brushed them with just milk when I ran out of eggs. Still turned out fine. Slightly less shiny, but no one complained.
Eat one fresh
I know I already said this, but it matters. Right out of the oven, slightly warm, a little butter melting in. That’s the moment.
These bunny rolls aren’t perfect, and I think that’s why I keep making them. They slow me down in a way I don’t usually allow. They’re a little messy, a little time-consuming, but they feel good to make.
And every year, when I pull that tray out of the oven, I still get that small, quiet kind of excitement. Not because they look perfect, but because I made them anyway.
Soft, buttery bunny-shaped buns perfect for Easter breakfast. Fun to shape with kids and delicious served warm with butter and jam.
ingredients
rolls
3.5tablespoons soft butter (50g, softened)
20g fresh yeast (or 7g instant yeast)
1/4cup milk (60ml, lukewarm)
2 1/3cups all-purpose flour (290g, spooned and leveled)
1pinch salt
3.5tablespoons sugar (40g)
1teaspoon vanilla extract
1large egg
1large egg yolk
for finishing
1large egg (beaten with 1 tbsp milk for egg wash)
as needed pearl or granulated sugar (for sprinkling on tails)
Instructions
Make the dough
1
Slice butter thinly and set aside to soften. Crumble fresh yeast into a small cup, add lukewarm milk (about 36°C/100°F), and stir until dissolved. Cover and rest 10-15 minutes.
Milk should feel pleasantly warm, not hot
2
In a large bowl, combine flour, salt, sugar, yeast mixture, softened butter, egg, egg yolk, and vanilla. Mix until roughly combined, then knead 7-10 minutes until smooth and elastic.
Use stand mixer with dough hook or knead by hand
First rise
3
Form dough into a ball, place in bowl, cover with lightly oiled plastic wrap (prick a few holes). Let rise in a warm place about 2 hours until doubled in volume.
Time may vary based on room temperature
Shape the bunnies
4
Punch down dough and divide into 8 equal pieces (~65g each). For each bunny: shape a thick cigar for the trunk, a small ball for the head, and three tiny pieces for ears and tail.
Keep trunks long and thin; they will widen while baking
5
Attach head to trunk, press ears onto top of head, and add tail. Place on parchment-lined baking sheet. Cover and rest 20 minutes.
Ensure ears are well-attached so they don't slide
Bake
6
Preheat oven to 180°C (350°F), no fan. Brush bunnies with egg wash, sprinkle tails with sugar, and prick eyes with a toothpick.
Dip toothpick in water if it sticks to dough
7
Bake 18-20 minutes until golden brown. Cool on a wire rack before slicing with a serrated knife.
Baking time may vary by oven
Nutrition Facts
Servings 8
Amount Per Serving
Calories225kcal
% Daily Value *
Total Fat6.5gg10%
Saturated Fat3.8gg19%
Trans Fat0gg
Cholesterol55mgmg19%
Sodium45mgmg2%
Potassium65mgmg2%
Total Carbohydrate36gg12%
Dietary Fiber1.2gg5%
Sugars8gg
Protein5.5gg11%
Calcium 25mg mg
Iron 1.8mg mg
* Percent Daily Values are based on a 2,000 calorie diet. Your daily value may be higher or lower depending on your calorie needs.
Note
Make ahead: Prepare dough the night before, let rise 1 hour, then refrigerate overnight. Shape and bake in the morning.
Egg substitute: Replace 1 egg + 1 yolk with 2 small eggs or 2 large eggs + 2 tsp flour.
Freezing: Freeze risen dough in an airtight container. Thaw overnight in fridge before shaping and baking.
Storage: Keep in a sealed container at room temperature for 1-2 days.
I’m a London-based food writer, recipe developer, and home cook who has been passionate about cooking for over 15 years. What started as a way to recreate my mother’s traditional dishes turned into a lifelong love for experimenting with flavors, writing about food, and helping others feel more confident in the kitchen.