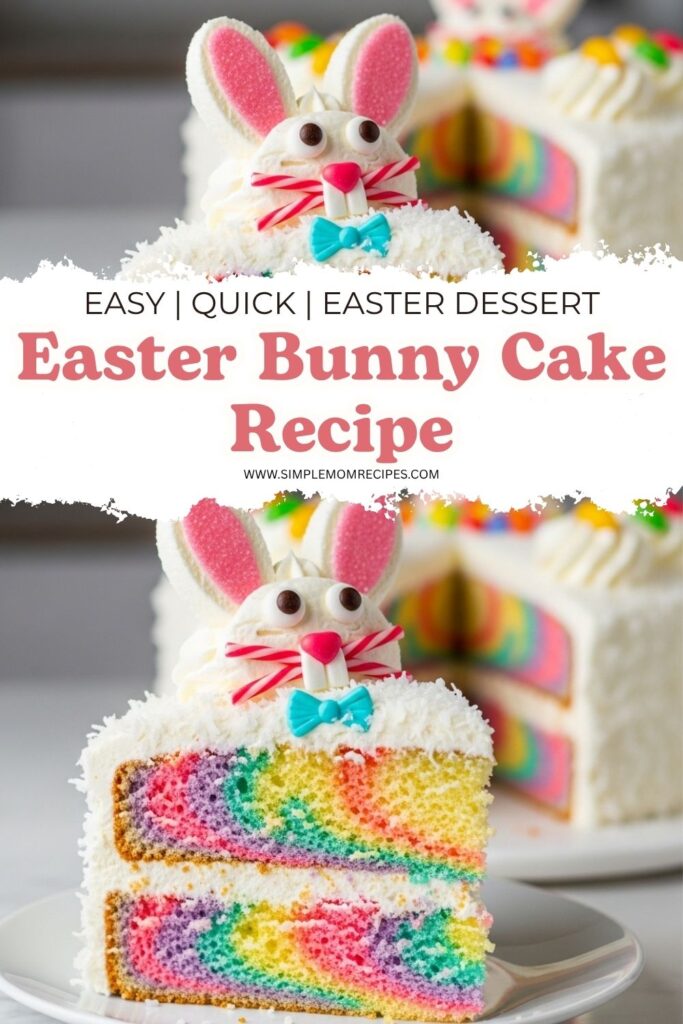
Easter Bunny Cake with colorful swirls, fluffy coconut topping, and simple decorating tricks. A fun, easy centerpiece that kids absolutely love.
It’s not even complicated, which is the funny part. It looks like something that took hours, but really it’s just two round cakes and a little cutting and moving things around.
The first time I made it, I was honestly nervous. I thought I’d mess up the shape or it would look like some weird blob. But frosting hides everything. Coconut hides even more.
Ingredients I Used for the Recipe
1 box vanilla cake mix (15.25 oz) - this is the base, simple and reliable
Eggs, oil, and milk - follow the box, but I swap water for milk for better flavor
1 extra egg - makes the cake softer and richer
1/2 cup sour cream - adds moisture and that slightly dense bakery feel
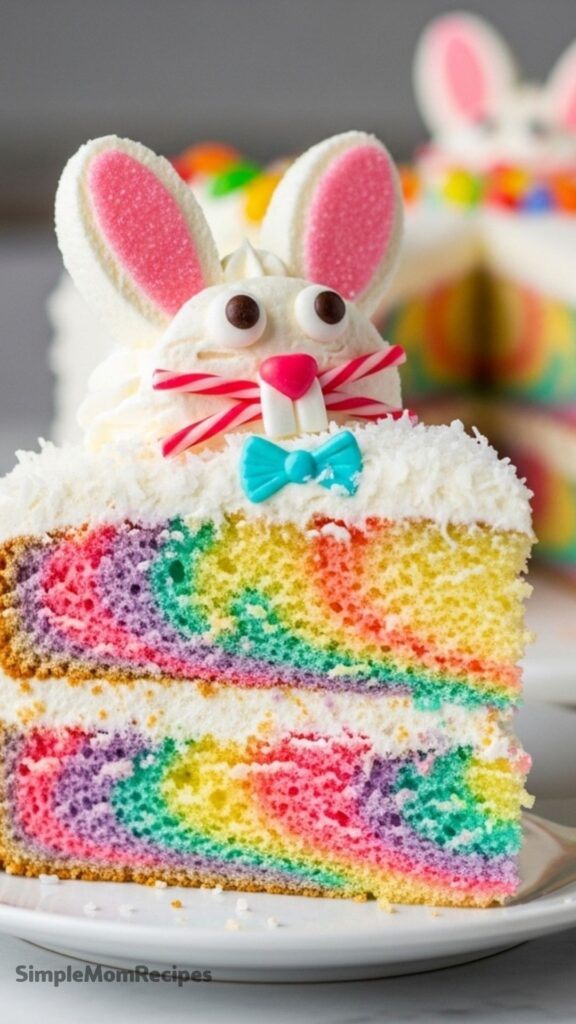
Pink, purple, and yellow food coloring - for the fun swirled inside
2 containers white frosting - enough to cover everything without stressing
Jelly beans - for eyes, nose, and a little decoration
Red licorice rope - for whiskers and outlining details
Pink colored sugar - for the inside of the ears
How to make Easter Bunny Cake?
Step 1 - Prep the pans and oven
I preheat the oven to 350°F and grease two round cake pans. Sometimes I line them with parchment if I’m feeling cautious, especially after one year where half a cake stayed stuck.
Step 2 - Mix the batter
I follow the cake mix instructions, but I always add sour cream, swap water for milk, and toss in that extra egg. It just tastes better. Not fancy, just better.
Step 3 - Add the colors
I divide the batter into three bowls and tint each one. Pink, purple, yellow. Then I layer them into the pans without mixing. It looks messy going in, but it works out.
Step 4 - Bake and cool
I bake them like normal round cakes. The hardest part here is waiting for them to cool. I’ve rushed this before and regret it every time because warm cake falls apart fast.
Step 5 - Cut and shape the bunny
This is where it starts to feel like a project. One cake stays whole for the face. The second one gets cut into ears and a bowtie shape. I use a serrated knife and just go slow.
Step 6 - Assemble the pieces
I place everything on a tray and kind of nudge it into place. It doesn’t have to be perfect. Mine never is. Once the frosting goes on, nobody notices uneven edges.
Step 7 - Frost and decorate
I spread frosting over the whole thing, then press coconut all over like I’m covering it with snow. Jelly beans become eyes and a nose. Licorice makes the face details. It comes together fast here.
The moment I cut into it
This part gets me every time. I slice into the cake and those colors show up inside. It’s not neat swirls like bakery cakes. It’s kind of chaotic. But that’s what makes it fun.
One year someone actually asked if something went wrong because the inside was purple and yellow. Then they laughed and took a second slice. So yeah, it works.
If you skip the colors, it’s still a great cake. But I like the surprise. It makes it feel more like a holiday thing and less like just dessert.
Little things I figured out the hard way
I’ve made this enough times to mess it up in different ways, so here’s what actually helps.
Tips
Let the cake cool completely - warm cake will crumble when you cut it
Use a serrated knife - it makes shaping way easier and cleaner
Don’t stress about symmetry - frosting and coconut fix everything
Press the coconut gently - otherwise it falls off when slicing
Start decorating simple - you don’t need to overdo the face details
Make it ahead if needed - it holds up fine covered at room temp
Why this cake sticks with me
I think it’s the reaction more than the taste. Don’t get me wrong, it tastes good. Soft, sweet, a little extra from the sour cream. But it’s the faces that make it worth it.
There’s something about bringing out a bunny-shaped cake that just changes the mood. People smile before they even try it. That doesn’t happen with regular cakes.
I used to think these kinds of cakes were only for people who were really into baking. Turns out, not true. I’m pretty casual in the kitchen, and this still works every time.
And now it’s kind of expected. If I showed up without it, I’d probably get called out. So yeah, I keep making it. Not because it’s perfect, but because it’s fun. That’s enough for me.
A fun and festive Easter Bunny Cake with colorful swirls, coconut frosting, and playful candy decorations. Simple to make and perfect for celebrating spring with kids and family.
ingredients
Cake
1(15.25 ounce) box vanilla cake mix
Water, vegetable oil and eggs (as called for on cake mix box)
Pink, purple and yellow food colors (optional)
Frosting and Decorations
2containers whipped fluffy white frosting (or homemade buttercream or cream cheese frosting)
3cups flaked coconut
Red licorice rope (for bow tie and whiskers)
Jelly beans (for eyes and nose)
Pink colored sugar (for ear details)
Instructions
1
Heat oven to 350°F (175°C). Spray or grease bottoms only of two 9-inch round cake pans. Line with parchment paper if desired.
2
Make cake batter as directed on box. For extra richness, add 1/2 cup sour cream, replace water with milk, and add one extra egg.
3
For colored swirls: Divide batter into 3 bowls. Dye each pink, purple, or yellow. Layer colors in pans without mixing. For plain cake, divide evenly between pans.
4
Bake as directed for two 9-inch rounds. Cool 10 minutes in pans, then transfer to cooling racks. Cool completely, about 1 hour.
5
Place one cake round on serving tray as the bunny face. Cut the second round to form ears and bow tie; arrange on tray.
6
Frost entire cake. Sprinkle with coconut. Use licorice for bow tie outline, whiskers, and mouth. Add jelly beans for eyes and nose. Fill ears with pink sugar. Store covered at room temperature.
Nutrition Facts
Servings 16
Amount Per Serving
Calories380kcal
% Daily Value *
Total Fat18gg28%
Saturated Fat8gg40%
Trans Fat0gg
Cholesterol45mgmg15%
Sodium280mgmg12%
Potassium120mgmg4%
Total Carbohydrate52gg18%
Dietary Fiber2gg8%
Sugars38gg
Protein4gg8%
Calcium 6% mg
Iron 4% mg
* Percent Daily Values are based on a 2,000 calorie diet. Your daily value may be higher or lower depending on your calorie needs.
Note
Make-ahead tip: Bake cakes a day ahead and frost the day of serving for best results.
No food coloring? Skip the swirls and keep it classic white—still adorable with coconut and candies!
Storage: Keep covered at room temperature up to 2 days or refrigerate up to 4 days.
Kid-friendly: Let little ones help place jelly beans and licorice for a fun family activity.
I’m a London-based food writer, recipe developer, and home cook who has been passionate about cooking for over 15 years. What started as a way to recreate my mother’s traditional dishes turned into a lifelong love for experimenting with flavors, writing about food, and helping others feel more confident in the kitchen.