There’s a quiet magic in transforming a simple orange into something that lasts, something you can string on a garland or drop into a steaming mug.
Dried orange slices capture the very essence of sunshine, preserving it in a delicate, stained-glass form you can hold in your hand.
A Tiny Slice of Sunshine
My kitchen never feels more alive than when it’s filled with the citrusy perfume of oranges slowly drying in the oven.
It’s a smell that promises cozy evenings and festive days, all wrapped up in a single, simple project anyone can master.
Ingredients Needed for the Recipe
Gathering your supplies is wonderfully straightforward, which is part of the charm. Here’s what you’ll need:
- Oranges: Any variety works beautifully. Navel oranges give you large, classic slices, while blood oranges offer a stunning deep red color. Honestly, just use what looks good at the market.
- Parchment Paper: This is crucial for preventing sticking and making cleanup a total breeze. Trust me on this one.
How to make Dried Orange Slices?
The process is more about patience than skill, a gentle coaxing of moisture from the fruit. Let’s walk through it.

Step 1 – Prep and Preheat
Start by warming your oven to a low 250°F. This low temperature is the secret to drying, not cooking, the fruit.
Line your baking sheet with that parchment paper, and you’re already halfway there.
Step 2 – Slice and Blot
Wash your oranges well, then slice them as evenly as you can, about 1/8 to 1/4-inch thick. A sharp knife helps immensely here.
Lay the slices flat on a few layers of paper towels and gently press another towel on top. This blotting step removes surface juice and speeds up the drying time quite a bit.
Step 3 – Bake and Watch
Arrange the blotted slices in a single layer on your prepared sheet, ensuring they aren’t touching. Slide them into the oven.
Now, the waiting begins. Plan for about 3 hours, but check every hour. If they’re browning too quickly at the edges, just nudge the oven temperature down by 25 degrees.
Step 4 – Cool and Crisp
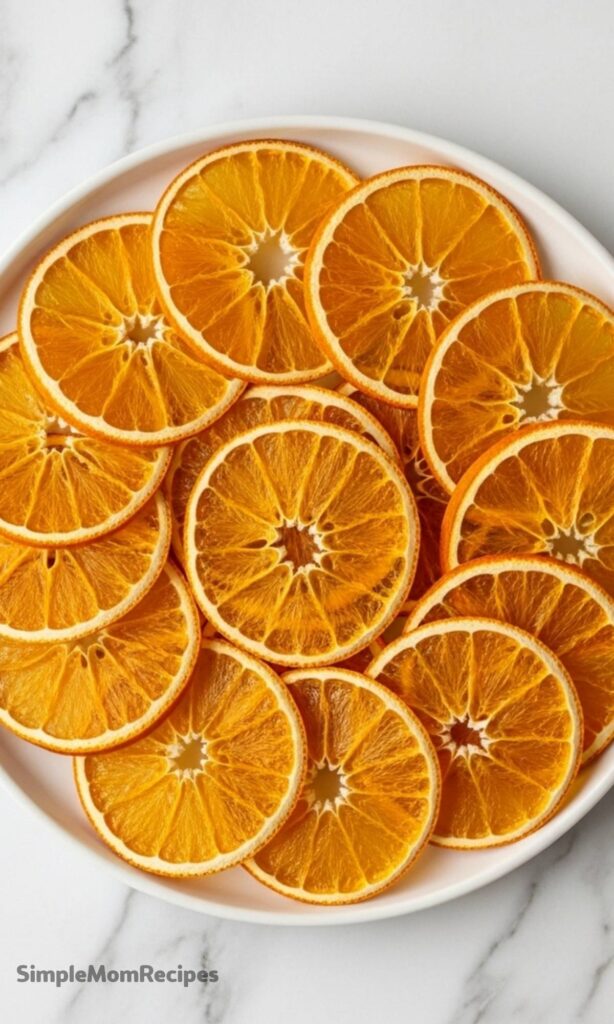
You’ll know they’re done when they feel dry to the touch and have a leathery, slightly pliable texture. They shouldn’t feel wet or sticky.
Let them cool completely on the baking sheet. They’ll crisp up a little more as they sit, revealing their final, perfect form.
Why This Recipe is a Keeper
Beyond their beauty, these slices solve a problem. They’re a brilliant way to use up a bounty of oranges before they turn.
They bridge the gap between cooking and crafting, a project that feels productive and yields something genuinely lovely.
Tips
- Uniformity is your friend. Try to keep slice thickness consistent so everything dries at the same rate.
- Don’t skip the blotting. That little bit of effort pays off in reduced oven time.
- If you have a convection oven setting, use it. The circulating air helps dry them evenly and can shorten the time.
- Get creative with shapes. Small mandarins or cara cara oranges create beautiful, varied sizes for mixed garlands.
Serving & Decorating Ideas
The real fun begins once the slices are cool. Their uses are nearly endless, which is why I make big batches.
Drape them over the rim of a holiday cocktail or float them in a warming mug of mulled wine. They add a splash of color and a whisper of flavor.
Thread them onto natural twine with cranberries, cinnamon sticks, or bay leaves for a stunning, aromatic garland.
They make gorgeous, edible toppings for cakes, tarts, and sweet breads, turning an everyday bake into a showstopper.
How to Store and Reheat
Once completely cooled, tuck your dried orange slices into an airtight container. A glass jar works perfectly and lets you admire your work.
Keep the jar in a cool, dry spot away from direct sunlight. They’ll stay edible for an incredibly long time, easily a year or two, and as pure decoration, they’ll last for seasons.
Dried Orange Slices Recipe
Description
These dried orange slices are a stunning, natural garnish that adds elegance to any cocktail, cake, or holiday decoration. Made with just one ingredient—fresh oranges—they’re simple to prepare, naturally sweet, and packed with bright citrus flavor. Whether you’re garnishing mulled wine, decorating a Christmas garland, or topping a festive dessert, these vibrant slices are as practical as they are pretty!
ingredients
Instructions
- Preheat your oven to 250°F (120°C). Line a baking sheet with parchment paper or place a wire rack on top for better air circulation.
- Using a sharp knife or mandoline, thinly slice the oranges into 1/8–1/4 inch rounds. Try to keep them even so they dry uniformly.
- Gently blot each orange slice with a paper towel to remove excess surface moisture.
- Place the slices in a single layer on the prepared baking sheet or wire rack. Avoid overlapping.
- Bake for about 3 hours, checking every hour. If slices are browning too quickly but aren’t fully dry, reduce the oven temperature slightly.
- Remove from the oven when slices are completely dry, crisp at the edges, and no longer sticky or moist.
- Let cool completely before using as garnish or storing.
Nutrition Facts
Servings 4
- Amount Per Serving
- Calories 45kcal
- % Daily Value *
- Total Fat 0.2g1%
- Potassium 174mg5%
- Total Carbohydrate 11g4%
- Dietary Fiber 2.4g10%
- Sugars 8g
- Protein 0.9g2%
- Calcium 43 mg
- Iron 0.1 mg
* Percent Daily Values are based on a 2,000 calorie diet. Your daily value may be higher or lower depending on your calorie needs.
Note
- For extra crispness: Use a wire rack on the baking sheet to allow airflow underneath the slices.
- Storage tip: Keep in an airtight container at room temperature for up to 2 years. Add a silica packet if your kitchen is humid.
- Creative uses: String them into garlands, add to potpourri, float in cocktails, or use to decorate holiday cakes and wreaths.
- Want a snack? Lightly sprinkle with cinnamon before baking for a sweet, spiced treat!
