Is there anything more delightfully silly than Halloween? Seriously.
It’s the one time of year we’re encouraged to play with our food, to turn the ordinary into something spooky and spectacular.
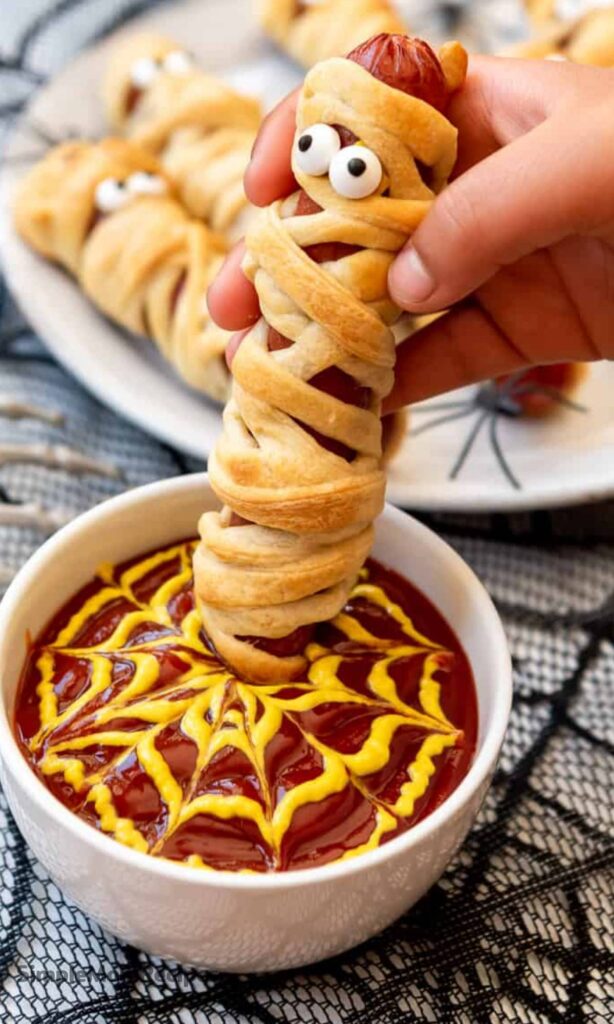
And these Crescent Mummy Dogs are the absolute champions of edible fun.
Why This Recipe is a Halloween Must-Have
You’re not just making dinner; you’re creating a memory, a little moment of magic in the kitchen.
It’s the kind of recipe that gets everyone involved, from the littlest ghouls to the grown-ups who are, let's be honest, just big kids at heart.
The beauty of it all? It’s almost embarrassingly simple, relying on just a handful of ingredients you probably already know.
Ingredients Needed for the Recipe
Gather your supplies, because the transformation is about to begin.
1 (8 oz.) can of crescent dough sheets (or classic crescent roll dough)
10 hot dogs (your favorite kind!)
Cooking spray or 2 tablespoons of melted butter
Candy eyeballs (the edible kind, of course!)
Mustard or ketchup (for both "glue" and dipping)
That’s truly it. The optional cheese is a fun, melty addition, but we'll get to that in a bit.
The Magic of the Mummy Transformation
Think of this less as cooking and more as a craft project with a delicious, savory reward at the end.
The crescent dough becomes the ancient, tattered bandages, while the hot dog waits patiently to be wrapped up for eternity.
And those googly eyes? They’re the final, hilarious touch that brings each mummy to life, or, well, you know what I mean.
How to make Crescent Mummy Dogs {4 Ingredient}?
Make this recipe yours—just save it to your Pinterest board!"
Preheat and Prepare Your Baking Stage
First things first, get your oven humming along at a cozy 375°F.
Then, line a large baking sheet with parchment paper—this is your stage, and it ensures your mummies won’t stick after their baking slumber.
Unraveling the Doughy Bandages
Now, for the dough. If you found the special mummy dog sheets, you’re a step ahead!
If you’re using classic crescent rolls, just press the seams together on a cutting board to create a solid sheet of dough. No big deal.
The Art of the Strip
This is where a pizza cutter becomes your best friend.
Slice the dough into thin, uneven strips; perfection is not the goal here. We want those bandages to look authentically ragged and ancient.
The Great Wrap
Here’s the fun part. Take a hot dog and a strip of dough, and start wrapping.
Leave a little gap near the top for the mummy’s face—this is crucial for their personality to shine through later.
Don’t worry if the strips are short; just press a new one onto the end and keep going. It’s all part of the charm.
A Shiny, Golden Finish
Once all your dogs are snug in their doughy wraps, arrange them on the baking sheet.
Give them a light spritz of cooking spray or a brush with melted butter. This little step is what gives them that gorgeous, golden-brown, bakery-quality look.
Baking to Perfection
Slide the tray into the oven and let the magic happen for about 12-16 minutes.
You’ll know they’re ready when the hot dogs are piping hot and the crescent dough is puffed up and beautifully golden.
Bringing Your Mummies to Life
Let them cool for just a minute—you don’t want to melt the eyeballs!
Then, using a toothpick or the tip of a knife, dab two tiny dots of mustard or ketchup onto the face area.
Gently press the candy eyes into the dots. And just like that, they’re alive! Well, sort of.
Tips
To Cheese or Not to Cheese? Adding a strip of cheese inside the wrap is delicious, but be warned: it melts and oozes, creating a wonderfully messy, "undead" look. For neater mummies, skip it.
Dry Your Dogs. If you find the hot dogs slippery, just pat them dry with a paper towel before wrapping. It makes the process so much easier.
Get Creative with Bandages. For an extra-mummy look, wrap a few strips in the opposite direction once you’re done with the main wrap. It adds more texture and fun.
The Eye Have It. Don’t be afraid to give your mummies personality! Cross-eyed, wide-eyed, one eye—it all adds to the spooky fun.
What to Serve with Your Spooky Crew
These mummy dogs are the star of the show, but every star needs a supporting cast.
Think about serving them with a creepy-crawly salad, some "wormy" pasta, or a big bowl of pumpkin soup.
And for dessert? Why not some ghostly cupcakes or spiderweb brownies? The theme is your playground.
Beyond Halloween: When Else to Whip These Up
Don’t you dare relegate this recipe to just one day a year. Oh no, it’s far too good for that.
These are perfect for kids' birthday parties, movie nights, or anytime you need a guaranteed smile at the dinner table.
They’re a fantastic, hands-on meal for sleepovers, and a real hit at potlucks where everyone needs a good conversation starter.
Storing and Reheating Your Undead Leftovers
If you somehow have leftovers, let the mummy dogs cool completely before storing them in an airtight container in the fridge.
They’ll keep for a day or two. To reheat, just pop them in a 350°F oven or toaster oven for about 10 minutes until warm and crispy again.
The microwave will work in a pinch, but it will make the dough a bit soft. The oven is definitely the way to go.
A Final Word from Kelsey
The real secret ingredient here isn’t something you can buy at the store. It’s the laughter, the little hands helping you wrap, the playful arguments over who gets the cross-eyed mummy.
So, embrace the mess, have fun with it, and create something wonderfully spooky together. Happy cooking!
These fun and spooky Crescent Mummy Dogs are the perfect Halloween treat! Just 4 simple ingredients—hot dogs, crescent roll dough, mustard or ketchup, and googly eyes—come together to make irresistibly cute and delicious mummy-wrapped hot dogs. Ready in under 30 minutes, they’re a hit with kids and adults alike!
2.5slices American cheese (cut into strips (may cause messier appearance))
Instructions
1
Preheat oven to 190°C (375°F). Line a large baking sheet with parchment paper or a silicone mat.
2
If using regular crescent rolls, press perforated seams together to form solid sheets. Use a pizza cutter to slice dough into thin strips (about ½-inch wide).
3
Wrap each hot dog with a strip of dough, starting from the bottom and spiraling upward, leaving a small gap near the top for the eyes. Stretch dough gently for thinner 'bandages.'
4
Place wrapped hot dogs on the baking sheet. Lightly spray or brush with cooking spray or melted butter for a golden finish.
5
Bake for 12–20 minutes (typically 16 minutes) until dough is puffed and golden brown.
6
Let cool slightly. Add two small dots of mustard or ketchup for eyes, then press googly eyes on top.
7
Serve warm with extra ketchup or mustard for dipping—or make a spiderweb dipping sauce by swirling mustard over ketchup and dragging a toothpick from edge to center.
Nutrition Facts
Servings 10
Amount Per Serving
Calories180kcal
% Daily Value *
Total Fat11gg17%
Saturated Fat4gg20%
Trans Fat0gg
Cholesterol25mgmg9%
Sodium520mgmg22%
Potassium180mgmg6%
Total Carbohydrate12gg4%
Dietary Fiber0gg0%
Sugars2gg
Protein7gg15%
Calcium 40 mg
Iron 1 mg
* Percent Daily Values are based on a 2,000 calorie diet. Your daily value may be higher or lower depending on your calorie needs.
Note
Use full dough sheets: Pillsbury now sells seamless crescent dough sheets—perfect for mummy wraps!
Less mess: Skip the cheese if you want neat bandages; cheese melts and drips.
Make ahead: Assemble unbaked mummies and refrigerate for up to 4 hours before baking.
Storage: Keep leftovers in an airtight container in the fridge for 1–2 days. Reheat in oven or air fryer to restore crispness.
Freezing: Freeze baked and cooled mummies for up to 3 months. Reheat from frozen at 175°C (350°F) for 10–12 minutes.
I’m a London-based food writer, recipe developer, and home cook who has been passionate about cooking for over 15 years. What started as a way to recreate my mother’s traditional dishes turned into a lifelong love for experimenting with flavors, writing about food, and helping others feel more confident in the kitchen.