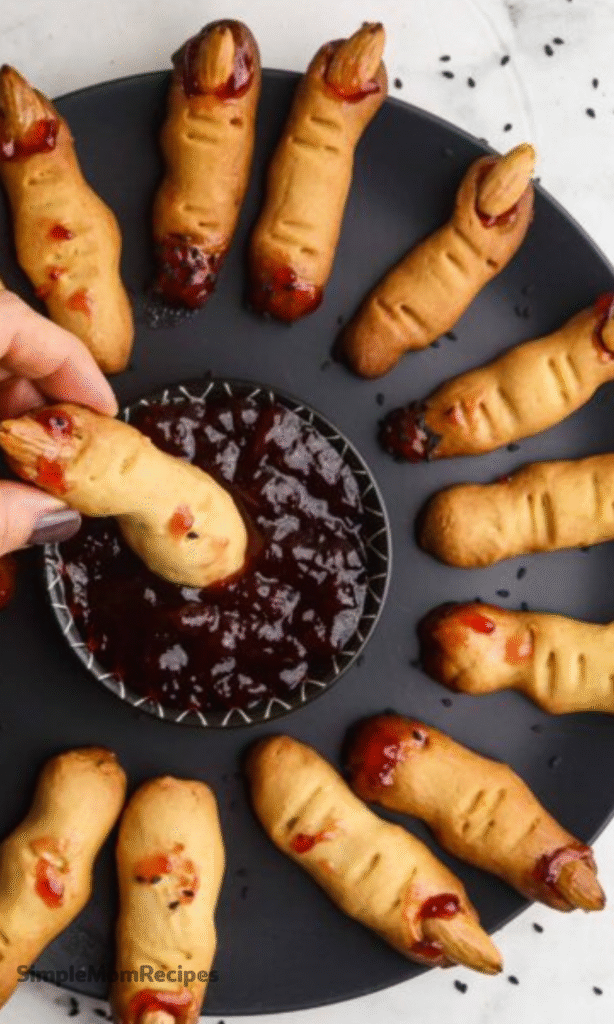
It’s almost scary how perfect these creepy witch finger cookies are as a Halloween treat. Buttery shortbread cookies are easy to make with green dye, and are finished with “bloody” red gel and almond finger nails. This witch finger cookie recipe is sure to be a spooky fun family tradition!
How can something that looks this spooky taste SO good? It’s because these creepy Halloween witch finger cookies with bloody nails are actually buttery, tender and crisp shortbread with almonds.
If you are planning to host a Halloween party you’ve got to add this recipe in your lineup. Because creepy is in on Halloween!
Why These Cookies Are a Halloween Must-Have
There’s a special kind of magic in food that tells a story, and these cookies are masterful storytellers. They’re not just a dessert; they’re a conversation piece, a centerpiece, a tiny, edible piece of theater that gets everyone laughing and shrieking in delight.
They strike the perfect balance between being genuinely eerie and completely delicious. Kids absolutely adore the gross-out factor, while adults can’t help but appreciate the clever, simple technique behind the creepy appearance. It’s a recipe that invites participation, turning your kitchen into a mini special effects studio.
Best of all, they’re deceptively simple. You don’t need to be a pastry chef to pull these off. With a little patience and a sense of humor, you can create a platter of fingers that looks like it crawled straight out of a witch’s cottage.
Ingredients Needed for the Recipe
Gathering your ingredients is the first step to creating your ghoulish masterpiece. Here’s what you’ll need:
- 1 cup unsalted butter, softened
- 1 cup powdered sugar (confectionery)
- 1 egg
- 1 teaspoon Almond extract
- 1 teaspoon Vanilla extract
- 2 3/4 cups all-purpose flour
- 1 teaspoon baking powder
- 1 teaspoon salt (use 1/2 teaspoon if using salted butter)
- 3/4 cup whole blanched almonds
- Green food coloring, a few drops
- 1 tube red decorator gel
Choosing Your Spooky Color Palette
The classic green hue gives these fingers that classic, otherworldly witchy vibe. But don’t feel limited by tradition! This is your chance to get creative and set a specific mood for your Halloween spread.
For a truly gruesome, freshly-severed look, try using a pale, skin-toned color with just a hint of grey or blue. You could even mix in a tiny speck of black food coloring to create a mottled, decaying effect. It’s all about the story you want your cookies to tell.
If you’re making these with very young children, a fun, bright purple or orange might be more their speed—spooky but still cheerful. The almond “nail” and red gel will still provide the essential creepy detail, no matter what color you choose.
How to make Creepy Witch Finger Cookies?
This is an extremely easy shortbread witch finger cookies recipe. Not much to it at all. Just follow these steps for a perfectly ghoulish outcome.

Gather and Mix the Wet Ingredients
In a large mixing bowl, add the softened butter. Add the powdered sugar, and cream them together until the mixture is light and fluffy. This is the base of your shortbread, so take a minute to get it nice and smooth.
Next, beat in the egg, the vanilla extract, and that wonderfully fragrant almond extract. The almond extract isn’t just for flavor; it really adds to the whole sensory experience, making the cookies smell as magical as they look. Scrape down the sides of the bowl to make sure everything is fully incorporated.
Incorporate the Dry Ingredients
Now, add the all-purpose flour, baking powder, and salt to the bowl. If you’re using salted butter, remember to decrease the added salt to just half a teaspoon. Mix everything until a stiff, but cohesive, dough forms.
This is where the transformation begins. Add a few drops of green food coloring to the dough. Start with a little, you can always add more. Knead it in with your hands (wearing gloves is a great idea here!) until you achieve a uniform, suitably witchy green color.
Chill the Dough
Place the cookie dough onto a large piece of plastic wrap. Wrap it tightly, pressing out any air pockets. This step is crucial—refrigerate the dough for a solid 30 minutes.
Chilling the dough firms up the butter, which prevents the cookies from spreading too much in the oven. It also makes the dough much easier to handle and shape into delicate fingers, trust me on this.
Shape the Fingers
After 30 minutes, remove the dough from the refrigerator. Using a tablespoon-sized scoop or just a heaping tablespoon of dough, portion it out. Roll each portion back and forth on a clean surface to form a finger-like shape.
Press a blanched almond firmly onto the tip of the finger to create the nail. Then, gently shape the dough around the base of the almond to make it look like the nail is growing out of the skin. This little detail makes a huge difference.
Create the Creepy Details
Now for the real artistry. Gently squeeze the dough in the center to create a knuckle shape. Then, using the tip of a toothpick or a small paring knife, carefully etch lines across the knuckle to mimic wrinkles and creases.
Don’t be too perfect here! Real fingers have uneven knuckles and lines. Making each one slightly different adds to the overall creepy, realistic effect. Place your completed fingers on a parchment-lined baking sheet, giving them a little space to breathe.
Bake to Perfection
Place the baking sheet in a preheated 325-degree oven. Bake for 20 to 25 minutes, or until the cookies are just starting to turn a very light golden brown around the edges.
You want them to be cooked through but still pale enough to maintain their ghoulish color. Over-baking will make them too brown and less… finger-like. Let them cool on the baking sheet for about 3 minutes before moving to the next, and final, step.
Add the Gory Final Touch
This is the most satisfying part. Carefully lift the almond “nail” off of each warm cookie. It should come off easily. Squeeze a small amount of the red decorator gel into the indentation you’ve created.
Now, press the almond back into place. The red gel will ooze out from underneath the nail in a gloriously gross way. Gross is definitely in on Halloween, and this effect never fails to get a reaction.
Tips for the Best Witch Fingers
For the most realistic fingers, try to vary the sizes and shapes a bit. Not all witches have long, slender fingers—some might be stubby, others might be crooked. This variety makes the platter look even more convincing and fun.
If your dough gets too soft and sticky while you’re shaping, don’t panic. Just pop it back into the refrigerator for 10 or 15 minutes to firm up again. Working with cool dough is the secret to getting those clean, detailed shapes.
And when making the knuckle lines, a light touch is key. You just want to indent the surface, not cut deep into the dough. A toothpick is often better than a knife for creating subtle, realistic wrinkles.
How to Store Your Ghoulish Creations
Once your cookies are completely cool, store them in a single layer in an airtight container. They’ll keep perfectly at room temperature for about 4 to 5 days. The shortbread base actually improves in texture after a day, becoming even more tender.
You can also freeze these cookies for long-term storage. Place the fully cooled cookies in a freezer-safe zip-top bag, squeeze out all the air, and freeze for up to 3 months. They’ll be ready to thrill at a moment’s notice.
If you’ve made the dough ahead and frozen the shaped-but-unbaked fingers, you can bake them directly from frozen. Just add a minute or two to the baking time. It’s the ultimate make-ahead party trick.
Fun Variations to Try
While the almond nail is classic, you can absolutely get creative. For a nut-free version, use a sliver of white candy coating or a shaped piece of white chocolate. You could even paint the nail on with icing after the cookies have baked and cooled.
Feeling extra adventurous? Add a tiny, unexpected flavor twist by incorporating a quarter teaspoon of cinnamon or a pinch of cayenne pepper into the dough. It adds a warm, mysterious note that plays beautifully with the buttery shortbread and almond extract.
And for the “blood,” while red gel is perfect for its viscosity, you could also use seedless raspberry jam for a fruity, homemade touch. Warm it slightly so it’s easy to spoon into the nail bed.
There you have it! A batch of chubby, edible, and delightfully creepy witch finger cookies. They’re more than just a treat; they’re a memorable part of the Halloween fun. So roll up your sleeves, and get ready to create something wonderfully wicked.

Creepy Witch Finger Cookies Recipe
Description
These delightfully spooky Creepy Witch Finger Cookies are the ultimate Halloween treat! Made from buttery shortbread dough tinted green, each “finger” is topped with an almond “fingernail” and a dab of red decorator gel for a gory, blood-dripping effect. Easy to make and guaranteed to be a hit at parties, these cookies are as fun to craft as they are to eat!
ingredients
Instructions
-
In a large mixing bowl, beat softened butter and powdered sugar until creamy. Add egg, almond extract, and vanilla extract; mix until smooth.
-
In a separate bowl, whisk together flour, baking powder, and salt. Gradually add to the wet ingredients and mix until a stiff dough forms.
-
Add a few drops of green food coloring and mix until evenly tinted. Wrap dough in plastic wrap and refrigerate for 30 minutes.
-
Preheat oven to 163°C (325°F). Line baking sheets with parchment paper.
-
Scoop about 1 tablespoon of dough and roll into a finger shape (about 3 inches long). Press a blanched almond into one end to form the nail. Pinch the center slightly to create a knuckle, then use a toothpick or knife to etch 2–3 wrinkle lines.
-
Place cookies 2 inches apart on baking sheets. Bake for 20–25 minutes, until edges are lightly golden. Let cool on the sheet for 3 minutes.
-
Gently lift each almond, squeeze a small drop of red decorator gel into the nail bed, then press the almond back down so the “blood” oozes out around the edges.
-
Let cookies cool completely before serving or storing.
Nutrition Facts
Servings 28
- Amount Per Serving
- Calories 77kcal
- % Daily Value *
- Total Fat 4.5gg7%
- Saturated Fat 2.8gg14%
- Trans Fat 0gg
- Cholesterol 14mgmg5%
- Sodium 79mgmg4%
- Potassium 0mgmg0%
- Total Carbohydrate 8.2gg3%
- Dietary Fiber 0gg0%
- Sugars 4.1gg
- Protein 1.1gg3%
* Percent Daily Values are based on a 2,000 calorie diet. Your daily value may be higher or lower depending on your calorie needs.
Note
- Make ahead: Dough can be refrigerated for up to 24 hours or frozen for 1 month. Shape and bake as needed.
- Nut-free option: Use pumpkin seeds, jellybean halves, or white chocolate pieces instead of almonds.
- Color variations: Skip green dye for pale “zombie fingers,” or use purple for mystical witches!
- Storage: Keep in an airtight container at room temperature for 4–5 days, or freeze for up to 3 months.
- Tip: For less spreading, ensure butter is softened (not melted) and chill dough thoroughly before baking.