There are some desserts that just feel like an occasion. You know the ones—the kind that make people stop mid-conversation and pull out their phones for a photo before anyone’s even taken a bite. This pavlova is absolutely one of those. It’s impressive without being fussy, elegant without trying too hard, and honestly? It tastes like a cloud decided to become a dessert.
I’ve made this recipe more times than I can count, and it never gets old. There’s something almost magical about watching simple egg whites transform into this glossy, stiff meringue that bakes up with a crisp shell and a soft, marshmallowy center. Then you pile on mascarpone cream and fresh berries, and suddenly you have this towering, gorgeous thing that looks like it belongs in a pastry shop window.
The version I’m sharing today has a couple small twists that take it from great to unforgettable. A little mascarpone in the whipped cream adds richness without weighing things down. And macerating the berries—just letting them sit with sugar and lemon juice for a bit—makes them incredibly juicy and flavorful. Little steps, big payoff.
Whether you’re making this for a holiday, a birthday, or just because it’s summer and berries are beautiful, I think you’re going to love it. And if you’ve never made pavlova before? Don’t worry. I’ll walk you through every single step.
Ingredients Needed for the Recipe
Before we get started, let’s talk about what you’ll need. Most of these are pretty simple, but a few details make a real difference.
- Egg whites: Six large ones, and they really should be at room temperature. Cold egg whites can still whip, but warm ones get fluffier faster and hold more volume. Set them out about 30 minutes before you start.
- Cream of tartar: Just a half teaspoon. It stabilizes the egg whites and helps them hold their structure. If you’ve ever had meringue that deflated or wept little beads of sugar, cream of tartar helps prevent that.
- Superfine sugar: One and a half cups. This dissolves more easily than regular granulated sugar, which means a smoother meringue. If you can’t find it, just pulse regular sugar in a food processor for 30 seconds. Problem solved.
- Cornstarch: One and a half teaspoons. This is the secret to that soft, chewy center. It sounds odd, but trust me on this one.
- Vanilla extract: One teaspoon for the meringue, another for the whipped topping. It’s warm and familiar and ties everything together.
- Mascarpone cheese: Eight ounces, cold. This is what makes the whipped topping extra luxurious. It’s thicker and richer than cream alone.
- Heavy cream: Two cups, also cold. The base of that billowy topping.
- Lemon zest: Freshly grated, from one lemon. It brightens up the cream and adds a little something you can’t quite name but would miss if it weren’t there.
- Mixed berries: About a pound. Use whatever looks best—strawberries, raspberries, blueberries, blackberries. A mix is nice because you get sweet and tart in every bite.
- Salt: Just small pinches here and there. It balances sweetness and helps flavors pop.
That’s it. Nothing too complicated, but every ingredient has a job.
How to make Classic Pavlova Recipe?
Alright, let’s get to the good part. I’ve made this pavlova more times than I can count, and I’ve learned a few things along the way. The steps aren’t hard, but a few small details really matter. Take your time, follow along, and you’ll have something beautiful.
Step 1 – Prep your oven and baking sheet
Preheat your oven to 250°F, with a rack right in the middle. Line a baking sheet with parchment paper. Now grab a 9-inch cake pan or a plate and trace a circle onto the parchment with a marker. Just lightly—you’ll see why in a second. Then flip the paper over. You don’t want marker touching your meringue. That circle is your guide for shaping later.
Step 2 – Start the meringue base
Pour those room temperature egg whites into the bowl of a stand mixer. Beat them on medium speed until they get foamy, about a minute. You’ll see lots of small bubbles and the mixture will look opaque. Add the salt and cream of tartar, then keep beating until soft peaks form. This takes another couple minutes. When you lift the beater, the whites should droop over slightly but hold a soft shape.
Step 3 – Add the sugar gradually
Here’s where patience matters. With the mixer still running on medium, start adding the superfine sugar one tablespoon at a time. I know it feels slow, but rushing this step can leave you with gritty meringue. Give each addition a few seconds to incorporate before adding the next. Once all the sugar is in, increase the speed to medium-high and beat until the mixture is glossy and forms stiff peaks. This takes about five to seven minutes. You’ll know it’s ready when the meringue stands straight up on the beater without drooping at all. It should look smooth and almost satiny.
Step 4 – Add the vanilla and cornstarch
With the mixer running, add the vanilla and cornstarch. Beat for another 30 seconds or so, just until everything is combined. The cornstarch might seem like an odd addition, but it’s what gives pavlova that soft, marshmallowy interior. Don’t skip it.
Step 5 – Shape the meringue
Secure your parchment paper to the baking sheet by putting a tiny dab of meringue under each corner. That acts like glue so the paper stays put. Now mound all the meringue onto the parchment, inside that circle you traced earlier. Use a spatula or a butter knife to spread it out to the edges. Here’s a little trick I learned—create a very slight well in the center. Not deep, just a shallow indent. That’s where the whipped cream will sit later. Smooth the top and sides just a little, but don’t overwork it. Perfectly smooth isn’t the goal here. A few peaks and swirls look lovely.
Step 6 – Bake and cool properly
Pop that baking sheet into the oven and bake for 85 to 90 minutes. The meringue should be dry and crisp all over when it’s done. Don’t worry if the top cracks a little—that’s totally normal and it’ll be covered with cream anyway. When the time’s up, turn the oven off and prop the door open with a wooden spoon or something heatproof. Let the meringue cool inside the oven for a full hour. This gradual cooling helps prevent sudden collapsing. After an hour, you can take it out. If you’re making it ahead, store the cooled meringue in an airtight container at room temperature for up to a day. No refrigerator—humidity is not your friend here.
Step 7 – Make the mascarpone whipped topping
Wash your mixer bowl well—any trace of grease can affect whipping. Add the cold mascarpone, cold heavy cream, granulated sugar, vanilla, and that fresh lemon zest. Start on low speed just to combine everything without splashing, then increase to medium-high. Beat until medium-stiff peaks form. This usually takes a minute or two. Be careful not to overbeat—you want it smooth and billowy, not curdled or too stiff. You can use this right away or refrigerate it for up to two hours.
Step 8 – Macerate the berries (optional but amazing)
If you want to take the fruit topping to another level, macerate them. In a medium bowl, gently mix your berries with one tablespoon of lemon juice and two tablespoons of granulated sugar. If you’re using strawberries, hull them and cut larger ones in half or quarters. Leave smaller berries like raspberries and blueberries whole. Let this sit at room temperature for 30 minutes to an hour. The sugar draws out the berries’ natural juices, creating a light syrup that’s absolutely delicious spooned over the cream.
Step 9 – Assemble the pavlova
Carefully peel the meringue off the parchment paper and transfer it to a serving platter. If it’s stuck, just move it with the paper still attached—you can trim the parchment down so it’s less noticeable. Mound that beautiful mascarpone cream onto the center and gently spread it outward, stopping about an inch from the edge. Don’t worry if the meringue cracks a little as you work. It happens.
Step 10 – Top with berries and serve
Right before serving—and I mean right before—spoon the berries over the cream. If you macerated them, include all those lovely juices too. Add a few fresh mint leaves if you have them, maybe another tiny grating of lemon zest for color. Then stand back and admire what you just made. It’s really something.
Tips
I’ve picked up quite a few little tricks over the years, and these are the ones I come back to every time I make pavlova.
- Make sure your bowl and whisk are completely clean and free of any grease. Even a tiny bit of fat can keep egg whites from whipping properly. I usually wipe mine with a little vinegar or lemon juice on a paper towel just to be safe.
- Humidity is the enemy of crisp meringue. Try not to make pavlova on a rainy or super humid day if you can help it. The sugar absorbs moisture from the air and the texture won’t be quite right.
- When you’re spreading the meringue, that slight well in the center isn’t just for looks. It gives the cream a place to sit without sliding off the sides. Don’t make it too deep though—just a gentle indent.
- If your meringue cracks while baking, don’t stress. It happens to everyone. The whipped cream and berries cover a multitude of imperfections, and nobody will know but you.
- For cleaner slices, use a sharp knife and wipe it clean between cuts. The meringue can be a little delicate, but this helps keep things neat.
- Leftover pavlova doesn’t keep well once it’s assembled. The cream and berries make the meringue soft. If you have leftovers, the texture won’t be the same the next day. Better to enjoy it all at once—not usually a problem with something this good.
Making Mini Pavlovas for Individual Servings
Sometimes a big pavlova feels right, but other times I want little individual ones. Maybe for a dinner party where everyone gets their own, or just because mini things are cute. This recipe works beautifully for that.
Instead of one large circle, shape 8 to 10 smaller meringues on two parchment-lined baking sheets. Leave a little space between them—they’ll spread slightly as they bake. Create that same small indent in the center of each one for the cream later. Bake on two racks, positioned in the upper and lower thirds of the oven. They’ll need about 50 to 55 minutes, until crisp and dry. Then turn the oven off, prop the door open, and let them cool inside for an hour just like the big one.
The rest of the process is the same. Top each little pavlova with a dollop of mascarpone cream and a spoonful of berries. They’re absolutely charming, and guests love having their own. Plus, you don’t have to worry about slicing a big one neatly. Win-win.
Make-Ahead Tips and Storage Suggestions
One of the things I really appreciate about pavlova is how flexible it can be. You can absolutely get ahead on parts of it, which makes entertaining so much less stressful.
The meringue base itself can be made a full day ahead. Once it’s completely cool, store it in an airtight container at room temperature. Do not refrigerate it. The humidity in the fridge will soften that crisp exterior and ruin the texture. Room temperature in a sealed container is perfect. I’ve even kept it successfully for two days, though one is ideal.
The mascarpone whipped topping can be made up to two hours ahead and kept in the refrigerator. Just give it a gentle stir before using if it needs to be smoothed out. The macerated berries can sit at room temperature for that hour before serving, so those are easy to time.
The one thing you really can’t do ahead is assemble it. Once the cream and berries go on, the clock starts ticking. The moisture from both will gradually soften the meringue. For the best texture—crisp outside, soft inside, creamy topping, juicy fruit—assemble right before you plan to serve. Ten minutes before people arrive is perfect. Then let everyone admire it before you dig in.
If you somehow have leftover assembled pavlova, the texture won’t be the same the next day. But it’s still delicious crumbled over ice cream or yogurt. Waste not, want not.

Classic Pavlova Recipe
Description
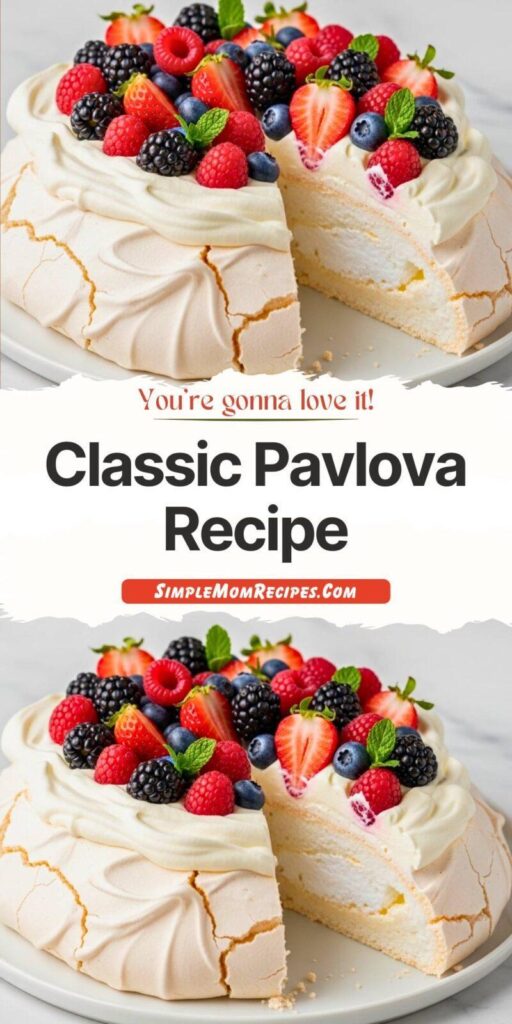
This gorgeous pavlova features a crisp meringue shell with a soft, marshmallowy center, topped with rich mascarpone whipped cream and fresh macerated berries. Naturally gluten-free and perfect for special occasions.
Ingredients
For the Pavlova
For the Whipped Topping
For the Fruit Topping
Instructions
For the Meringue
Prep Oven & Pan
Preheat oven to 250°F (120°C). Place rack in center. Line a baking sheet with parchment paper. Trace a 9-inch circle using a cake pan or plate. Flip parchment over so marker doesn’t touch food.Whip Egg Whites
In a stand mixer, beat egg whites on medium until foamy (~1 min). Add salt and cream of tartar; beat until soft peaks form (~2 min).Add Sugar Gradually
Gradually add superfine sugar, 1 tbsp at a time, while beating. Once all added, increase speed to medium-high and beat until glossy stiff peaks form (5–7 min).Finish Meringue
Add vanilla and cornstarch; beat 30 seconds more until just combined.Shape Meringue
Mound meringue onto traced circle. Use a spatula to spread into a 9-inch round with slightly raised edges and a shallow well in the center. Keep texture rustic—do not over-smooth.Bake & Cool
Bake 85–90 minutes until dry and crisp. Turn off oven, prop door open, and let cool inside for 1 hour. Store at room temperature up to 1 day if making ahead.
For the Whipped Topping
Whip Cream Mixture
In a clean bowl, combine cold mascarpone, heavy cream, sugar, vanilla, lemon zest, and pinch of salt. Beat on low to combine, then medium-high until medium-stiff peaks form (1–2 min). Do not overbeat.
For Macerated Berries (Optional)
Macerate Berries
Gently toss berries with 1 tbsp lemon juice and 2 tbsp sugar. Let sit 30–60 minutes at room temperature until juicy.
To Assemble
Assemble Pavlova
Carefully transfer cooled meringue to serving platter. Spread mascarpone cream over top, leaving 1-inch border. Top with fresh or macerated berries and mint just before serving.
Note
• For Passover: omit cornstarch. • Mini pavlovas: make 8–10 small nests; bake 50–55 min. • Do not refrigerate assembled pavlova—it softens the meringue. • Best served immediately after assembly.
