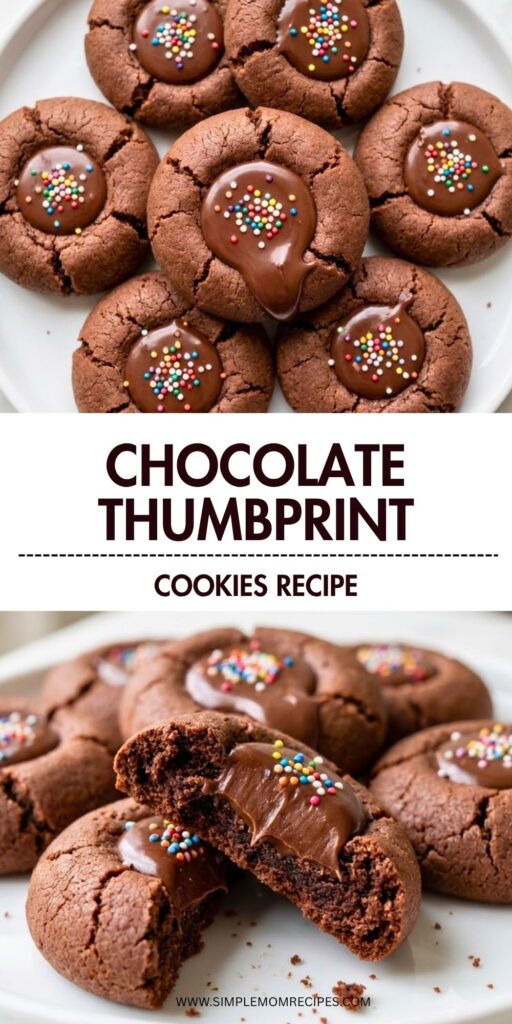
I have a weakness for chocolate cookies that look a little fancy but really aren't much trouble to make. These chocolate thumbprint cookies are exactly that kind of cookie for me. The outside is soft and chewy, the chocolate flavor is deep without being bitter, and the little pool of ganache in the center makes them feel like something I spent way more time making than I actually did.
I especially like making these around Christmas, when I already have cookie sheets everywhere and somehow keep finding excuses to bake another batch. The sprinkles are completely optional, but I usually add them because a tiny handful of colorful nonpareils makes these cookies look cheerful without taking away from all that chocolate.
One thing I learned pretty quickly is that the chilling step isn't something I want to skip. I have tried rushing cookies like this before, and the result was usually flatter, wider cookies with centers that didn't quite look right. Giving the dough time to chill makes a noticeable difference.
Ingredients I Used for the Recipe
- 1 1/2 cups (188 g) all-purpose flour: I use properly measured flour to give the cookies enough structure while still keeping them chewy.
- 1/2 cup (40 g) Dutch process cocoa powder: This gives the cookies their rich, dark chocolate flavor and deep color.
- 1/2 teaspoon salt: I add this to balance the sweetness and make the chocolate taste fuller.
- 1/2 teaspoon baking powder: This gives the cookies just a little lift without turning them cakey.
- 3/4 cup (168 g) unsalted butter, softened: Soft butter helps create a smooth, creamy dough when mixed with the sugars.
- 3/4 cup (165 g) packed light brown sugar: I like the softness and chew that brown sugar brings to these cookies.
- 1/4 cup (50 g) granulated sugar: A little white sugar helps balance the brown sugar and keeps the texture from getting too heavy.
- 2 egg yolks, room temperature: The yolks add richness and help keep the cookies tender.
- 1 1/2 teaspoons vanilla bean paste or vanilla extract: I usually reach for vanilla bean paste, but regular extract works perfectly fine.
- 1 cup (200 g) semi-sweet chocolate chips: I use these for the smooth chocolate ganache filling.
- 1/2 cup (120 ml) heavy whipping cream: This melts together with the chocolate to make the creamy ganache.
- Nonpareils, optional: I like adding a few on top, especially for a holiday cookie tray.
How to Make Chocolate Thumbprint Cookies?
Step 1 - Mix the Dry Ingredients
I start by whisking the flour, Dutch process cocoa powder, salt, and baking powder together in a medium bowl. I like doing this first so the cocoa is evenly distributed before it goes into the butter mixture.
I also take a second to check my flour measurement here. If I scoop straight into a bag of flour with the measuring cup, I can easily end up using too much. I spoon it into the cup and level it off with a knife, or I weigh it when I have my kitchen scale out.
Step 2 - Cream the Butter and Sugars
In a large bowl, I beat the softened butter, brown sugar, and granulated sugar together for about two minutes. I want the mixture to look creamy and smooth rather than greasy or lumpy.
The butter really does need to be softened for this. When I forget to set it out ahead of time, I end up fighting with the mixer, and there is no reason to make cookie baking harder than it needs to be.
Step 3 - Add the Egg Yolks and Vanilla
I add the two room-temperature egg yolks and vanilla, then mix for another minute or two. The mixture should become lighter and fluffy.
This is one of those little moments where I don't rush. Once everything looks pale and creamy, I know the dough is ready for the dry ingredients.
Step 4 - Finish the Cookie Dough
I add the dry ingredients to the butter mixture and mix just until everything comes together. I don't keep mixing once I stop seeing dry streaks because I want the finished cookies to stay tender.
The dough should be soft enough to scoop but firm enough to roll into balls. If it feels a little sticky, that's okay. The refrigerator is about to do some of the work.
Step 5 - Shape and Chill the Cookies
I scoop the dough into about 34 portions, using roughly one tablespoon of dough for each cookie. I roll each portion into a ball and place the balls on parchment-lined baking sheets.
For the centers, I use a 1/4 teaspoon instead of my thumb. I know that makes these technically less thumbprint-y, but I like the smaller, neater indent it creates. I press gently into the center of each dough ball without pushing all the way through.
Then I chill the prepared cookies for at least one hour. I really recommend giving them the full chill. This is one step I used to want to skip, and it always came back to haunt me when the cookies spread too much in the oven.
Step 6 - Bake the Cookies
I preheat the oven to 350°F and arrange the chilled cookies about 1 1/2 inches apart on the baking sheets. I bake them for 9 to 11 minutes, and around 10 minutes is usually my favorite point.
When they come out, the centers may have puffed up slightly and the indents may not look as deep. While the cookies are still hot, I gently press the centers down again with the 1/4 teaspoon.
I also like to use a round cookie cutter or biscuit cutter around the outside of each warm cookie. I move it in a gentle circular motion without actually cutting the cookie. It helps pull the edges back into a neat circle, which is especially useful if the cookies spread a little.
I leave the cookies on the baking sheet for about five minutes, then move them to a cooling rack. They need to cool completely before I add the ganache.
Step 7 - Make the Chocolate Ganache
While the cookies cool, I make the filling. I put the semi-sweet chocolate chips into a small bowl and heat the heavy cream until it is just about to boil.
I pour the hot cream over the chocolate and let it sit for about one minute. Then I stir slowly until the chocolate melts into the cream and the mixture becomes smooth and glossy.
If I have little bits of chocolate hanging around, I give it another minute of gentle stirring. I don't worry about making it complicated. This ganache is wonderfully simple.
Step 8 - Fill and Finish the Cookies
Once the cookies are completely cool, I spoon about one teaspoon of ganache into each center. I add a little more when the indentation has enough room because, honestly, I don't see a reason to leave good chocolate behind.
I finish them with a few nonpareils while the ganache is still soft. Then I refrigerate the cookies for about 10 to 15 minutes so the chocolate can set.
After that, they are ready to eat. I usually sneak one before putting the rest away, which has become less of a bad habit and more of a required quality-control step in my kitchen.
A Few Things I Learned While Making Them
The biggest lesson for me with these cookies is that measuring the flour correctly matters more than it seems. Too much flour can make the dough heavier and take away some of that soft, chewy texture I like so much.
I also prefer Dutch process cocoa here. Since chocolate is the main flavor, I don't want to use a cocoa powder that tastes flat or overly sharp. The darker cocoa gives these cookies that deep chocolate character that works really well with the sweet ganache.
Another little trick I keep using is the 1/4 teaspoon for the center. I tried making thumbprints with my actual thumb once, and my cookies ended up with uneven wells. They still tasted good, obviously, but I wanted prettier cookies. The measuring spoon wins for me.
Tips
- Measure the flour carefully. I spoon flour into the measuring cup and level it rather than scooping directly from the container. If I weigh it, I use about 188 grams.
- Don't skip chilling. The chilled dough holds its shape much better while baking and helps keep the cookies thick and chewy.
- Use softened butter. If the butter is rock hard, the sugar won't cream into it properly. I like to let it soften naturally on the counter.
- Keep the egg yolks at room temperature. They blend more easily into the butter mixture and help everything come together smoothly.
- Don't overbake. I usually pull these at about 10 minutes. They may look slightly soft when they first come out, but they continue settling as they cool.
- Fix the centers while the cookies are hot. If the indent gets smaller during baking, gently press it down again before the cookies cool.
- Use a round cutter to tidy the edges. A gentle circular motion around each warm cookie can give the edges a cleaner, more bakery-style shape.
- Let the cookies cool before adding ganache. Warm cookies can make the ganache soften too quickly, and I prefer a clearly defined chocolate center.
- Give the ganache time to set. A short 10 to 15 minute chill in the refrigerator makes the filling much easier to handle.
- Store them airtight. I keep the finished cookies in an airtight container for up to three days. They can also be frozen for up to two weeks.
When I Like to Serve These Cookies
I think these are especially good for Christmas cookie trays because they have a little more going on than a plain chocolate cookie, but they aren't fussy. The dark cookie, shiny ganache center, and tiny sprinkles look festive without needing a lot of decorating.
I also like them with coffee when I have a quiet afternoon and no reason to share the batch immediately. The cookie itself is rich, so I don't need a huge dessert. One or two is usually enough, although somehow I never seem to stop at exactly one.
If I am making them ahead for guests, I prefer to let the ganache set completely before stacking them. That keeps the centers neat and prevents the cookies from sticking together. It is a small thing, but it makes serving them much easier later.
For me, these chocolate thumbprint cookies hit that sweet spot between easy and special. I get a chewy dark chocolate cookie, a creamy ganache center, and just enough decoration to make them feel festive. I don't need a complicated cookie project every time I bake, and this is one recipe I can make when I want something that looks impressive without spending the whole day in the kitchen.