This chocolate swirl milk bread stuck with me in a way I didn’t expect. It’s soft, slightly sweet, and that swirl never fails to make it feel a little special.
first time I made it, I rushed the dough. Big mistake. It still tasted good, but the texture was off and I knew it could be better. The second time, I slowed down, let things rise properly, and yeah… that’s when it clicked.
Now it’s one of those recipes I pull out when I want something cozy but still a little impressive. I usually end up slicing it thick, toasting it lightly, and eating it with a cup of tea while pretending I’m going to share it with someone else.
Ingredients I Used for the Recipe
2 ⅔ cups (330g) all-purpose flour - this is the base of the bread, gives structure and that soft crumb
1/2 tsp (2g) salt - just enough to balance the sweetness
2/3 cup (160ml) lukewarm milk - helps make the dough soft and rich
1/3 cup (70g) sugar - adds sweetness and also helps the yeast do its thing
1 ¼ tsp (4g) active dry yeast - this is what makes the bread rise and get fluffy
3 tbsp (40g) butter, melted - gives richness and that tender texture
1 egg, beaten - adds structure and softness at the same time
1 tsp (5g) vanilla extract - brings that warm, sweet flavor that pairs so well with chocolate
2 tbsp (16g) cocoa powder - for the chocolate dough and that deep swirl
1 tbsp (15ml) milk - helps mix the cocoa smoothly into the dough
1 egg, beaten (for brushing) - gives that golden, slightly shiny top
How to make Chocolate Swirl Milk Bread?
Step 1 - Wake Up the Yeast
I start by mixing the yeast with a little sugar and some of the lukewarm milk. Then I just leave it alone for about 5 to 10 minutes. If it gets foamy, I know it’s alive and ready. If not, I’ve learned the hard way to just start over.
Step 2 - Make the Dough
In a big bowl, I mix flour, sugar, and salt. Then I add the milk, the yeast mixture, egg, vanilla, and melted butter. I usually start with a spoon, then switch to my hands because it just feels easier to know when it’s coming together.
I knead until it stops sticking so much and feels smooth. Not perfect, just smooth enough.
Step 3 - Divide and Flavor
Once the dough is ready, I split it into two equal pieces. One stays plain. The other gets cocoa powder and a bit of milk kneaded into it.
This part can get messy. The cocoa doesn’t want to mix at first, and I always think I messed it up. But it comes together if I keep going.
Step 4 - Let It Rise
I place both doughs into lightly oiled bowls and cover them. Then I let them sit in a warm spot for about an hour, until they double in size.
I used to rush this step. Now I don’t. The difference in texture is huge when I let it fully rise.
Step 5 - Roll the Layers
Once risen, I roll out the vanilla dough into a rectangle, then do the same with the chocolate dough. Nothing fancy, just roughly even.
I place the chocolate layer on top of the vanilla one and gently roll them together a bit more so they stick.
Step 6 - Create the Swirl
This is the fun part. I roll the dough up almost like a log, then slice it into strips. I twist some of them so the chocolate and vanilla alternate in a messy, swirled way.
I don’t try to make it perfect. Actually, the more uneven it looks, the better it turns out after baking.
Step 7 - Shape and Rest Again
I place everything into a greased loaf pan. Sometimes I just tuck the pieces in however they fit. It always works out.
Then I let it rest again for about 30 minutes. It puffs up a little more, which helps the final texture.
Step 8 - Bake Until Golden
I brush the top with beaten egg, then bake it. If it starts browning too fast, I loosely cover it with foil. I learned that after one loaf got way too dark on top while still underbaked inside.
The smell at this point is unreal. It fills the whole kitchen.
Step 9 - Let It Cool (the hardest part)
I always want to cut into it right away. Every single time. But if I do, the texture gets a little gummy. So I wait until it cools completely.
It’s worth it. The slices come out clean, and the swirl looks so much better.
Little Things I Learned Along the Way
One thing I figured out after a few tries is that this bread is really forgiving. I’ve messed up the swirl, over-twisted it, even slightly overbaked it once, and it still turned out good.
If I want it extra chocolatey, I sometimes spread a thin layer of chocolate spread or sprinkle chocolate chips before rolling. It melts into the layers and makes it feel more like a dessert.
I’ve also played around with flavors. Coffee instead of cocoa works surprisingly well. I tried matcha once too, and that one felt a little fancy for my usual mood but still good.
The biggest thing though? Don’t rush the rise. I know I already said it, but yeah… that’s the difference between okay bread and really soft, fluffy bread.
Tips
I don’t always follow recipes perfectly, so these are the things I actually pay attention to now.
If the dough feels too sticky, I add just a little flour, not too much. I used to overdo it and ended up with dense bread.
Warm milk matters. Too hot kills the yeast, too cold slows everything down. I just aim for slightly warm to the touch.
Don’t stress about perfect shapes. The swirl comes out unique every time, and that’s kind of the point.
If the top browns too fast, cover it loosely with foil. Saves the loaf every time.
Let it cool fully before slicing. I know it’s annoying, but it really makes a difference.
Store leftovers wrapped well. It stays soft for a couple days, and honestly tastes even better the next morning.
How I Usually Serve It
Most days, I keep it simple. A thick slice, maybe lightly toasted, and a cup of tea. That’s it.
Sometimes I spread a little butter on it while it’s still warm. It melts into the bread and mixes with the chocolate swirl in the best way.
And if I’m feeling a little extra, I turn it into French toast. That might actually be my favorite way to use leftovers, if there are any.
This bread feels like one of those small wins in the kitchen. Not complicated, not perfect, but really satisfying. And every time I make it, I remember why I keep coming back to it.
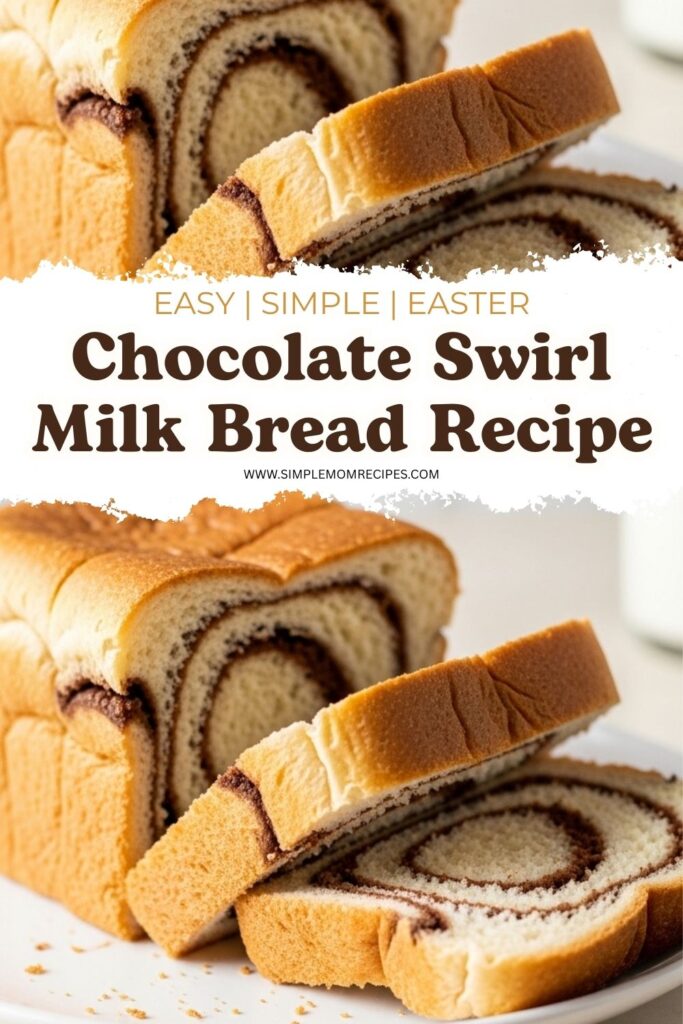
This Chocolate Swirl Milk Bread features a soft, tender crumb with beautiful vanilla and chocolate swirls throughout. A classic combination that's perfect alongside milk or tea for breakfast, or as a delightful snack any time of day. The sweet milk bread dough is divided, with cocoa added to half, then rolled together to create stunning marbled layers that bake up golden and irresistible.
ingredients
Main Dough
2 ⅔cups all-purpose flour (330g)
1/2tsp salt (2g)
2/3cup lukewarm milk (160ml, plus extra for chocolate dough)
1/3cup sugar (70g, plus 1 tsp for yeast activation)
1 ¼tsp active dry yeast (4g, or 15g fresh yeast)
3tbsp butter (40g, melted)
1large egg (beaten, for dough)
1tsp vanilla extract (5g)
For Chocolate Dough
2tbsp cocoa powder (16g, unsweetened)
1tbsp milk (15ml)
For Brushing
1large egg (beaten)
Instructions
Prepare the Dough
1
Activate YeastIn a medium bowl, combine yeast, 1 tsp sugar, and ⅓ cup lukewarm milk. Let rest for 5-10 minutes until foamy to activate the yeast.
2
Mix DoughIn a large bowl, whisk together flour, remaining sugar, and salt. Add remaining milk, activated yeast, beaten egg, vanilla extract, and melted butter. Knead until dough pulls away from bowl sides.
Use hands, hand mixer, or stand mixer
3
Divide DoughDivide dough into two equal pieces. Shape one piece into a ball for vanilla dough. Transfer to an oiled bowl and cover with plastic wrap.
4
Make Chocolate DoughAdd cocoa powder and 1 tbsp milk to the second half of dough. Knead until cocoa is fully incorporated and dough is evenly colored. Transfer to an oiled bowl and cover with plastic wrap.
5
First RiseLet both doughs rest in a warm place for about 1 hour, or until doubled in size.
Roll and Shape the Bread
6
Roll Vanilla DoughOn an oiled surface, roll the vanilla dough into an 8x12 inch (20x30cm) rectangle.
7
Roll Chocolate DoughRepeat with the chocolate dough, rolling to the same 8x12 inch (20x30cm) rectangle.
8
Layer DoughsPlace the chocolate dough rectangle over the vanilla dough rectangle. Continue rolling gently to form an 8x20 inch (20x50cm) rectangle.
9
Roll and CutStart rolling up the layered dough tightly from one long edge, almost to the end. Cut the rolled dough into about 10 even strips.
10
Twist and Final RollTwist some strips to alternate the vanilla and chocolate colors. Continue rolling the entire assembly into a log shape.
11
Pan and Second RiseTransfer the roll to an 8½ x 4½-inch loaf pan lined with parchment paper. Let rest at room temperature for 30 minutes to rise slightly.
Bake the Bread
12
Preheat and PrepareMeanwhile, preheat oven to 350°F (180°C). Brush the top of the risen loaf with beaten egg for a golden finish.
13
Adjust TemperatureReduce oven temperature to 320°F (160°C) before placing bread inside.
This prevents over-browning
14
BakeBake for about 40 minutes, or until the top is deep golden and the bread sounds hollow when tapped.
15
Prevent Over-BrowningIf the top browns too quickly, loosely cover with aluminum foil after about 15 minutes of baking.
16
Cool CompletelyRemove from oven and let the chocolate swirl milk bread cool completely in the pan before transferring to a wire rack. Slice only when fully cooled.
Cutting while warm will make the bread gummy
Nutrition Facts
Servings 10
Amount Per Serving
Calories221kcal
% Daily Value *
Total Fat6.3gg10%
Saturated Fat2.8gg14%
Trans Fat0gg
Cholesterol46mgmg16%
Sodium30mgmg2%
Potassium85mgmg3%
Total Carbohydrate34.5gg12%
Dietary Fiber1.4gg6%
Sugars8.2gg
Protein6.7gg14%
Calcium 25mg mg
Iron 1.8mg mg
* Percent Daily Values are based on a 2,000 calorie diet. Your daily value may be higher or lower depending on your calorie needs.
Note
Extra chocolatey? Before rolling, spread a thin layer of chocolate hazelnut spread or sprinkle chocolate chips over the chocolate dough for intensified flavor.
Flavor variations: Substitute cocoa with instant coffee powder for a vanilla-coffee swirl, or use matcha powder for a vanilla-matcha version.
Filling ideas: Add a layer of chocolate ganache, ground nuts, or fruit preserves before rolling for creative twists.
Storage tip: Keep cooled bread wrapped at room temperature for up to 3 days, or freeze slices for up to 1 month. Reheat gently to restore softness.
Make ahead: Prepare dough through the first rise, then refrigerate overnight. Bring to room temperature before rolling and baking the next day.
I’m a London-based food writer, recipe developer, and home cook who has been passionate about cooking for over 15 years. What started as a way to recreate my mother’s traditional dishes turned into a lifelong love for experimenting with flavors, writing about food, and helping others feel more confident in the kitchen.