There’s something truly magical about a perfect butter cookie, isn’t there?
It’s not just a treat; it’s a little bite of comfort, a moment of pure, simple joy.
The Secret Ingredient You’ll Adore
Now, I know calling any recipe “the best ever” is a bold move, but this one truly earns its title.
The secret weapon? It’s milk powder, a humble pantry staple that works absolute wonders.
Ingredients Needed for the Recipe
- All-Purpose Flour: This forms the sturdy, yet tender, backbone of our cookie.
- Salt: A pinch is all it takes to make the sweet, buttery flavors truly sing.
- Unsalted Butter: The star of the show, providing that irreplaceable rich flavor and melt-in-your-mouth texture.
- White Granulated Sugar: It sweetens the deal and helps create a lovely, delicate crumb.
- Egg Yolks: These add richness, color, and help bind our dough together beautifully.
- Vanilla Extract: A classic flavor enhancer that brings warmth and depth to every bite.
- Milk Powder: Our secret ingredient! It introduces an incredible creaminess and deep, toasty flavor.
- Whole Milk (Optional): Just a teaspoon on standby, in case your dough needs a tiny bit of loosening.
Your Butter Cookie Toolkit
You won’t need any fancy equipment to create these little masterpieces.
A good mixer, a few bowls, and a sturdy piping bag are your main allies in this delicious mission.
How to make The Best Ever Butter Cookies?

Step 1- Prep Your Station
Begin by preheating your oven to 350°F (180°C) and lining your baking sheets with parchment paper.
This simple step is your first defense against sticking and ensures a perfect, even bake.
Step 2- Combine the Dry Goods
In a medium bowl, whisk together your flour and salt until they are happily united.
There’s no need to sift here; a good whisk will distribute everything just fine.
Step 3- Cream Butter and Sugar
Now, in a large bowl, beat the softened butter and sugar together for about three minutes.
You’re looking for a mixture that is light, fluffy, and pale in color, but don’t overdo it.
Step 4- Incorporate Wet Ingredients
Add the egg yolks, vanilla, and that magical milk powder to the butter mixture.
Mix on a low speed just until everything is smoothly combined, scraping down the bowl as needed.
Step 5- Bring the Dough Together
Gently add your pre-mixed dry ingredients to the wet mixture.
Mix on a low-medium speed only until the flour disappears, then stop immediately to avoid toughness.
Step 6- Test for Piping
Use a spatula to press out any air bubbles and give the dough a final gentle mix until it’s smooth.
If it feels too firm for piping, add a single teaspoon of milk; if it’s pipeable, you’re golden.
Step 7- Pipe the Rosettes
Fit a large piping bag with a big star tip and fill it halfway with dough for easier handling.
Pipe small, tight rosettes onto your prepared baking sheets, leaving a little space between each.
Step 8- The Crucial Chill
Slide the entire baking sheet into the refrigerator for a solid 30 minutes.
This step is non-negotiable, as it firms up the butter and guarantees your cookies hold their beautiful shape.
Step 9- Bake to Perfection
Bake one tray at a time on the middle oven rack for about 15 minutes.
Watch for the edges to turn a light golden brown for a classic cookie, or a bit darker for a richer, crispier bite.
Step 10- Cool and Decorate
Let the cookies cool right on the baking tray for 30 minutes; they need this time to firm up.
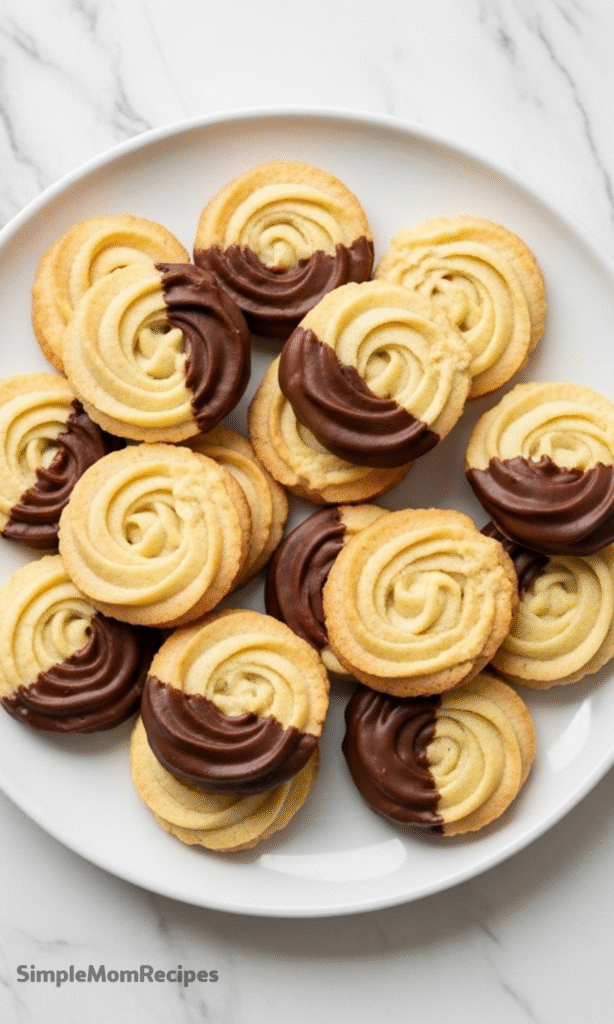
For a festive touch, you can dip them in melted chocolate and add sprinkles while the chocolate is still wet.
Tips
- Room temperature ingredients are your best friend for a smooth, non-curdled dough.
- Double-bag your piping bag if it feels thin to prevent any messy mid-pipe explosions.
- For ultimate accuracy, use a kitchen scale to measure your flour and other ingredients.
- Resist the urge to overmix the dough after adding the flour; a light hand makes a tender cookie.
- Let the cookies cool completely on the tray—they’re too delicate to move when warm.
Fun Flavor Variations
Feel free to get creative and make this timeless recipe your very own.
A little lemon or orange zest folded into the dough can add a wonderful, bright citrus note.
Storing Your Masterpieces
Keep your cooled butter cookies in an airtight container at room temperature.
They’ll stay perfectly delicious for up to three weeks, though they rarely last that long.

The Best Ever Butter Cookies Recipe
Description
These butter cookies are hands down the best I’ve ever had! They’re rich and buttery, with a delicate crumb and melt-in-your-mouth texture. Best of all, they’re easy to make with just a handful of kitchen staples. Perfect with a warm cup of tea or as part of a holiday spread!
Ingredients
Main Ingredients
For Decorating (Optional)
Instructions
-
Preheat oven to 180 °C (350°F) conventional (see note 4 if using a convection oven) and line two large baking sheets with parchment paper (I used two 18x13 inch half-sheet baking trays). Set aside.
-
Combine flour and salt and mix until well combined (no need to sift). Set aside.
-
In a large bowl combine softened butter and sugar and using a hand or stand mixer on a medium speed (use the paddle attachment if using a stand mixer), cream for 3 minutes until light and fluffy. Do not over-cream.
-
Add in egg yolks, vanilla and milk powder and mix on a low speed until well combined. Scrape down the bowl as needed.
-
Add in premixed dry ingredients and mix on low-medium speed until just combined. Do not overmix.
-
Use a spatula to gently press down on the dough to release any air bubbles, then mix carefully until the dough is smooth. It should now be ready for piping. To test, transfer a small portion into a piping bag fitted with a large pastry tip, such as an Ateco 849 or 827 (avoid using a small tip, as the dough will be too difficult to pipe). If the dough feels too firm, add 1 teaspoon of room-temperature milk and gently fold it in with the spatula. Only add milk if needed (see note 5).
-
When the dough is ready, transfer half of it into a large piping bag (working with half at a time makes piping more manageable). If your piping bag is thin, layer it with a second bag to prevent tearing while piping. Pipe the dough into small rosettes onto the parchment-lined baking sheets. This recipe should yield approximately 40 cookies.
-
Place cookies into the fridge to chill for 30 minutes (see note 6). They should feel hard when you touch them.
-
Bake one tray at a time on the middle rack of the oven for about 15 minutes, or until the cookies begin to develop a light golden brown color. The more browning, the richer the flavor and the crispier the exterior. Adjust the baking time to suit your preference.
-
Once baked, let the cookies cool on the tray for 30 minutes to firm up. If coating with chocolate, melt the chocolate in 30-second intervals in the microwave, stirring between each interval, or melt it over a double boiler. Dip each cookie halfway into the melted chocolate, then place it back onto the parchment paper to set. If using sprinkles, add them to the chocolate before it sets. The cookies develop the optimal texture a day after they're made (store in an airtight container at room temperature) although they can be enjoyed straight away too!
Nutrition Facts
Servings 40
- Amount Per Serving
- Calories 110kcal
- % Daily Value *
- Total Fat 7g11%
- Saturated Fat 4g20%
- Trans Fat 0.2g
- Cholesterol 23mg8%
- Sodium 34mg2%
- Potassium 35mg1%
- Total Carbohydrate 11g4%
- Dietary Fiber 0.2g1%
- Sugars 6g
- Protein 1g2%
- Calcium 15 mg
- Iron 0.4 mg
* Percent Daily Values are based on a 2,000 calorie diet. Your daily value may be higher or lower depending on your calorie needs.
Note
- Note 1. I recommend using the gram measurements for best results, however if you don't have a scale and are using cup measurements, then ⅛ cup is also equal to 2 tbsp (in case you don't have an ⅛ cup).
- Note 2. You want the butter to be soft, but not melted. It should have a shine to it and you should be able to easily run a spatula through it (almost like a soft buttercream). If you're unsure, check the recipe video for a visual 🙂
- Note 3. I recommend using chocolate melts or chocolate chips as they'll set nicely and won't easily melt. When melting the chocolate, if it's too thick (sometimes chocolate chips in particular can be very thick when melted), add in a few teaspoons of unflavored vegetable oil and mix until it has a thin enough consistency to coat the cookies.
- Note 4. If using a convection oven that has a fan function, bake at 160 °C (320°F) as the fan function bakes food faster.
- Note 5. If using the gram measurements, adding the milk shouldn't be necessary. The more liquid in the batter, the more the cookies will spread while baking so only add it in if you really need too 🙂
- Note 6. Chilling the cookies before baking will resolidify the butter. This will prevent the cookies from spreading too much while baking so that they retain their piped shape.