Halloween has this magical way of turning the ordinary into something extraordinary, doesn’t it? It’s that one time of year where a little spookiness is not just welcome, it’s celebrated with open arms, and maybe a playful shriek or two.
And what better way to join the fun than by creating a treat that’s both delicious and delightfully macabre? These Bleeding Brain Cupcakes are the perfect centerpiece for your Halloween spread, guaranteed to be a conversation starter.
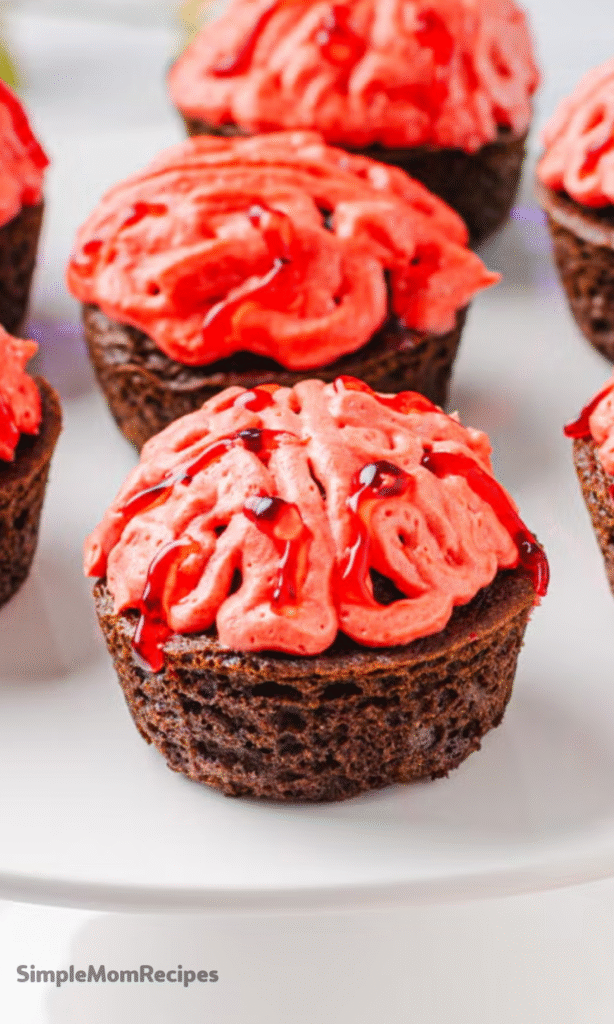
They combine a classic, moist red velvet cake with a surprise jam-filled center, all topped with a buttercream brain that looks almost too real to eat. Almost.
Why These Cupcakes Are a Halloween Must-Make
Let’s be honest, the name alone is a winner. But beyond the fantastic gore-factor, these cupcakes are genuinely a joy to bake.
The process is surprisingly simple, making it a fantastic project to do with kids or for a beginner baker wanting to impress. The “wow” factor is immense, yet the technique is totally approachable.
You get to play with food coloring, pipe fun shapes, and reveal a hidden, “bleeding” surprise. It’s baking that feels more like a fun, creative experiment.
Ingredients Needed for the Recipe
Gathering your ingredients beforehand is the first step to baking success. It makes the whole process so much smoother, trust me.
Here’s what you’ll need to create these ghoulish goodies:
- 150g Butter or baking spread, softened & unsalted
- 150g Caster sugar
- 2 Large Eggs
- 1 tsp Vanilla extract
- 85ml Buttermilk
- 165g Self-raising flour
- 1 ½ tbsp Cocoa powder
- ½ tsp Bicarbonate of soda
- 1 tsp Red food colouring (professional gel type)
- 200g Strawberry or Raspberry Jam
- 200g Butter, unsalted & softened (for buttercream)
- 400g Icing sugar (for buttercream)
- 1 tsp Vanilla extract (for buttercream)
- 2 tbsp Milk (for buttercream)
- Pink food colouring (professional gel type, for buttercream)
The Secret to a Truly Vibrant Red Velvet
That deep, bloody red color is crucial for the theme, but achieving it can be tricky. The secret, honestly, lies in the food coloring.
Liquid food colorings from the supermarket often fade during baking and can add an unwanted watery consistency to your batter. For a red that stays bold and brilliant, a professional-grade gel food coloring is non-negotiable.
Brands like Pro Gel, Sugarflair, or Americolor are highly concentrated, so you need less, and they won’t throw off your recipe’s balance. It’s a small investment for a huge visual payoff.
How to make Bleeding Brain Cupcakes?
Now for the main event! Follow these steps, and you’ll have a tray of terrifyingly tasty treats in no time.

Preparing Your Batter
Start by preheating your oven to 160°C Fan/180°C/350°F/Gas Mark 4. Line a cupcake tin with those classic black cupcake cases to set the spooky stage.
In a mixing bowl, whisk your softened butter and caster sugar together until the mixture becomes light, pale, and wonderfully fluffy. An electric mixer makes this a breeze, but a bit of energetic arm work will do the trick.
Next, add the eggs and that lovely vanilla extract, mixing them in thoroughly until everything is beautifully combined. Don’t worry if it looks a little curdled at this point; it will all come together.
Baking to Perfection
Now, add all the remaining cupcake ingredients: the buttermilk, cocoa powder, bicarbonate of soda, your powerful red food coloring, and the self-raising flour.
Mix everything on a low speed, or fold gently by hand, just until you have a smooth, uniformly red batter. Be careful not to overmix at this stage.
Divide the vibrant red mixture evenly between your 12 black cupcake cases. Pop the tray into the preheated oven and bake for 20-25 minutes.
You’ll know they’re done when a skewer inserted into the centre comes out clean. Then, transfer them to a wire rack to cool completely. Patience is key here—decorating warm cupcakes is a recipe for a melted mess!
Creating the “Bleeding” Center
Once the cupcakes are fully cool, it’s time for the gruesome fun to begin. Take a cupcake corer or a small, sharp knife.
Carefully remove a small core from the center of each cupcake. You want to create a little well for the jam, but be sure not to go all the way to the bottom.
Fill each hole with your strawberry or raspberry jam. Using a piping bag for this is neat, but a small spoon works just as well. This is your hidden, deliciously “bleeding” surprise.
Piping the Brain
For the buttercream, beat the softened butter on its own for a few minutes until it’s really smooth. This helps create a light base.
Gradually add the icing sugar, milk, vanilla extract, and just a tiny dot of your pink gel food coloring. Mix it all together until it’s silky and spreadable.
Remember, you can always add more pink color, but you can’t take it away, so start with a minuscule amount. You’re aiming for a pale, fleshy pink tone.
Spoon the buttercream into a piping bag fitted with a simple round nozzle. Now, for the artistic part: pipe a straight line down the center of the cupcake.
Then, on either side of that line, pipe squiggles and curves to mimic the look of a brain’s hemispheres. It’s easier than it looks, and even slightly messy squiggles add to the creepy effect!
Can You Make These Cupcakes in Advance?
Absolutely! In fact, getting a head start can make your Halloween party day much less stressful.
The un-decorated cupcakes can be baked a day ahead, stored in an airtight container at room temperature. You can even core and fill them with jam ahead of time.
The buttercream can be made and stored in the fridge for up to three days; just let it come back to room temperature and give it a quick re-whip before piping. For best results, though, assemble the fully decorated cupcakes on the day you plan to serve them.
Tips
Room temperature ingredients are your best friend here. They combine more evenly, giving you a smoother batter and a lighter, fluffier cupcake crumb. Take your butter, eggs, and buttermilk out about an hour before you start.
When measuring your flour, for heaven’s sake, use kitchen scales if you can. It’s the most accurate way and ensures your cupcakes have the perfect texture. Spooning and leveling cup measurements can lead to using too much flour.
And for the best flavor, use a real vanilla extract, not an essence. The difference is night and day, adding a warm, rich depth that synthetic versions just can’t match.
Navigating Dietary Restrictions
Want to make these spooky treats for everyone? It’s totally possible with a few clever swaps.
For a gluten-free version, simply replace the self-raising flour with a gluten-free self-raising flour blend. If you only have a plain gluten-free flour, remember to add 1 ½ teaspoons of baking powder.
To make them dairy-free, use a dairy-free baking spread and milk alternative. You can even make a DIY “buttermilk” by adding a tablespoon of lemon juice to your dairy-free milk and letting it sit for a few minutes until it thickens slightly.
Always double-check the labels of all your ingredients, including food colorings, to ensure they meet your dietary needs.
Serving Your Creepy Creations
Presentation is the final, thrilling touch. Arrange these brains on a dark slate or a wooden board for a real laboratory aesthetic.
You could even add a few decorative touches like plastic spiders, a dusting of red sprinkles for “blood spatter,” or a little sign with a funny name like “Professor Kelsey’s Lab Specimens.”
Serve them alongside other Halloween favorites—think a bubbling punch bowl or some cheesy “monster fingers”—to create a truly unforgettable spooky spread. Get ready for screams of delight!

Bleeding Brain Cupcakes Recipe
Description
These Bleeding Brain Cupcakes are perfect spooky treats to delight family, friends, or your local trick-or-treaters! Made with a simple red velvet sponge, filled with strawberry or raspberry jam, and decorated to look like a brain with pink buttercream swirls, they’re delightfully creepy—and the yummiest brains you’ll ever eat!
ingredients
For the Sponge
For the Filling
For the Buttercream
Instructions
-
Preheat your oven to 180°C (350°F). Line a 12-cup muffin tin with black cupcake cases.
-
In a large bowl, cream together butter and sugar until light and fluffy (use an electric mixer for best results).
-
Add eggs and vanilla extract; mix until fully incorporated.
-
In a separate bowl, sift together flour, cocoa powder, and bicarbonate of soda. Add to the wet ingredients along with buttermilk and red food colouring. Mix until smooth and uniform.
-
Divide batter evenly among the cupcake cases (about ⅔ full).
-
Bake for 20–25 minutes, or until a skewer inserted into the center comes out clean. Cool in the tin for 5 minutes, then transfer to a wire rack to cool completely.
-
Once cooled, use a cupcake corer or small knife to remove the center of each cupcake (about 1-inch deep). Fill each cavity with 1–2 teaspoons of jam.
-
To make the buttercream: beat softened butter for 2 minutes until creamy. Gradually add icing sugar, vanilla, and milk. Beat until smooth. Add a tiny drop of pink food colouring and mix to a pale pink shade.
-
Fit a piping bag with a round nozzle. Pipe a straight line down the center of each cupcake, then pipe squiggly lines on either side to mimic brain folds.
-
Store in an airtight container at room temperature for up to 2 days, or refrigerate for up to 3 days. Bring to room temperature before serving.
Nutrition Facts
Servings 12
- Amount Per Serving
- Calories 320kcal
- % Daily Value *
- Total Fat 14g22%
- Saturated Fat 9g45%
- Trans Fat 0.5g
- Cholesterol 60mg20%
- Sodium 180mg8%
- Potassium 120mg4%
- Total Carbohydrate 46g16%
- Dietary Fiber 1g4%
- Sugars 34g
- Protein 3g6%
- Calcium 60 mg
- Iron 1 mg
* Percent Daily Values are based on a 2,000 calorie diet. Your daily value may be higher or lower depending on your calorie needs.
Note
- Room temperature ingredients ensure even mixing and a fluffy texture.
- No buttermilk? Mix 1 tbsp lemon juice into 85ml milk and let sit 5 minutes.
- Gluten-free? Use GF self-raising flour blend + ½ tsp xanthan gum.
- Dairy-free? Substitute with plant-based butter and milk; use dairy-free jam.