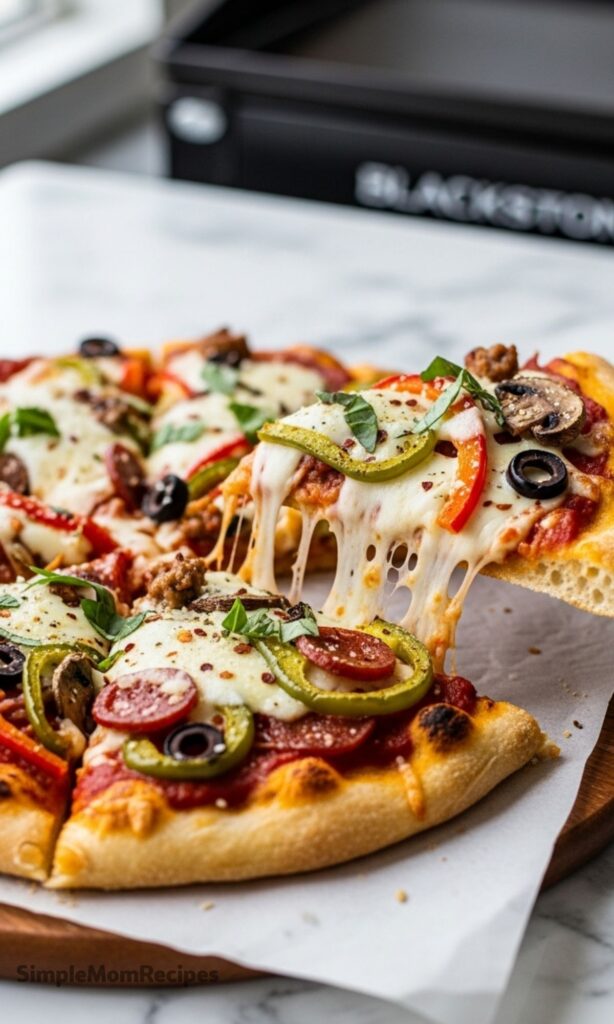
I used to think pizza belonged in the oven. That was just the rule in my kitchen for years. But one evening I was already cooking outside on my griddle and thought… why not try pizza here too?
Turns out it’s easier than I expected. No oven preheating. No baking sheet. No juggling three pans around the kitchen. Everything cooks on one surface and the cleanup is honestly way lighter.
After a few attempts, this became one of my regular weeknight dinners. Sometimes I make a classic pepperoni version. Other nights I just throw whatever leftovers I find in the fridge on top and call it pizza night.
The biggest difference with the griddle is heat only comes from the bottom. That took me a couple tries to figure out. Once I started using a melting dome to trap heat on top, the cheese melted perfectly and the whole thing worked way better.
Ingredients I Used for the Recipe
Your favorite pizza dough - enough for one 12-inch pizza. I use either homemade dough or a store-bought one depending on how lazy I’m feeling that day.
3 to 4 tablespoons extra virgin olive oil - used for cooking vegetables and brushing the crust so it browns nicely on the griddle.
14 ounces pizza sauce, warmed - a jar of your favorite sauce works great. I warm it a bit so the pizza cooks evenly.
8 ounces mozzarella cheese, shredded - I usually shred it myself because it melts smoother than the bagged stuff.
1 teaspoon Italian seasoning - optional, but I like sprinkling some on the crust for extra flavor.
1/2 red bell pepper, sliced - adds a little sweetness and color.
1/2 onion, sliced - for that classic pizza flavor.
1/2 cup sliced mushrooms - these cook quickly and add a nice earthy flavor.
1/2 cup cooked sausage or pepperoni - totally optional but always a hit in my house.
2 tablespoons sliced black olives - optional topping if you like them.
Garnishes - red pepper flakes, garlic powder, grated parmesan, or fresh basil if I have some.
How to make Blackstone Pizza?
Step 1 - Preheat the Griddle
I start by turning on the Blackstone and letting it heat up properly. The surface should be pretty hot, around 450 to 500°F. If the griddle isn’t hot enough, the dough tends to stick and that becomes a frustrating mess.
While it heats, I usually pull the pizza sauce from the fridge and warm it slightly. Cold sauce straight on hot dough never worked well for me.
Step 2 - Shape and Season the Dough
I stretch the dough into a round that’s roughly 12 inches wide. Nothing perfect here. Mine usually ends up slightly uneven and that’s fine.
Then I brush both sides lightly with olive oil and sprinkle a little Italian seasoning on one side. Sometimes I poke a few tiny holes with a fork if the dough looks like it might bubble too much.
Step 3 - Cook the Vegetables First
Before the pizza even touches the griddle, I cook the vegetables. I drizzle a little olive oil on the surface and toss on the sliced peppers, onions, and mushrooms.
They only need a few minutes. I cook them until they soften but still hold their shape. Mushy toppings ruin pizza faster than anything.
Once they’re done, I move them off to the side or onto a plate so they stay warm.
Step 4 - Cook the Pizza Dough
Now the fun part. I place the dough on the hot griddle with the seasoned side facing down.
If I’m using raw dough, it usually takes about two minutes before the bottom turns lightly golden. Then I flip it and cook the other side for another couple minutes.
This part took me a few tries when I first started. If the crust cooks too fast, the toppings won’t have time to heat. Medium thickness dough tends to work best for me.
Step 5 - Add Sauce, Cheese, and Toppings
As soon as I flip the crust, I start building the pizza right away. First a thin layer of pizza sauce. Then a generous handful of shredded mozzarella.
After that come the toppings. The sautéed peppers, onions, mushrooms, maybe sausage or pepperoni. I try not to overload it though because too much topping can make the crust soggy.
Step 6 - Melt the Cheese with a Dome
This step changed everything for me. Since the griddle only heats from below, the cheese won’t melt properly without trapping some heat.
I place a melting dome right over the pizza. Within a minute or two the cheese softens and melts beautifully.
If the crust starts cooking too fast, I slide the pizza onto a cutting board but leave the dome over it for another minute. The trapped heat finishes melting the cheese.
Step 7 - Rest, Slice, and Serve
Once the cheese is melted and the crust looks golden, I pull the pizza off the griddle and let it sit for a minute or two.
I usually finish it with a sprinkle of parmesan, some red pepper flakes, and maybe torn basil if I have some growing outside.
Then I slice it up and it disappears pretty fast.
Pizza Toppings I Keep Coming Back To
One thing I really like about making pizza this way is how flexible it is. I don’t follow strict topping rules anymore. I just use whatever sounds good that night.
Shredded chicken with BBQ sauce
Pineapple with ham for a Hawaiian style pizza
Bacon crumbles and mushrooms
Pesto instead of pizza sauce
Leftover roasted vegetables
I’ve even made quick pizzas using naan bread instead of dough when I needed dinner fast. Those cook incredibly quick on the griddle.
Tips I Learned After Making This a Bunch of Times
Pre-cook your toppings
Raw vegetables release moisture while cooking. When I skipped this step once, the pizza turned watery. Now I always sauté them first.
Shred your own cheese
I didn’t believe this mattered until I tried both versions. Fresh shredded mozzarella melts smoother and tastes better.
Keep the crust size manageable
If the pizza gets too big, the melting dome won’t cover it properly. I try to keep mine just under 12 inches so it fits easily.
Make sure the griddle is fully hot
Cold griddles are the biggest reason dough sticks. I learned that the annoying way once when half my pizza refused to release.
Watch the crust thickness
Thicker dough needs extra time. Thin crust cooks fast, sometimes only a minute or two per side.
After making this dozens of times now, pizza night at my place barely feels like cooking. It’s simple, quick, and everything happens outside on the griddle. That alone makes it worth it for me.
And honestly, there’s something fun about standing outside flipping pizza dough on a hot griddle. It feels a little messy, a little experimental, and somehow the pizza always tastes better that way.
Making pizza on the Blackstone griddle is even easier than using the oven. You can use any crust—homemade, store-bought, or unconventional like flatbread or naan—and load it with your favorite toppings cooked right on the griddle. This method contains all the cooking to one surface with no extra pans to clean, making pizza night quicker, easier, and deliciously satisfying.
ingredients
1pound pizza dough (homemade or store bought, gluten-free option available)
Preheat GriddlePreheat your Blackstone griddle to low-medium heat. The surface temperature should be between 450°F and 500°F (230°C-260°C). While heating, warm the pizza sauce if refrigerated.
Use an infrared thermometer to verify even heating across the cooking surface
2
Prepare DoughShape pizza dough into a 12-inch round crust. Drizzle about 1 tablespoon olive oil on each side and sprinkle ½ teaspoon Italian seasoning on the top. If using uncooked dough, gently poke small holes throughout to prevent bubbling.
Ensure your melting dome fits over the entire crust
3
Sauté ToppingsAdd prepared vegetables to the griddle with remaining olive oil. Sauté until softened but not mushy, about 3-5 minutes. Remove, cover, and keep warm.
Cook any raw meats like sausage thoroughly before adding to pizza
4
Cook CrustPlace dough seasoned-side down on the hot griddle. For uncooked dough, cook 2 minutes per side until lightly browned. For pre-cooked crusts or alternatives like naan, heat 1-2 minutes per side.
Cooking time varies based on crust thickness
5
Add ToppingsImmediately after flipping the crust, spread a thin layer of warmed pizza sauce over the cooked side. Sprinkle shredded mozzarella evenly, then add your selected toppings in a single layer.
Avoid overloading with cheese or pepperoni to prevent excess grease and sogginess
6
Melt CheeseCover the pizza with a griddle-safe melting dome until the cheese is fully melted and the crust is cooked through, about 2-4 minutes.
If crust browns too quickly before cheese melts, remove pizza to a board and keep covered with dome to finish melting
7
Rest and ServeCarefully remove pizza from griddle. Let rest for 2-3 minutes, then garnish as desired, slice, and serve immediately.
Resting helps cheese set for cleaner slices
Nutrition Facts
Servings 2
Amount Per Serving
Calories1225kcal
% Daily Value *
Total Fat62gg96%
Saturated Fat23gg115%
Trans Fat0gg
Cholesterol90mgmg30%
Sodium2205mgmg92%
Potassium400mgmg12%
Total Carbohydrate134gg45%
Dietary Fiber9gg36%
Sugars16gg
Protein50gg100%
Calcium 55% mg
Iron 22% mg
* Percent Daily Values are based on a 2,000 calorie diet. Your daily value may be higher or lower depending on your calorie needs.
Note
Prevent sticking: Ensure griddle is clean and fully preheated. Add a light brush of olive oil if dough sticks.
Crust thickness tip: Thicker crusts need 1-3 extra minutes per side; thinner crusts need only 1-2 minutes total.
Gluten-free option: Use your favorite gluten-free dough or pre-baked crust with same method.
Make ahead: Assemble pizzas ahead, refrigerate up to 3 days, then reheat on griddle before serving.
Kid-friendly: Portion toppings into small dishes so kids can customize their own mini pizzas.
I’m a London-based food writer, recipe developer, and home cook who has been passionate about cooking for over 15 years. What started as a way to recreate my mother’s traditional dishes turned into a lifelong love for experimenting with flavors, writing about food, and helping others feel more confident in the kitchen.